🧢 Beautiful ✨ Detailed πŸ’ Adorable

A Hairy Caterpillar Amigurumi Pattern

A Hairy Caterpillar Amigurumi Pattern
4.1β˜… Rating
5-7 Hours Time Needed
2.5K Made This
βœ‚οΈ

Intermediate Level

Ideal for those with basic crochet experience, featuring slightly more advanced stitches and techniques to expand your skills.

⏱️

Weekend Treat

Takes 5-7 hours, making it an enjoyable project to finish over a couple of days.

🧸

Cute Companion

An adorable friend to cherish, handcrafted with love to bring comfort and joy for years to come.

About This A Hairy Caterpillar Amigurumi Pattern

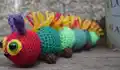
This pattern creates a playful, segmented hairy caterpillar with a fluffy spine and tiny feet. You will work in continuous rounds from the head down through multiple colored body segments. The pattern uses Double Knit (DK) yarn and simple shaping with increases and decreases for clear, rounded segments.

A Hairy Caterpillar Amigurumi Pattern crochet pattern - detailed view of completed project

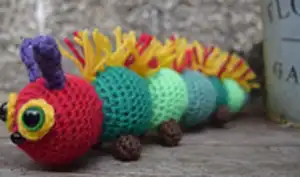
Includes instructions for eye rings, antennae, feet, and how to attach hair strands to create the signature hairy spine. Uses safety eyes and a small safety nose for a polished finish.

Why You'll Love This A Hairy Caterpillar Amigurumi Pattern

I absolutely love this pattern because it is bright, tactile, and joyful to make. I enjoy how the color changes create distinct body segments that are fun to customize. The hairy spine is a playful detail that brings the caterpillar to life, and I always smile when I see the finished texture. I also love that the pattern is modularβ€”you can change yarn colors and make different sizes easily.

A Hairy Caterpillar Amigurumi Pattern step 1 - construction progress A Hairy Caterpillar Amigurumi Pattern step 2 - assembly progress A Hairy Caterpillar Amigurumi Pattern step 3 - details and accessories A Hairy Caterpillar Amigurumi Pattern step 4 - final assembly and finishing

Switch Things Up

I love how easily this caterpillar can be customized by changing colours; try pastel shades for a nursery-friendly look or bold brights for a toy that pops.

You can make a mini keyring version by using finer yarn and a smaller hook, or scale up with chunky yarn for a big floor toy.

I often swap the placement of the feet and reduce or increase the number to change the character's stance and personality.

Try embroidering small patterns onto each segment or adding tiny crocheted accessories like a scarf or a hat for seasonal variations.

I also like to vary the hair length and density; longer, fuller strands make a dramatic mane while sparse strands give a subtle texture.

For a washable toy, consider embroidered eyes instead of safety eyes for baby-safe versions.

Experiment with different yarn textures like boucle or mohair for a super fuzzy spine effect.

Change the antenna style by making them longer, curled, or topped with a small pompom for added charm.

I sometimes add a little wire inside the body to make a poseable version that can curl and bend for display.

Don't be afraid to play with color sequencing across the segments; repeating a two-color stripe or rainbow gradient gives very different looks.

When making multiples, try mixing neutral body colors with bright spines to create a coordinated set that feels handmade and special.

Common Mistakes & How to Fix Them

βœ— Not leaving a small hole in the eye ring can make installing safety eyes impossible; do not fully close the magic ring and leave a small centre hole to fit the eye stem through. βœ— Forgetting to stuff as you go will make closing and shaping the body harder; stuff each segment lightly while you work to keep a smooth shape and avoid lumps. βœ— Skipping stitch markers when changing rounds can lead to miscounted stitches; place a marker at the start of each round and recount frequently during increases and decreases. βœ— Pulling the yarn too tight while attaching hair strands can distort the stitches; insert the hook and secure hair with a loop, pulling gently so the base stitch remains even. βœ— Missing color change points will give incorrect segment sizes; change color exactly at the end of the rounds specified (for example at the end of round 32) to maintain the intended pattern.

A Hairy Caterpillar Amigurumi Pattern

Make a colorful, playful hairy caterpillar that is full of personality and texture. This pattern guides you through crocheting a segmented body, attaching safety eyes, sewing tiny feet, and adding a fluffy spine for a whimsical finish. Perfect for gifting or decorating a child's room, the caterpillar is made in bright, mix-and-match DK yarn colors.

Intermediate 5-7 Hours

Materials Needed for A Hairy Caterpillar Amigurumi Pattern

β€” Main Fabric

  • 01
    Double Knit (DK) yarn - Red x1 ball
  • 02
    Double Knit (DK) yarn - Dark Green x1 ball
  • 03
    Double Knit (DK) yarn - Bright Green x1 ball
  • 04
    Double Knit (DK) yarn - Sage Green x1 ball
  • 05
    Oddments of Purple, Dark Brown, and Yellow for antennae, feet and hair

β€” Tools Required

  • 01
    Hook - 4mm
  • 02
    Stuffing (polyester fibrefill)
  • 03
    Safety eyes - 12mm green x2
  • 04
    Safety nose - 9mm black triangle nose
  • 05
    Stitch marker
  • 06
    Tapestry needle for sewing in ends

Progress Tracker

0% Complete

β€” Eye Rings x2 :

Round 1 :

Using Yellow make a magic ring, ch1. dc x8 into ring, ss into first st. FO.

Info :

Do not fully close your magic ring, leave a small hole in the centre, just enough to fit the stem of the safety eye through. Pop a safety eye into the centre, but do not attach the back yet. You will attach the eyes to the head between rows 3 and 4 once you have made the head.

β€” Head &Body :

Info :

You will be starting at the head and working down the body to the tail. Stuff as you go. Using Red make a magic ring, ch1.

Round 1 :

dc x8 into ring (8)

Round 2 :

inc around (16)

Round 3 :

[inc, dc] repeat around (24)

Round 4 :

[inc, dc x2] repeat around (32)

Round 5-10 :

dc around (32)

Info :

Attach eyes (including eye rings), between rows 3 and 4, about 7 stitches apart.

Round 11 :

[dec, dc x2] repeat around (24)

Round 12 :

[dec, dc] repeat around (16)

Round 13 :

dec around (8). Change to Dark Green

Round 14 :

inc (24)

Round 15 :

[inc, dc] repeat around (24)

Round 16 :

[inc, dc x2] repeat around (32)

Round 17-20 :

dc around (32)

Round 21 :

[dec, dc x2] repeat around (24)

Round 22 :

[dec, dc] repeat around (16)

Round 23 :

dec around (8). Change to Bright Green

Round 24-32 :

repeat rows 14-23 - Changing to Sage Green at the end of round 32.

Round 33-41 :

repeat rows 14-23 - Changing to Dark Green at the end of round 41.

Round 42 :

inc around (16)

Round 43 :

[inc, dc] repeat around (24)

Round 44-46 :

dc around (24)

Round 47 :

[dec, dc] repeat around (16)

Round 48 :

dec around (8). change to Bright Green

Round 49-55 :

rep[eat rows 42-48, changing to Sage Green at teh end of row 55.

Round 56 :

inc around (16)

Round 57-58 :

dc around (16)

Round 59 :

dec (8)

Round 60 :

dec (4)/ FO. leaving a long end to close. Thread end through remaining stitches and pull to close.

Info :

Sew in ends

β€” Antenna x2 :

Info :

Using Purple make a magic ring, ch1

Round 1 :

dc x3 into ring (3)

Round 2 :

inc, dc, inc (5)

Round 3 :

dc around (5)

Round 4 :

dec, dc x3 (4)

Round 5-6 :

dc around (4). FO.

Info :

Stuff tips of antenna lightly.

Info :

Sew antenna to centre top of head, a couple of rows above the eyes, and a couple of stitches apart.

β€” Feet x 6 :

Info :

Using Brown make a magic ring, ch1

Round 1 :

dc x4 into ring (4)

Round 2 :

inc around (8)

Round 3-4 :

dc around (8). FO

Info :

Stuff lightly.

Info :

Sew 2 feet to the first body segment (first green segment after the head).

Info :

Attach feet to the underside, about 3 stitches apart.

Info :

Sew 2 to the second body segment.

Info :

Sew 2 to the fourth body segment.

β€” Hairy Spine :

Info :

Cut several 10cm lengths of Yellow yarn, and a about 8 Red. Attach along the centre of the Caterpillars back, interspersing the Red at random intervals till you reach the tail.

Item Name (To Attach the hair strands) :

Attach the strands by inserting your crochet hook into the loop of a stitch. Catch the middle of the hair strand and pull a loop through. Pull the ends of the strand through the loop. This should hold firmly.

Info :

Cut spine hairs to length (aprox 2cm), so they stick up nicely.

Info :

Tadah! Enjoy!

Assembly Instructions

  • Attach the eye rings and safety eyes between rounds 3 and 4 of the head, about 7 stitches apart; do not attach the eye backs until the placement is confirmed.
  • Sew the two antennae to the centre top of the head a couple of rows above the eyes and a couple of stitches apart, stuffing the tips lightly first.
  • Sew 6 feet in pairs: place 2 feet on the first body segment (first green segment after the head), 2 on the second segment, and 2 on the fourth segment; attach feet to the underside about 3 stitches apart.
  • Attach hair strands along the centre of the back by inserting a hook into a stitch loop, pulling a folded hair strand through and securing the ends through the loop; trim to approx 2cm.
  • Weave in all ends and thread long tail through remaining stitches at tail opening, pull to close securely before finishing.

Important Notes

  • πŸ’‘Use stitch markers to keep track of the beginning of each round, especially during increases and decreases to keep segments even.
  • πŸ’‘Stuff each body segment as you go to maintain smooth shaping and to prevent lumps when closing the tail.
  • πŸ’‘Leave a small hole in eye rings for the safety eye stem and attach backs only after checking placement between rounds 3 and 4.
  • πŸ’‘Change colors exactly at the rounds specified (for example at the end of round 32 and round 41) to create the intended segment pattern.

This cheerful Hairy Caterpillar brings color and texture to any shelf or toy box. The segmented body and fuzzy spine are perfect for playful hands and curious eyes. Make one in bright shades or soft pastels to suit your style. πŸ§ΆπŸ›βœ¨

You ask,

we answer.

FAQs

What size will the finished piece be?

Finished Length: Approximately 25cm when using DK yarn and a 4mm hook as specified in the materials.

Can I use different yarn weights for this pattern?

Yes, but the final size will change; using a thicker yarn and larger hook will produce a bigger, chunkier caterpillar while a finer yarn will make a smaller toy.

Do I need prior crochet experience for this pattern?

This pattern is rated intermediate; basic knowledge of dc, increases, decreases, and working in rounds is helpful for best results.

How long does this project typically take to complete?

Most crocheters finish this project in about 5-7 hours depending on experience, color changes, and finishing details like hair and assembly.