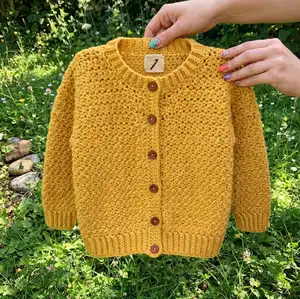
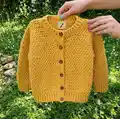
Make a cozy, textured crew neck cardigan with this clear crochet pattern. Youll create a classic buttoned sweater worked in a simple two-row pattern repeat and finished with ribbed edges and a neat button band. The pattern includes full sizing for multiple adult sizes and complete finishing instructions so you can sew and button the cardigan with confidence.
Progress Tracker
0% Complete
— Notes :
Info :
Use the same color throughout the pattern. When only one number is given in black, it applies to all sizes.
— Back :
Row 1 :
(RS). 1 sc in 2nd ch from hook. 1 sc in each ch to end of chain. Turn. 9 sc.
Row 2 :
Ch 1. 1 sctbl in each st to end of row. Turn.
Info :
Rep last row until Ribbing (when slightly stretched) measures 18½ (20¼-22¼-24½-27½-31½)" [47 (51.5-56.5-62-70-80) cm], ending on a WS row. Do not fasten off. Do not turn.
Row 3 :
(WS). Ch 1. Work 61 (67-73-81-91-103) sc evenly across long edge of Ribbing. Turn.
Info :
Proceed in pattern as follows:
Row 4 :
(RS). Ch 1. 1 sc in first st. *1 dc in next st. 1 sc in next st. Rep from * to end of row. Turn.
Row 5 :
Ch 3 (counts as dc). *1 sc in next dc. 1 dc in next sc. Rep from * to end of row. Turn.
Row 6 :
Ch 1. 1 sc in first dc. *1 dc in next sc. 1 sc in next dc. Rep from * to end of row, working last sc in top of ch 3. Turn.
Info :
Rep last 2 rows for pat until work from lower edge measures 16 (16-16-16½-16½-16½)" [40.5 (40.5-40.5-42-42-42) cm] for Her Version or 17 (17-17-17½-17½-17½)" [43 (43-43-44.5-44.5-44.5) cm] for His Version, ending on a WS row. Fasten off.
Row 7 :
Shape armholes: (RS). Skip first 6 (8-10-12-14-18) sts. Join yarn with sl st to next dc. Ch 1. 1 sc in same sp as last sl st. Pat across next 48 (50-52-56-62-66) sts. Turn. Leave rem 6 (8-10-12-14-18) sts unworked.
Info :
Cont even in pat over 49 (51-53-57-63-67) sts until armhole measures 8½ (9-9½-10-10½-10½)" [22.5 (23-23-24.5-25.5-27.5) cm], ending on a WS row. Fasten off.
Row 8 :
Shape neck: 1st row: (RS). Ch 1. Pat across 19 (19-20-21-24-24) sts (neck edge). Turn. Leave rem 6 (6-7-8-7-9) sts unworked.
Row 9 :
2nd row: Ch 1. Sc2tog. Pat to end of row. Turn.
Row 10 :
3rd row: Ch 1. Pat to last 2 sts. Sc2tog. Turn.
Info :
Rep last 2 rows twice more. 13 (13-14-15-18-18) sts rem. Work 1 row even in pat. Fasten off.
Row 11 :
Shape left shoulder: Next row: (RS). Skip first 6 (6-8-8-10-10) sts. Join yarn with sl st to next dc. Ch 1. 1 sc in same sp as last sl st. Pat to end of row. Fasten off.
— Left Front :
Row 2 :
1st row: (RS). 1 sc in 2nd ch from hook. 1 sc in each ch to end of chain. Turn. 9 sc.
Row 3 :
2nd row: Ch 1. 1 sctbl in each st to end of row. Turn.
Info :
Rep last row until Ribbing (when slightly stretched) measures 9 (10-11-12-13)" [measurement as given for size]. Do not fasten off. Do not turn.
Row 4 :
(WS). Ch 1. Work 31 (33-37-41-45-51) sc evenly across long edge of Ribbing. Turn.
Row 5 :
Proceed in pat as follows: 1st row: (RS). Ch 1. 1 sc in first st. *1 dc in next st. 1 sc in next st. Rep from * to end of row. Turn.
Row 6 :
2nd row: Ch 3 (counts as dc). *1 sc in next dc. 1 dc in next sc. Rep from * to end of row. Turn.
Row 7 :
3rd row: Ch 1. 1 sc in first dc. *1 dc in next sc. 1 sc in next dc. Rep from * to end of row, working last sc in top of ch 3. Turn.
Info :
Rep last 2 rows for pat until work from lower edge measures 16 (16-16½-16½-16½)" [40.5 (40.5-40.5-42-42-42) cm] for Her Version or 17 (17-17-17½-17½-17½)" [43 (43-43-44.5-44.5-44.5) cm] for His Version, ending on a WS row. Fasten off.
Row 8 :
Shape armholes: Next row: (RS). Skip first 6 (8-10-12-14-18) sts. Join yarn with sl st to next dc. Ch 1. 1 sc in same sp as last sl st. Pat across next 23 (25-25-27-27-29) sts. Fasten off.
Row 9 :
Next row: Skip first 7 (7-6-7-8-8) sts. Join yarn with sl st to next st. Pat across next 23 (25-25-27-27-29) sts. Fasten off.
— Right Front :
Info :
Work from ** to ** as given for Left Front. Do not fasten off.
Row 1 :
Shape armhole: Next row: (RS). Skip first 6 (6-8-10-10) sts. Join yarn with sl st to next dc. Ch 1. 1 sc in same sp as last sl st. Pat to end of row. Fasten off.
— Sleeves :
Row 2 :
1st row: (RS). 1 sc in 2nd ch from hook. 1 sc in each ch to end of chain. Turn. 9 sc.
Row 3 :
2nd row: Ch 1. 1 sctbl in each st to end of row. Turn.
Info :
Rep last row until Ribbing (when slightly stretched) measures 9½ (9½-10-10½-10½-11)" [24.5 (24.5-25.5-25.5-26.5-26.5) cm], ending on a WS row. Do not fasten off. Do not turn.
Row 4 :
(WS). Ch 1. Work 31 (31-33-33-35-37) sc evenly across long edge of Ribbing. Turn.
Row 5 :
Proceed in pat as follows: 1st row: (RS). Ch 1. 1 sc in first st. *1 dc in next st. 1 sc in next st. Rep from * to end of row. Turn.
Row 6 :
2nd row: Ch 3 (counts as dc). *1 sc in next dc. 1 dc in next sc. Rep from * to end of row. Turn.
Row 7 :
3rd row: Ch 1. 1 sc in first dc. *1 dc in next sc. 1 sc in next dc. Rep from * to end of row, working last sc in top of ch 3. Turn.
Row 8 :
4th row (inc row): Ch 1. (1 sc, 1 dc) in first sc. *1 sc in next dc. 1 dc in next sc. Rep from * to last 2 sts. 1 sc in next dc. (1 dc, 1 sc) in last sc. Turn.
Row 9 :
5th row: Ch 3 (counts as dc). *1 sc in next dc. 1 dc in next sc. Rep from * to end of row. Turn.
Row 10 :
6th row (inc row): Ch 3 (counts as dc). 1 sc in first dc. *1 dc in next sc. 1 sc in next dc. Rep from * to last 2 sts. 1 dc in next sc. (1 sc, 1 dc) in top of ch 3. Turn.
Info :
Rep 3rd to 6th rows 2 (3-3-4-6-7) times more. 43 (47-49-53-63-69) sts.
Info :
Sizes XS/S, M, L, XL and 2/3XL only: Next row: (RS). Ch 1. 1 sc in first dc. *1 dc in next sc. 1 sc in next dc. Rep from * to end of row, working last sc in top of ch 3. Turn. Next row (inc row): Ch 1. (1 sc, 1 dc) in first sc. *1 sc in next dc. 1 dc in next sc. Rep from * to last 2 sts. 1 sc in next dc. (1 dc, 1 sc) in last sc. Turn.
Info :
Rep 3rd to 6th rows to shape sleeve until specified stitch count is reached and as given for sizes. Final stitch counts will be 43 (47-49-53-63-69) sts depending on size.
— Finishing :
Info :
Next row: Ch 3 (counts as dc), *1 sc in next dc. 1 dc in next sc. Rep from * to end of row. Turn. Rep last 3 rows 5 (5-4-3-0) time(s) more. 55 (59-59-61-65) sts.
Info :
All sizes: Cont even in pat until work from lower edge measures 17 (17-17-16½-16-16)" [40.5 (40.5-40.5-42-42-42) cm] for Her Version or 18 (18-18-17½-17-17)" [43 (43-43-44.5-44.5-44.5) cm] for His Version, ending on a WS row. Place markers at each end of last row. Work a further 6 (6-8-10-12-14) rows in pat. Fasten off.
Info :
Sew shoulder seams.
— Neckband :
Row 2 :
1st row: (RS). 1 sc in 2nd ch from hook. 1 sc in each ch to end of chain. Turn. 6 sc.
Row 3 :
2nd row: Ch 1. 1 sctbl in each st to end of row. Rep last row until Neckband (when slightly stretched) measures length to fit along neck edge, sewing in place as you work, taking care to allow stretch in seam.
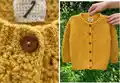
— Button Band :
Row 1 :
Button Band: 1st row: (RS). Join yarn with sl st and work 71 (73-73-77-77-81) sc for Her Version up Left Front edge to top of neckband or 75 (77-77-81-81-85) sc for His Version down Right Front to lower edge. Turn.
Rows 2-5 :
2nd to 5th rows: Ch 1. 1 sc in each sc to end of row. Turn.
Info :
Place markers on band for 7 buttons, having bottom button ½" [1 cm] above lower edge, top button in center of neckband and rem 5 buttons spaced evenly between.
— Buttonhole Band :
Row 1 :
Buttonhole Band: 1st row: (RS). Join yarn with sl st and work 71 (73-73-77-77-81) sc for Her Version down Right Front to lower edge or 75 (77-77-81-81-85) sc up Left Front edge to top of neckband for His Version. Turn.
Row 2 :
2nd row: Ch 1. 1 sc in each sc to end of row. Turn.
Row 3 :
3rd row: Ch 1. *1 sc in each sc to next button marker. Ch 2. Skip next 2 sc. Rep from * 6 times more. 1 sc in each sc to end of row. Turn.
Row 4 :
4th row: Ch 1. 1 sc in each sc and 2 sc in each ch-2 sp to end of row. Turn.
Row 5 :
5th row: Ch 1. 1 sc in each sc to end of row. Fasten off.
Info :
Sew in sleeves, placing rows above markers along unworked sts of Front and Back to form square armholes. Sew side and sleeve seams.
This adult crew neck cardigan is a versatile wardrobe staple with lovely texture and clean finishing details. Its ribbed hems and neat button band make it wearable and timeless. Make it in your favorite Simply Soft color for a cozy, everyday sweater. 🧶👕