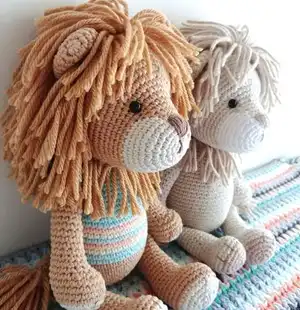
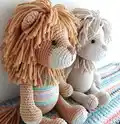
Meet Alan, a charming and stylish lion who is ready to become your new best friend. Standing approximately 30cm tall, Alan features a magnificent mane made from soft wool and wears a colorful striped t-shirt that adds a touch of whimsy to his character. This intermediate-level project uses colorwork techniques to create his distinctive snout and outfit, making him a rewarding project for crocheters looking to refine their skills.
Progress Tracker
0% Complete
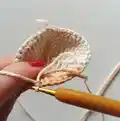
— Head :
Info :
Start with the snout in Natural color.
Round 1 :
6 sc in a magic ring (6)
Round 3 :
(1 inc, 1 sc) x 6 (18)
Round 4 :
(3 inc, 6 sc) x 2 (24)
Round 5 :
(1 inc, 1 sc) x 3, 6 sc, (1 inc, 1 sc) x 3, 6 sc (30)
Round 6 :
(1 inc, 2 sc) x 3, 6 sc, (1 inc, 2 sc) x 3, 6 sc (36)
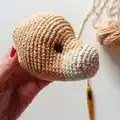
Info :
From R7 to R10 add the Camel color. The stitches in camel must stay centered.
Round 7 :
12 sc in natural, 6 sc in camel, 18 sc in natural (36)
Round 8 :
11 sc in natural, 8 sc in camel, 17 sc in natural (36)
Round 9 :
10 sc in natural, 10 sc in camel, 16 sc in natural (36)
Round 10 :
9 sc in natural, 12 sc in camel, 15 sc in natural (36)
Info :
Cut the natural yarn. From now on continue in Camel color.
Round 11 :
10 sc, (1 inc, 1 sc) x 6, 14 sc (42)
Round 13 :
10 sc, (1 inc, 2 sc) x 6, 14 sc (48)
Round 14 :
10 sc, (1 inc, 3 sc) x 6, 14 sc (54)
Round 15 :
(1 inc, 8 sc) x 6 (60)
Round 26 :
(1 dec, 8 sc) x 6 (54)
Round 28 :
(1 dec, 7 sc) x 6 (48)
Round 30 :
(1 dec, 6 sc) x 6 (42)
Info :
Place the eyes on the 2nd Round counting from the last Round in natural color (approx between R11-R12 area relative to color change), with 9 or 10 stitches of separation.
Round 31 :
(1 dec, 5 sc) x 6 (36)
Round 32 :
(1 dec, 4 sc) x 6 (30)
Info :
Fill with polyfiber.
Round 33 :
(1 dec, 3 sc) x 6 (24)
Round 34 :
(1 dec, 2 sc) x 6 (18)
Round 35 :
(1 dec, 1 sc) x 6 (12)
Info :
Finish filling the snout and head tightly. Close with 1 sl st, hide the thread and cut.
— Ears (Make 2) :
Round 1 :
6 sc in a magic ring (6)
Round 3 :
(1 inc, 1 sc) x 6 (18)
Round 7 :
(1 dec, 7 sc) x 2 (16)
Info :
Close with 1 sl st and leave a thread to sew. Ears do not get filled.
— Body :
Info :
Start with Camel color.
Round 1 :
6 sc in a magic ring (6)
Round 3 :
(1 inc, 1 sc) x 6 (18)
Round 4 :
(1 inc, 2 sc) x 6 (24)
Round 5 :
(1 inc, 3 sc) x 6 (30)
Round 6 :
(1 inc, 4 sc) x 6 (36)
Round 7 :
(1 inc, 5 sc) x 6 (42)
Round 8 :
(1 inc, 6 sc) x 6 (48)
Round 9 :
(1 inc, 7 sc) x 6 (54)
Info :
Change to t-shirt color (Light Turquoise).
Round 20 :
(1 dec, 7 sc) x 6 (48)
Info :
Change to Aquamarine Green.
Round 23 :
(1 dec, 6 sc) x 6 (42)
Round 26 :
(1 dec, 5 sc) x 6 (36)
Round 29 :
(1 dec, 4 sc) x 6 (30)
Round 32 :
(1 dec, 3 sc) x 6 (24)
Info :
Close with 1 sl st and leave a long thread to sew. Fill the body with plenty of polyfiber.
— Legs (Make 2) :
Info :
Start with Natural color.
Round 1 :
6 sc in a magic ring (6)
Round 3 :
(1 inc, 1 sc) x 6 (18)
Round 4 :
(1 inc, 2 sc) x 6 (24)
Round 5 :
(1 inc, 3 sc) x 6 (30)
Info :
Change to Camel color.
Round 10 :
9 sc, 6 dec, 9 sc (24)
Round 11 :
8 sc, 4 dec, 8 sc (20)
Round 12 :
8 sc, 2 dec, 8 sc (18)
Info :
Fill the base of the leg with polyfiber.
Round 15 :
(1 dec, 7 sc) x 2 (16)
Round 18 :
1 dec, 14 sc (15)
Round 25 :
(1 dec, 3 sc) x 3 (12)
Info :
Continue filling the leg up to R23 approx. The last 2 rounds remain unfilled. Suggestion: Knit 2 or 3 sc extras for the left leg when finished R25 and 7 or 8 sc for the right leg before closing.
Round 26 :
Close by flattening both sides and unite every pair of stitches with 1 sc (approx 6 sc). Cut yarn leaving a long thread.
— Arms (Make 2) :
Info :
Start with Natural color.
Round 1 :
6 sc in a magic ring (6)
Round 3 :
(1 inc, 1 sc) x 6 (18)
Round 4 :
(1 inc, 2 sc) x 6 (24)
Info :
Change to Camel color.
Round 9 :
6 sc, 6 dec, 6 sc (18)
Round 10 :
6 sc, 3 dec, 6 sc (15)
Round 12 :
(1 dec, 3 sc) x 3 (12)
Info :
Fill the base with polyfiber.
Info :
Knit 1 sc extra for the left arm and 2 or 3 sc extras for the right one to align color change. Change to t-shirt color (Light Turquoise).
Info :
Change to Aquamarine Green.
Round 26 :
(1 dec, 4 sc) x 2 (10)
Info :
Knit 2 sc extras for the left arm and 6 sc for the right one. Fill arm slightly (last 3 rounds unfilled).
Round 27 :
Close by flattening both sides and unite pairs with 1 sc (5 sc). Cut yarn leaving long thread.
— Tail :
Round 1 :
6 sc in a magic ring (6)
Round 5 :
(1 dec, 2 sc) x 3 (9)
Round 20 :
Flatten and knit 4 sc taking together the opposites.
Info :
Fill the base of the tail and then just a bit until half. Add hair to the tail: Cut wool threads approx 18cm long. Pass one through a stitch starting at R5, make a knot. Cover all spaces downwards and trim.
— Mane :
Info :
Use acrylic wool (Camel color). Cut strips approx 16-17cm long.
Step 1 :
Attach hairpieces using a crochet hook (latch hook method). Start at the inner border of the left ear, go behind the ears, across the back of the neck, and to the other ear.
Step 2 :
Add a second round of hair below the first to add volume.
Step 3 :
Delimit the face outline by placing hairpieces 6 or 7 stitches under the eyes, forming a diagonal going down for the beard/cheeks.
Step 4 :
Fill in the top of the head and back of the head. You don't need a strand in every single stitch due to the volume of the wool, but ensure no holes are visible.
Step 5 :
Styling: Tie back the hair behind ears. Trim the front/bangs just above the eyes. Release the rest and trim in layers to shape a balanced mane.
This Alan the Lion pattern brings a classic wild animal to life with a modern, stylish twist! 🦁 The combination of amigurumi and latch-hook mane techniques makes for a fun challenge with a stunning result. Whether for a child's best friend or a shelf display, Alan is sure to roar his way into your heart. Happy crocheting! 🧶✨