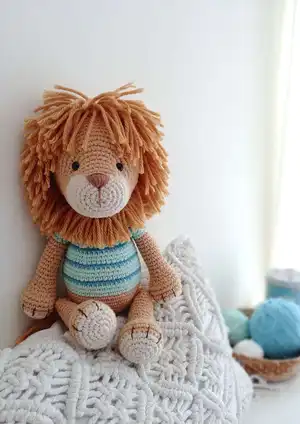
Bring Alan the Lion to life with this charming intermediate amigurumi pattern. You will enjoy a clear, photo-rich guide that walks you through the head, body, limbs, mane and final assembly. The pattern highlights the special wool mane technique for a fluffy, characterful finish. Perfect as a gift or a cuddly companion you can personalize with colors and small details.
Progress Tracker
0% Complete
— Head :
Round 1 :
Make 6 sc in a magic ring (6)
Round 3 :
(1 inc, 1 sc) x6 (18)
Round 4 :
(3 inc, 6 sc) x2 (24)
Round 5 :
(1 inc, 1 sc) x3, 6 sc (1 inc, 1 sc) x3, 6 sc (30)
Round 6 :
(1 inc, 2 sc) x3, 6 sc, (1 inc, 2 sc) x3, 6 sc (36)
Infos :
From R7 to R10 add the camel color as follows: the stitches in camel must stay centered.
Round 7 :
12 sc in natural, 6 sc in camel, 18 sc in natural (36)
Round 8 :
11 sc in natural, 8 sc in camel, 17 sc in natural (36)
Round 9 :
10 sc in natural, 10 sc in camel, 16 sc in natural (36)
Round 10 :
9 sc in natural, 12 sc in camel, 15 sc in natural (36)
Info :
These stitches in camel must stay centered.
Infos :
Recommendations: In order to make these changes of color I didn’t cut the yarn. I only took the precaution to let them loose in order that the knit won’t stay tense and then adjusted the threads when doing the change of color. I have had hiding the camel color while knitting the round.
Info :
From now on we will continue in camel color. Cut the natural yarn.
Round 11 :
10 sc, (1 inc, 1 sc) x6, 14 sc (42)
Round 13 :
10 sc, (1 inc, 2 sc) x6, 14 sc (48)
Round 14 :
10 sc, (1 inc, 3 sc) x6, 14 sc (54)
Round 15 :
(1 inc, 8 sc) x6 (60)
Round 16 to 25 :
60 sc (60) 10 rounds
Round 26 :
(1 dec, 8 sc) x6 (54)
Round 28 :
(1 dec, 7 sc) x6 (48)
Round 30 :
(1 dec, 6 sc) x6 (42)
Info :
Place the eyes on the 2nd R counting from the last R in natural color and with 9 or 10 stitches of separation.
Round 31 :
(1 dec, 5 sc) x6 (36)
Round 32 :
(1 dec, 4 sc) x6 (30)
Info :
Fill with polyfiber.
Round 33 :
(1 dec, 3 sc) x6 (24)
Round 34 :
(1 dec, 2 sc) x6 (18)
Round 35 :
(1 dec, 1 sc) x6 (12)
Info :
Finish filling the snout and the head tightly before closing. The head must be in good shape. Close with 1 sl sc, hide the thread and cut.
— Embroider the nose :
Info :
Start from the 2nd round from the center of the magic ring and take in the central 6 sc. Cover the triangle completely with various stitches, make one or two horizontal stitches and finally embroider the vertical line.
— Ears x2 :
Info :
Use the camel color. Ears don't get filled. Close with 1 sl st and leave a thread to sew. Sew the ears onto the head approx on round 11, counting from the eyes location and with 12 stitches of separation.
Round 1 :
6 sc in a magic ring (6)
Round 3 :
(1 inc, 1 sc) x6 (18)
Round 4 to 6 :
18 sc (18) 3 rounds
Round 7 :
(1 dec, 7 sc) x2 (16)
Info :
The mane will be the last step we will do, once we have finished sewing all parts.
— Body :
Info :
Start with the camel color.
Round 1 :
Make 6 sc in a magic ring (6)
Round 3 :
(1 inc, 1 sc) x6 (18)
Round 4 :
(1 inc, 2 sc) x6 (24)
Round 5 :
(1 inc, 3 sc) x6 (30)
Round 6 :
(1 inc, 4 sc) x6 (36)
Round 7 :
(1 inc, 5 sc) x6 (42)
Round 8 :
(1 inc, 6 sc) x6 (48)
Round 9 :
(1 inc, 7 sc) x6 (54)
Round 10 to 14 :
54 sc (54)
Info :
Change to t-shirt color (light turquoise).
Round 15 to 19 :
54 sc (54) 10 rounds in t-shirt color (light turquoise)
Round 20 :
(1 dec, 7 sc) x6 (48) (there are 6 rounds in light turquoise)
Info :
Change to aquamarine green color.
Round 21 and 22 :
48 sc (48) 2 rounds
Round 23 :
(1 dec, 6 sc) x6 (42)
Round 24 and 25 :
42 sc (42) 2 rounds
Round 26 :
(1 dec, 5 sc) x6 (36)
Round 27 and 28 :
36 sc (36) 2 rounds
Round 29 :
(1 dec, 4 sc) x6 (30)
Round 30 and 31 :
30 sc (30) 2 rounds
Round 32 :
(1 dec, 3 sc) x6 (24)
Round 33 and 34 :
24 sc (24) 2 rounds
Info :
Close with 1 sl st and leave a long thread to sew. Fill the body with quite polyfiber.
— Legs x2 :
Info :
We start with natural color.
Round 1 :
Make 6 sc in a magic ring (6)
Round 3 :
(1 inc, 1 sc) x6 (18)
Round 4 :
(1 inc, 2 sc) x6 (24)
Round 5 :
(1 inc, 3 sc) x6 (30)
Info :
Change to camel color.
Round 6 to 9 :
30 sc (30) 4 rounds
Round 10 :
9 sc, 6 dec, 9 sc (24)
Round 11 :
8 sc, 4 dec, 8 sc (20)
Round 12 :
8 sc, 2 dec, 8 sc (18)
Round 13 and 14 :
18 sc (18) 2 rounds
Info :
Fill the base of the leg with polyfiber.
Round 15 :
(1 dec, 7 sc) x2 (16)
Round 16 and 17 :
16 sc (16) 2 rounds
Round 18 :
1 dec, 14 sc (15)
Round 19 to 24 :
15 sc (15) 6 rounds
Round 25 :
(1 dec, 3 sc) x3 (12)
Info :
Continue filling the leg up to R23 approx. These last 2 rounds remain unfilled.
Round 26 :
Close by flattening both sides the knit and unite every pair of stitches with 1 sc. You should have 6 sc. Cut the yarn keeping a long thread to sew.
Info :
Suggestion: Knit 2 or 3 sc extras for the left leg when finished R25 and 7 or 8 sc for the right leg. Then make the R26 for closure. This is useful for the changing of colors to be hidden and not seen in front.
— Arms x2 :
Info :
We start with natural color.
Round 1 :
Make 6 sc in a magic ring (6)
Round 3 :
(1 inc, 1 sc) x6 (18)
Round 4 :
(1 inc, 2 sc) x6 (24)
Info :
Change to camel color.
Round 5 to 8 :
24 sc (24) 4 rounds
Round 9 :
6 sc, 6 dec, 6 sc (18)
Round 10 :
6 sc, 3 dec, 6 sc (15)
Round 12 :
(1 dec, 3 sc) x3 (12)
Info :
Fill the base with polyfiber.
Round 13 to 21 :
12 sc (12) 9 rounds
Info :
Knit 1 sc extra for the left arm and 2 or 3 sc extras for the right one. Make sure that the changing of color from natural to camel stays in line.
Info :
Change to t-shirt color (light turquoise).
Round 22 and 23 :
12 sc (12) 2 rounds
Info :
Change to aquamarine green color.
Round 24 to 25 :
12 sc (12) 2 rounds
Round 26 :
(1 dec, 4 sc) x2 (10)
Info :
Knit 2 sc extras for the left arm and 6 sc for the right one as same as the legs, the color changing will be better and not seen in front.
Info :
Fill the arm with a bit of polyfiber. The last 3 rounds remain unfilled.
Round 27 :
Close by flattening both sides the knit and unite every pair of stitches with 1 sc. You should have 5 sc. Cut the yarn leaving a long thread to sew.
— Tail :
Info :
Crochet in camel color as follows.
Round 1 :
6 sc in a magic ring (6)
Round 3 and 4 :
12 sc (12) 2 rounds
Round 5 :
(1 dec, 2 sc) x3 (9)
Round 6 to 19 :
9 sc (9) 14 rounds
Round 20 :
Flatten and knit 4 sc taking together the opposites.
Info :
Fill the base of the tail and then just a bit until half. It must be light. Do not put any polyfiber at the superior part.
Info :
Let's put the hair to the tail like this: Cut wool threads of approx 18 cm long. With the help of the crochet hook pass one through one stitch starting at the R5 of the tail. Make a knot of 1 round only and adjust to ensure. Repeat all the way through the round. Continue adding threads downwards covering all spaces. Finally cut as long as you like. You may model the hair as you wish.
— Assembling :
Info :
1. We will start by sewing the head onto the body. The body's color changing must remain on the back. Use pins to set the head and make sure the eyes to be placed in the center and at the front. We will use the remaining body's thread. Use the sewing needle with it and follow these steps.
Info :
Note: For the assembling of the different parts there are images of another lion included. The head is centered and resting over the body approx 5 rounds from the end of the last round in natural color from the snout.
Info :
2. Now let's sew the legs. The legs are placed 3 rounds beneath the first round of the t-shirt. Use the pins in order to center them both sides of the body and placed at the same distance. Make a couple stitches at the inferior part for more insurance, although they are perfectly sewed when the legs are closed with 1 round of sc.
Info :
3. The arms are placed underneath the union of the head and the body. As same as we did with the legs, we will make a couple stitches under the arm.
Info :
4. We will sew the tail one round under the t-shirt.
Info :
5. We will embroider Alan's claws. We can do it at this point or after making the mane. You may use embroidery yarn, wool or a thinner yarn in brown. Every leg and arm have 3 claws. They must be centered. Place each one with 3 stitches of separation taking over 3 rounds in total, as shown on the images.
Info :
6. Finally we will do the lion’s mane. Follow the mane instructions and images to place each hairpiece evenly around head and neck.
— Mane :
Info :
Important considerations: We will use cashmilon wool for the mane. I chose a camel color, similar to Alan's body. The mane is not difficult to make, it takes time and patience. Be careful with hairpieces cut. The mane must be neat and with a nice shape. Cut strips approx 16 or 17 cm long (or as suggested 16-17 cm). Use the crochet hook to put the hairpieces.
Info :
Follow the next sequence in order to see how to place each hairpiece: Start placing the hairpiece at the inner border of the left ear, just on the round where the ears were sewed. It's very important not to keep holes or any visible stitch. Cover all spaces and reach the back of the neck, adjusting every hairpiece.
Info :
Now continue where you started going to the other side and complete the round. The first row is ready. We will do the second round to make it with more volume. Start on the lower round at the center and do not leave any free space. Then repeat the same on the other side and complete the round.
Info :
Let's delimitate the outline of the face and the beard. Start approx 6 or 7 stitches under the eyes line. Continue forming up a diagonal going down, trying to distribute the hairpieces. Repeat the same on the other side. Cover the triangle formed after doing the head's delimitation. You may add some hairpieces at the inferior part of the beard.
Info :
Let's put another line of hairpieces between the ears as shown. Add a few more hairpieces at the little space left between the ears to cover any visible holes. From now on we will complete the head. You may continue placing the hairpieces in circular way, following the rounds direction or divide the head in two with a hairpiece line and complete halves. At this point there’s no need to put hairpieces for every stitch because the wool mane will look voluminuous.
Info :
Note: I like closing with 12 stitches because it keeps a flatten form. If you wish to do it this way you may go taking two stitches together from the front loop till closing the circle. Adjust with a couple of stitches and hide the threads.
This Alan the Lion pattern brings a fluffy mane and a gentle personality to life with step-by-step photos and clear instructions. 🧶 The mane technique is worth the time and gives a beautiful, tactile finish you can customize. 💛 Make one for keepsakes, gifts, or nursery decor — each Alan turns out uniquely yours. ✂️