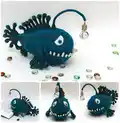
Make Anglerfish SAM, an unusual and charming amigurumi that doubles as a decorative toy or a quirky night lamp. This intermediate-level pattern guides you through detailed fins, a toothed jaw, and a wired lamp arm to create a 18x35 cm toy. You will enjoy shaping the finger-rays and adding beads and wire for a playful, posable result.
Progress Tracker
0% Complete
— FINS :
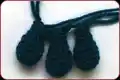
Side fin (Overview) :
Make two with solid yarn and 1.5 mm crochet hook following the instructions. Start with finger-rays using solid yarn and 1.5 mm crochet hook. The following instructions are given for one fin.
Side fin A - Finger-ray rounds :
1) Make a MR, 6 sc into the ring. 2) 2 sc in each st around (12) 3) (3 sc, 2 sc in next st) * 3 (15) 4-5) sc in each st around (15) 6) (3 sc, 2 sc tog) * 3 (12) 7) (sc, 2 sc tog) * 4 (8) 8-10) sc in each st around (8)
Side fin B - Finger-ray rounds :
After having made one ray, cut off the yarn, but do not cut the yarn after having made the second ray. Continue working from the marker of the second ray. 11) 2 sc in next st, 2 sc, (2 sc in next st) * 2, 2 sc, 2 sc in next st (12). Fasten off, weave in the end.
How to join rays (Side fin) :
Join the rays together according to the following instructions. The diagram sign means increase of the previous rnd, so the diagram shows how to place fingers "B" and at what places to join the rays to each other (you have to match the increases with increases). When joining rays together you DO NOT have to make increases or decreases! To avoid holes draw up one more loop through the same place where you have just made a sc as you are going to make another sc but do not crochet it. Then draw up another loop through the st in the previous rnd of the other ray. As a result you have 3 sts on the hook. Make a sc through all 3 sts.
Side fin Join rounds :
Join the rays together according to the diagram shown above: 4 sc around finger "A" (make the 4th sc as described to avoid holes), 6 sc around finger "B", 6 sc around finger "B", 8 sc around finger "A"; turn work and continue in the opposite direction: 6 sc around finger "B", 6 sc around finger "B", 4 sc around finger "A" (40).
Side fin Continued shaping :
2) 2 sc tog, 16 sc, (2 sc tog) * 2, 16 sc, 2 sc tog (36) + shift st 3) (16 sc, 2 sc tog) * 2 (34) 4) (15 sc, 2 sc tog) * 2 (32) + shift st 5) (14 sc, 2 sc tog) * 2 (30) 6) (13 sc, 2 sc tog) * 2 (28) + shift st 7) (12 sc, 2 sc tog) * 2 (26) 8) (11 sc, 2 sc tog) * 2 (24) + shift st 9) (10 sc, 2 sc tog) * 2 (22). Change the yarn into the multicolor yarn. 10) (9 sc, 2 sc tog) * 2 (20) + shift st 11-13) sc in each st around (20) + shift st 14) (9 sc, 2 sc in next st) * 2 (22) 15) (10 sc, 2 sc in next st) * 2 (24). Fasten off and weave in the end. Stuff the finger-rays with polyester (do not stuff too tightly!). Do not stuff the fin itself.
Side fin Reinforcement :
Reinforce the fin. You will need at least 120 cm of wire for one fin. Insert the even parts of the wire into each finger so the ends coming out of the fin even. One end of the wire will make the frame of the fishing line and the the other end will form the spine of the fish.
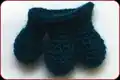
Lower fin (Overview) :
Make one with solid yarn and 1.5 mm crochet hook following the instructions. Instructions how to make finger-rays are given for A - 2 rays and B - 1 ray.
Lower fin Finger-ray rounds A :
1) Make a MR, 6 sc into the ring. 2) 2 sc in each st around (12) 3) (3 sc, 2 sc in next st) * 3 (15) 4-5) sc in each st around (15) 6) (3 sc, 2 sc tog) * 3 (12) 7) (sc, 2 sc tog) * 4 (8) 8-9) sc in each st around (8) After having made one ray, cut off the yarn and weave in the end, but do not cut the yarn after having made the second ray. Continue working from the marker of the second ray.
Lower fin Finger-ray rounds B :
10) 2 sc in next at, 2 sc, (2 sc in next st) * 2, 2 sc, 2 sc in next st (12). Fasten off, weave in the end.
Lower fin Join and shaping :
Join the rays together according to the diagram: 4 sc around finger "A", 6 sc around finger "B", 8 sc around finger "A"; turn work and continue in the opposite direction: 6 sc around finger "B", 4 sc around finger "A" (28). 2) (2 sc in next st, 13 sc) * 2 (30) + shift st 3) (2 sc in next st, 14 sc) * 2 (32) 4) (2 sc in next st, 15 sc) * 2 (34). Fasten off and weave in the end. Do not insert the wire at this step. Stuff the finger-rays with polyester (do not stuff too tightly!). Do not stuff the fin itself.
Dorsal fin (Overview) :
Make one with solid yarn and 1.5 mm crochet hook following the instructions. Attention! In order not to mix the fingers I recommend grouping them and labeling them with name labels (see Appendix).
Dorsal fin Finger-ray rounds (A - E) :
1) Make a MR, 6 sc into the ring. 2) 2 sc in each st around (12) 3) (3 sc, 2 sc in next st) * 3 (15) 4-5) sc in each st around (15) 6) (3 sc, 2 sc tog) * 3 (12) 7) (sc, 2 sc tog) * 4 (8) 8-12) sc in each st around (8) Do not cut the yarn; continue working from the marker of this ray. For B, C, D rays additional rows: see chart: 17) 2 sc in next st, 2 sc, (2 sc in next st) * 2, 2 sc, 2 sc in next st (12). Fasten off, weave in the end. For C and D follow respective table cells for finishing and fastening off.
Dorsal fin Join rounds :
Join the rays together according to the diagram shown above: 4 sc around finger "A", 6 sc around finger "B", 6 sc around finger "C", 6 sc around finger "C", 5 sc around finger "D"; turn work and continue in the opposite direction: 6 sc around finger "C", 6 sc around finger "C", 6 sc around finger "B", 4 sc around finger "A" (58).
Dorsal fin Continued join :
2) Join the rays together according to the diagram shown below: 2 sc in next st, 28 sc around the item you have just made, 5 sc, (2 sc in next st) * 2, 5 sc around finger "D", turn work and continue in the opposite direction: 29 sc around the item you have just made (73) + shift st. 2) join the rays together according to the diagram shown below: 2 sc in next st, 36 sc around the item you have just made, 5 sc, (2 sc in next st) * 2, 5 sc around finger "D", turn work and continue in the opposite direction: 36 sc around the item you have just made (88).
Dorsal fin Final shaping :
4) Join the rays together according to the diagram shown below: 2 sc in next st, 43 sc around the item you have just made, 3 sc, 2 sc in next st, 4 sc around finger "E", turn work and continue in the opposite direction: 44 sc around the item you have just made (98). 5) (2 sc in next st, 48 sc) * 2 (100) + shift st 6) (2 sc in next st, 49 sc) * 2 (102) + shift st 7) (2 sc in next st, 50 sc) * 2 (104). Fasten off and weave in the end. Do not insert the wire at this step. Stuff the finger-rays with polyester. Do not stuff the fin itself.
Tail (Overview) :
Make one with solid yarn and 1.5 mm crochet hook following the instructions. Instructions how to make finger-rays: A - 2 rays, B - 4 rays, C - 1 ray. A - 2 rays (make them only after you have made all B and C rays).
Tail Finger-ray rounds B :
1) Make a MR, 6 sc into the ring. 2) 2 sc in each st around (12) 3) (3 sc, 2 sc in next st) * 3 (15) 4-5) sc in each st around (15) 6) (3 sc, 2 sc tog) * 3 (12) 7) (sc, 2 sc tog) * 4 (8) 8-11) sc in each st around (8)
Tail Finger-rays B finishing :
Fasten off, weave in the end. 13) 2 sc in next st, 2 sc, (2 sc in next st) * 2, 2 sc, 2 sc in next st (12). Fasten off, weave in the end.
Tail Join rounds :
Join the rays together according to the diagram shown above: 4 sc around finger "A", 6 sc around finger "C", 3 sc, 2 sc in next st, 4 sc around finger "B", turn work and continue in the opposite direction: 6 sc around finger "C", 3 sc, 2 sc in next st around finger "A" (30). 2) (14 sc, 2 sc in next st) * 2 (32) 3) (15 sc, 2 sc in next st) * 2 (34). Fasten off and weave in the end.
Tail Reinforce and continue :
Reinforce the tail. Fold the tail in half. Cut 1 m of wire, insert even parts of the wire into the rays so the ends coming out of the tail are even. Take the ends of the wire in the upper and lower edges of the tail between Rnds 8 and 9. Wrap the ends of the wire with plaster. Continue working: 12) (2 sc tog, 22 sc, 2 sc tog) * 2 (48) 13) (2 sc tog, 20 sc, 2 sc tog) * 2 (44) 14) (2 sc tog, 18 sc, 2 sc tog) * 2 (40) 15) (2 sc tog, 16 sc, 2 sc tog) * 2 (36) 16) (2 sc tog, 14 sc, 2 sc tog) * 2 (32). Fasten off and weave in the end. Stuff the finger-rays and the tail with polyester. Put 2 "B" fingers aside. You will use them later.
— Body :
Lower jaw :
Make one with multicolor yarn and 1.5 mm crochet hook following the instructions. The marker goes along the side edge of the jaw. You do not have to change its position. 1) Make a MR, 6 sc into the ring. 2) 2 sc in each st around (12) 3) (sc, 2 sc in next st) * 6 (18) 4) sc, 2 sc in next st, (2 sc, 2 sc in next st) * 5, sc (24) 5) (3 sc, 2 sc in next st) * 6 (30) 6) 2 sc, 2 sc in next st, (4 sc, 2 sc in next st) * 5, 2 sc (36) 7) (5 sc, 2 sc in next st) * 6 (42) 8) 3 sc, 2 sc in next st, (6 sc, 2 sc in next st) * 5, 3 sc (48) 9) (7 sc, 2 sc in next st) * 6 (54) 10) 4 sc, 2 sc in next st, (8 sc, 2 sc in next st) * 5, 4 sc (60) 11) (9 sc, 2 sc in next st) * 6 (66) 12) 5 sc, 2 sc in next st, (10 sc, 2 sc in next st) * 5, 5 sc (72) 13) (11 sc, 2 sc in next st) * 6 (78) 14) 6 sc, 2 sc in next st, (12 sc, 2 sc in next st) * 5, 6 sc (84) 15) (13 sc, 2 sc in next st) * 6 (90) 16) sc in each st around (90) 17) 7 sc, 2 sc in next st, (14 sc, 2 sc in next st) * 5, 7 sc (96) 18) sc in each st around (96) 19) (15 sc, 2 sc in next st) * 6 (102) 20) sc in each st around (102) 21) 8 sc, 2 sc in next st, (16 sc, 2 sc in next st) * 5, 8 sc (108) 22) sc in each st around (108) 23) (35 sc, 2 sc in next st) * 3 (111) 24) sc in each st around (111) 25) 18 sc, 2 sc in next st, (36 sc, 2 sc in next st) * 2, 18 sc (114) 26) sc in each st around (114) 27) (37 sc, 2 sc in next st) * 3 (117) 28) sc in each st around (117)
Lower jaw continued rounds :
29) 19 sc, 2 sc in next st, (38 sc, 2 sc in next st) * 2, 19 sc (120) 30) sc in each st around (120) 31) (39 sc, 2 sc in next st) * 3 (123) 32) sc in each st around (123) 33) 20 sc, 2 sc in next st, (40 sc, 2 sc in next st) * 2, 20 sc (126) 34-35) sc in each st around (126) 36) (41 sc, 2 sc in next st) * 3 (129) 37) sc in each st around (129) 38) 21 sc, 2 sc in next st, (42 sc, 2 sc in next st) * 2, 21 sc (132) 39) ((2 sc in next st) * 2, 64 sc) * 2 (136) 40) sc, (2 sc in next st) * 2, 66 sc, (2 sc in next st) * 2, 65 sc (140) 41) 2 sc, (2 sc in next st) * 2, 68 sc, (2 sc in next st) * 2, 66 sc (144) 42) 3 sc, (2 sc in next st) *2, 70 sc, (2 sc in next st) * 2, 67 sc (148). ss. Fasten off, weave in the end.
Muzzle :
Make one with multicolor yarn and 1.5 mm crochet hook following the instructions. The marker goes along the back. You do not need the change position of the marker before you start joining the muzzle and the jaw. 1) Make a MR, 7 sc into the ring. 2) 2 sc in each st around (14) 3) (sc, 2 sc in next st) * 7 (21) 4) sc, 2 sc in next st, (2 sc, 2 sc in next st) * 6, sc (28) 5) (3 sc, 2 sc in next st) * 7 (35) 6) 2 sc, 2 sc in next st, (4 sc, 2 sc in next st) * 6, 2 sc (42) 7) 3 sc, 2 sc in next st, (6 sc, 2 sc in next st) * 5, 3 sc (48) 8) (7 sc, 2 sc in next st) * 6 (54) 9) 4 sc, 2 sc in next st, (8 sc, 2 sc in next st) * 5, 4 sc (60) 10) (9 sc, 2 sc in next st) * 6 (66) 11) 5 sc, 2 sc in next st, (10 sc, 2 sc in next st) * 5, 5 sc (72) 12) (11 sc, 2 sc in next st) * 6 (78) 13) 6 sc, 2 sc in next st, (12 sc, 2 sc in next st) * 5, 6 sc (84) 14) sc in each st around (84) 15) (13 sc, 2 sc in next st) * 6 (90) 16) sc in each st around (90) 17) 7 sc, 2 sc in next st, (14 sc, 2 sc in next st) * 5, 7 sc (96)
Muzzle continued rounds :
18) sc in each st around (96) 19) (15 sc, 2 sc in next st) * 6 (102) 20) sc in each st around (102) 21) 8 sc, 2 sc in next st, (16 sc, 2 sc in next st) * 5, 8 sc (108) 22) sc in each st around (108) 23) (17 sc, 2 sc in next st) * 6 (114) 24) sc in each st around (114) 25) 9 sc, 2 sc in next st, (18 sc, 2 sc in next st) * 5, 9 sc (120) 26) sc in each st around (120) 27) (39 sc, 2 sc in next st) * 3 (123) 28) sc in each st around (123) 29) 20 sc, 2 sc in next st, (40 sc, 2 sc in next st) * 2, 20 sc (126) 30) sc in each st around (126) 31) (41 sc, 2 sc in next st) * 3 (129) 32) sc in each st around (129) Do not cut the yarn. Now you have to join the lower jaw and the muzzle into one impudent greedy muzzle.
How to assemble the muzzle and the lower jaw (Info) :
Fold the lower jaw to place the increases in opposite corners. There are 72 sts on the inner side of the jaw (including the increases of the previous rnd) and there are 76 sts on the outer side of the jaw (including the increases of the previous rnd). There are 148 sts in total on the lower jaw (76 + 72). Turn the muzzle so that the marker is in the center of the future back. The back comprises 57 sts, the inner part of the muzzle hiding under the lower jaw comprises 72 sts. The total number of sts for the muzzle is 129 sts (57 + 72). Start working from this marker. I recommend using 50 cm of cotton yarn as marker. It facilitates counting the rnds and placing additional markers for the fins. Do not remove the marker until you finish work. Now it is the main marker! It goes along the center of the back.
Joining muzzle and lower jaw - Inner contour :
1) 28 sc around the muzzle, then insert the hook into 29th st of the muzzle and between 1st and 2nd sts of the lower jaw (near the first increase), join the inner part of the lower jaw and the muzzle, make 72 sc inserting the hook through the sts of the muzzle and the jaw at the same time (you have to put the items RS facing each other and insert the hook from inside of the jaw), 29 sc around the muzzle till the marker (129).
Joining muzzle and lower jaw - Outer contour :
2) 28 sc from the marker around the muzzle, insert the hook between 1st and 2nd sts near the increase of the lower jaw, 76 sc around the outer part of the lower jaw, 29 sc around the muzzle till the marker (133). Then continue working around the outer contour only (muzzle and the outer side of the lower jaw).
Body Continue rounds after joining (outer contour) :
3) 2 sc in next st, 132 sc (134) 4) sc in each st around (134) 5) 2 sc in next st, 133 sc (135) 6-10) sc in each st around (135) 11) 2 sc tog, 133 sc (134) 12) (2 sc tog, 65 sc) * 2 (132) 13) 32 sc, 2 sc tog, 64 sc, 2 sc tog, 32 sc (130) 14) 16 sc, 2 sc tog, 94 sc, 2 sc tog, 16 sc (128)
Body Further shaping and reinforcement info :
At this step you have to reinforce the jaw to make the fish keep shape and fix the teeth. If you crochet tightly enough, it is not necessary to make the wire frame. Cut a piece of wire as long as the outer contour of the jaw + 1 more cm at each end. With pliers, make small loops at the ends of the wire. Try the frame on to the body and fix it with pins. In order to make a toothy smile you have to make 2 sets of teeth using the following diagram. You can place teeth as you like.
— TEETH :
Teeth Overview :
You can make teeth with 1.0 mm or 1.25 mm crochet hook (depending on the yarn you use) and white or gray yarn following the instructions given below. You can make as many teeth as you want. You can insert a wire inside the teeth to make them stronger. Make teeth or make of polymer clay two sets of teeth.
Teeth A - 2 teeth :
1) Make a MR, 6 sc into the ring. 2-3) sc in each st around (6) 4) (sc, 2 sc in next st) * 3 (9) 5-10) sc in each st around (9). Fasten off, weave in the end.
Teeth B - 2 teeth :
1) Make a MR, 6 sc into the ring. 2-3) sc in each st around (6) 4) (sc, 2 sc in next st) * 3 (9) 5-8) sc in each st around (9). Fasten off, weave in the end.
Teeth C - 2 teeth :
1) Make a MR, 6 sc into the ring. 2-3) sc in each st around (6) 4) (sc, 2 sc in next st) * 3 (9) 5-6) sc in each st around (9). Fasten off, weave in the end.
Teeth D - 8/10 teeth :
2-4) sc in each st around (6). Fasten off, weave in the end. You will make two sets of teeth and place them to create the smile. You can insert a wire inside the teeth to make them stronger. DO NOT forget to wrap the ends of the wire in order to avoid injuries.
Assembly Instructions
- Join the muzzle and the lower jaw by working the inner contour: 28 sc around the muzzle, join the inner part of the lower jaw and the muzzle, make 72 sc inserting the hook through muzzle and jaw at the same time, then 29 sc around the muzzle till the marker (129).
- Join the outer contour: 28 sc from the marker around the muzzle, insert hook between 1st and 2nd sts near increase of the lower jaw, 76 sc around the outer part of the lower jaw, 29 sc around the muzzle till the marker (133). Continue working around the outer contour only.
- Position and sew the fins: place the side fins, dorsal fin, lower fin, and tail along the center back and sides according to the diagrams; pin in place and sew with a yarn needle using the long tails and whipstitch, reinforcing with wire where indicated.
- Attach teeth and eyes: make two sets of teeth and attach them to the jaw using sewing or glue; add eyes (beads or toy eyes) and sew or glue firmly into eye sockets. Add beads and embroidery details as shown.
- Insert wires for lamp arm and fin frames: use copper wire to form the lamp frame and spine; insert the wire ends into the fin rays and the tail, wrap wire ends with tape, test lamp placement and secure with pins prior to final sewing.
- Embellish and finish: sew on beads on body as adornments, weave in all ends, ensure stuffing is even, and test posability. Fasten off and weave in any remaining tails.
Important Notes
- 💡Use stitch markers to keep track of rounds and when joining muzzle and jaw to keep the main marker along the center back.
- 💡Stuff finger-rays lightly and main body firmly but not overstuffed to keep shape and allow wire insertion.
- 💡Reinforce wire ends with fabric plaster or insulation tape to avoid injuries and secure wires inside the toy.
- 💡Weave in ends as you go and fasten off after finishing each small element to keep assembly tidy.
- 💡Count stitches and follow diagrams when joining rays and contours to avoid gaps and misaligned seams.
This unique Anglerfish SAM is a showpiece that blends crochet skill with playful design and a hint of engineering. Make one as a quirky lamp, a conversation-starting shelf friend, or a special handmade gift. Your SAM will be full of personality and little details that make it truly yours. 🐟✨🧶