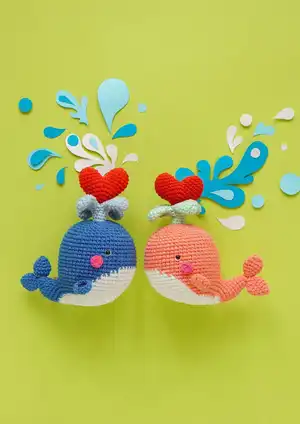
Dive into a handmade ocean adventure with this delightful collection of four amigurumi sea creatures. This pattern set includes instructions for a romantic Cupid Whale, a playful Seal in a Blowfish costume, an artistic Crab, and a sea-faring Captain Turtle. Each character features unique accessories and whimsical details, making them perfect for play or nursery decor.
Progress Tracker
0% Complete
— CUPID WHALE :
— Body (Yarn A) :
Info :
We will change color if the letter color changes. Red letter: yarn A. Black letter: yarn B.
Round 1 :
sc 7 into a magic loop (7)
Round 3 :
[sc 1, inc] 7x (21)
Round 4 :
[sc 1, inc, sc 1] 7x (28)
Round 5 :
[sc 3, inc] 7x (35)
Round 6 :
[sc 2, inc, sc 2] 7x (42)
Round 7 :
[sc 5, inc] 7x, change to yarn B (49)
Round 8 :
sc 3, inc, sc 3, sc 3, inc, [sc 6, inc] 2x, sc 6, inc, [sc 6, inc] 2x, sc 3 (56)
Round 9 :
sc 7, inc, sc 1, sc 6, inc, [sc 7, inc] 2x, sc 1, sc 6, inc, [sc 7, inc] 2x (63)
Round 10 :
sc 4, inc, sc 6, sc 2, inc, [sc 8, inc] 2x, sc 4, sc 4, inc, [sc 8, inc] 2x, sc 4 (70)
Round 11 :
sc 13, sc 27, sc 30 (70)
Round 12 :
sc 14, sc 25, sc 31 (70)
Round 13 :
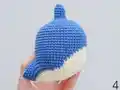
sc 15, sc 23, sc 16, we will divide the body & the tail from this rnd (pic 1), skip the next 16 sts, continue to crochet the next rnd (pic 2&3) (54)
Round 14 :
sc 16, sc 21, sc 17 (54)
Round 15 :
sc 18, sc 17, sc 19 (54)
Round 16 :
sc 20, sc 13, sc 21, break yarn A (54)
Round 17-24 :
sc 54 (8 rnds), insert eyes between rnd 20&21, 17 sts apart (pic 13&14) (54)
Round 25 :
[sc 7, dec] 6x (48)
Round 26 :
[sc 6, dec] 6x (42)
Round 27 :
[sc 5, dec] 6x (36)
Round 28 :
[sc 4, dec] 6x, stuff firmly (30)
Round 29 :
[sc 3, dec] 6x (24)
Round 30 :
[sc 2, dec] 6x (18)
Round 31 :
[sc 1, dec] 6x (12)
Round 32 :
(blo) sc 12 (12)
Round 33-37 :
sc 12 (5 rnds), do not stuff this part (12)
Info :
Use the crochet hook to push the last 6 rnds inside the body (pic 5&6). Skip the next 2 sts from the last st on the whale's body (pic 7), join yarn B on, continue to crochet the tail.
— Tail (Yarn B) :
Round 1 :
sc 12, skip the next 2 sts, join with the 1st st of this rnd (pic 8&9) (12)
Round 2 :
[sc 4, dec] 2x (10)
Round 3 :
sc 10, stuff firmly (10)
Info :
Break the yarn, weave in the last 6 sts (pic 4). Break the yarn, weave in the last 5 sts (pic 10).
— Cheeks (Yarn E, X2) :
Round 1 :
sc 6 into a magic loop (6)
Info :
Break the yarn with a long rest to sew later.
— Water Fountain (Yarn C, X4) :
Round 1 :
sc 6 into a magic loop (6)
Round 3-5 :
sc 12 (3 rnds) (12)
Round 6 :
[sc 4, dec] 2x (10)
Round 7 :
[sc 3, dec] 2x (8)
Info :
Make another 3 pieces the same way, but do not break the yarn on the 4th piece (pic 17), continue to crochet the following rnds:
Round 8 :
sc 4 on the 4th piece, sc 4 on the 3rd piece, sc 4 on the 2nd piece, sc 4 on the 1st piece = 16 sts (pic 18-19-20-21), slst on the 1st st to make a ring (pic 22) (16)
Round 9 :
sc 16 (4 sts for each piece) (pic 25) (16)
Round 10 :
dec 8, stuff firmly (8)
Info :
Break the yarn, weave in the last 8 sts (pic 26). Use tapestry needle to create a dent in the middle of the fountain (pic 27&28). Use your finger to bend each piece (pic 29&30). Put the water fountain inside the hole (pic 31&32).
— Tail Fins (Yarn B, X2) :
Round 1 :
sc 3 into a magic loop (3)
Round 3 :
[sc 1, inc] 3x (9)
Round 4 :
[sc 2, inc] 3x (12)
Round 5-6 :
sc 12 (2 rnds) (12)
Info :
Break the yarn, weave in the last 6 sts.
— Flippers (Yarn B, X2) :
Round 1 :
sc 5 into a magic loop (5)
Round 3 :
sc, hdc, dc, [dc inc] 4x, dc, hdc, sc (14)
Info :
Break the yarn with a long rest to sew later. Sew the Fins on the tail & Flippers, Cheeks on both side (pic 15&16).
— Heart (Yarn D) :
Round 1 :
sc 6 into a magic loop (6)
Round 3 :
[sc 1, inc] 6x (18)
Round 4-5 :
sc 18 (2 rnds) (18)
Info :
Break the yarn, make the 2nd piece the same way but do not break the yarn, join with the 1st piece (pic 31), and continue to crochet the following rnds:
Round 6 :
sc 18 (on the 1st piece), sc 18 (on the 2nd piece) (36)
Round 8 :
[sc 4, dec] 6x (30)
Round 9 :
[sc 3, dec] 6x (24)
Round 10 :
[sc 2, dec] 6x, stuff firmly (18)
Round 11 :
[sc 1, dec] 3x (12)
Info :
Break the yarn, weave in the last 6 sts (pic 34). Put the heart above the water fountain (pic 35), and we have finished the Cupid Whale!
— SEAL & BLOWFISH :
— Seal Body (Yarn A) :
Round 1 :
ch 5, start on the 2nd ch from the hook, inc, sc 2, inc 2 on the last st, continue to crochet on the other side, sc 2, inc (12)
Round 2 :
[sc 1, inc] 6x (18)
Round 4 :
[sc 1, inc, sc 1] 6x (24)
Round 5 :
sc 24, break yarn A, change to yarn B (24)
Round 6 :
[sc 3, inc] 6x (30)
Round 8 :
sc 1, [sc 1, inc] 3x, sc 3, [inc, sc 1] 3x, sc 14 (36)
Round 9 :
sc 1, [sc 1, inc, sc 1] 3x, sc 3, [sc 1, inc, sc 1] 3x, sc 14 (42)
Round 10 :
sc 1, [sc 3, inc] 3x, sc 3, [inc, sc 3] 3x, sc 14 (48)
Round 11-22 :
sc 48 (12 rnds) (48)
Round 23 :
[sc 7, dec] 4x, sc 12 (44)
Round 24 :
[sc 3, dec, sc 3] 4x, sc 12 (40)
Info :
Do not break the yarn, use a piece of yarn A-15cm to pull through the middle st of rnd 3 as pic 3, stuff slightly, pull the yarn slowly to make the dent on the muzzle (pic 4), then tighten the string (pic 5). Repeat the same with the 2 eye dents (pic 6-7), insert safety eyes between rnd 7&8 (pic 8), continue to crochet the following rnds:
Round 25 :
[sc 5, dec] 4x, sc 12 (36)
Round 26 :
[sc 2, dec, sc 2] 4x, sc 12 (32)
Round 27 :
[sc 3, dec] 4x, sc 12 (28)
Round 28 :
[sc 1, dec, sc 1] 4x, sc 12 (24)
Round 29 :
[sc 1, dec] 4x, sc 12, stuff firmly (20)
Round 30 :
[sc 8, dec] 2x (18)
Round 32 :
[sc 1, dec] 6x (12)
Info :
Use brown thread to sew the nose & black thread to sew the eyebrows (pic 13). Embroider 3 French Knots on each cheek. Use pins to locate the nose (pic 10). Seperate the pink yarn/thread as pic 11, use a single thread to embroider the nose (pic 12).
— Tongue (Yarn D) :
Round 1 :
sc 6 into a magic loop (6)
Info :
Break the yarn, weave in the last 6 sts (pic 9). Break the yarn with a long rest. Sew the tongue on the dent we created before (pic 14).
— Flippers (Yarn B, X2) :
Round 1 :
ch 6, start on the 2nd ch from the hook, inc, sc 3, inc 2 on the last st, continue to crochet on the other side, sc 3, inc (14)
Round 3 :
[dec, sc 5] 2x (12)
Round 4 :
[dec, sc 4] 2x (10)
Round 5 :
[dec, sc 3] 2x (8)
Round 6 :
[dec, sc 2] 2x (6)
Info :
Break the yarn, sew 2 edges together.
— Tail Fins (Yarn B, X2) :
Round 1 :
ch 7, start on the 2nd ch from the hook, inc, sc 4, inc 2 on the last st, continue to crochet on the other side, sc 4, inc (16)
Round 3 :
[dec, sc 6] 2x (14)
Round 4-7 :
Repeat rnd 3-6 of the Flippers (6)
Info :
Break the yarn, sew 2 edges together. Sew flippers & tail fins as pic 15&16.
— Blowfish (Yarn A) :
Info :
We will change color if the letter color changes. Black letter: yarn A. Red letter: yarn C.
Round 1 :
ch 52, slst on the 1st ch to make a ring, sc 52 (52)
Round 2-7 :
sc 52 (6 rnds) (52)
Round 8 :
(blo) sc 25, inc, sc 25, inc (54)
Round 9 :
sc 4, inc, [sc 8, inc] 2x, sc 4, sc 3, Dc Tr (Double Treble), inc, sc 4, Dc Tr, sc 3, inc, sc 1, Dc Tr, sc 5, Dc Tr, inc, sc 4 (60)
Round 10 :
[sc 9, inc] 3x, [sc 9, inc] 3x (66)
Round 11 :
sc 5, inc, [sc 10, inc] 2x, sc 5, sc 5, inc, sc 1, Dc Tr, sc 7, Dc Tr, inc, sc 5, Dc Tr, sc 4, inc, sc 1, Dc Tr, sc 3 (72)
Round 12 :
sc 36, sc 36 (72)
Round 13 :
sc 36, sc 3, Dc Tr, sc 8, Dc Tr, sc 7, Dc Tr, sc 8, Dc Tr, sc 6 (72)
Round 14 :
sc 36, sc 36 (72)
Round 15 :
sc 36, sc 8, [Dc Tr, sc 7] 3x, Dc Tr, sc 3 (72)
Round 16 :
sc 36, sc 36 (72)
Round 17 :
sc 36, sc 3, Dc Tr, sc 8, Dc Tr, sc 7, Dc Tr, sc 8, Dc Tr, sc 6 (72)
Round 18 :
sc 5, dec, [sc 10, dec] 2x, sc 5, sc 5 dec, [sc 10, dec] 2x, sc 5 (66)
Round 19 :
[sc 9, dec] 3x, sc 7, Dc Tr, sc 1, dec, sc 4, Dc Tr, sc 4, dec, Dc Tr, sc 8, dec (60)
Round 20 :
sc 4, dec, [sc 8, dec] 2x, sc 4, sc 4, dec, [sc 8, dec] 2x, sc 4 (54)
Round 21 :
sc 25, dec, sc 3, Dc Tr, sc 5, Dc Tr, sc 5, Dc Tr, sc 6, Dc Tr, sc 2, dec (52)
Info :
Break the yarn with a long rest (pic 23-24). Use the scissors to cut the inside yarn (pic 25-26). Fold the white part inside (pic 27-28). Use a tapestry needle to sew 2 edges together (pic 29-30). Stuff firmly along sewing (pic 31-32).
— Blowfish’s Eyes (Yarn A, X2) :
Round 1 :
sc 5 into a magic loop (5)
Round 3 :
[sc 1, inc] 5x (15)
Info :
Break the yarn with a long rest, stuff slightly.
— Blowfish’s Fins (Yarn C-X1, Yarn A-X1) :
Round 1 :
ch 8, start on the 2nd ch from the hook, inc, sc 5, inc 2 on the last st, continue to crochet on the other side, sc 5, inc (18)
Round 3 :
[dec, sc 7] 2x (16)
Round 4 :
[dec, sc 6] 2x (14)
Round 5 :
[dec, sc 5] 2x (12)
Round 6 :
[dec, sc 4] 2x (10)
Round 7 :
[dec, sc 3] 2x (8)
Round 8 :
[dec, sc 2] 2x (6)
Info :
Break the yarn with a long rest, stuff slightly.
— Blowfish’s Tail (Yarn C) :
Round 1 :
ch 17, start on the 2nd ch from the hook, inc, sc 14, inc 2 on the last st, continue to crochet on the other side, sc 14, inc (36)
Round 3 :
[dec, sc 16] 2x (34)
Round 4 :
[dec, sc 15] 2x (32)
Round 5 :
[dec, sc 14] 2x (30)
Round 6 :
[dec, sc 13] 2x (28)
Round 7 :
[dec, sc 12] 2x (26)
Round 8 :
[dec, sc 11] 2x (24)
Round 9 :
[dec, sc 10] 2x (22)
Round 10 :
[dec, sc 9] 2x (20)
Round 11 :
[dec, sc 8] 2x (18)
Round 12 :
[dec, sc 7] 2x (14)
Info :
Break the yarn with a long rest, stuff slightly.
— Blowfish’s Mouth (Yarn E) :
Round 1 :
ch 13, slst on the 1st ch to make a ring, sc 13 (13)
Info :
Break the yarn with a long rest to sew later. Use your hands to stretch the hole inside. Sew the eyes on the Blowfish. Sew the mouth on the Blowfish. Sew the Tail & Fins on the Blowfish. Put the Seal inside the Blowfish and we have finished!
— CRAB :
— Body (Yarn A) :
Round 1 :
sc 6 into a magic loop (6)
Round 2-6 :
sc 6 (5 rnds) (6)
Info :
Break the yarn, make the 2nd piece the same way but do not break the yarn, ch 3 and join with the 1st piece (pic 1&2), and continue to crochet the following rnds:
Round 13 :
sc 9 (on the 1st piece), sc 3 (on the 3 chs), sc 9 (on the 2nd piece), sc 3 (on the 3 chs) (24)
Round 14 :
[sc 3, inc] 6x (30)
Round 16 :
[sc 2, inc, sc 2] 6x (36)
Info :
Do not break the yarn, leave it here (pic 3). If you make this toy for babies, you should not put the wire inside, please move the rnd 18 to continue crocheting. But if you want the eyes can be bendable, following these steps: Stuff slightly the eyes (pic 4), use a plastic coated wire-about 7-8cm (pic 5), push the wire into the eyes and then continue to stuff firmly (pic 6), and make a knot as pic 7 to fix the wire. Repeat the same for the 2nd eye (pic 8), now we can bend the eyes (pic 9). Continue to crochet:
Round 18 :
[sc 5, inc] 6x (42)
Round 20 :
sc 5, [sc 1, inc] 3x, sc 15, [inc, sc 1] 3x, sc 10 (48)
Round 22 :
sc 5, [sc 1, inc, sc 1] 3x, sc 15, [sc 1, inc, sc 1] 3x, sc 10 (54)
Round 24 :
sc 5, [sc 3, inc] 3x, sc 15, [inc, sc 3] 3x, sc 10 (60)
Round 25-31 :
sc 60 (7 rnds) (60)
Round 32 :
sc 5, [sc 3, dec] 3x, sc 15, [dec, sc 3] 3x, sc 10 (54)
Round 33 :
sc 5, [sc 1, dec, sc 1] 3x, sc 15, [sc 1, dec, sc 1] 3x, sc 10 (48)
Round 34 :
sc 5, [sc 1, dec] 3x, sc 15, [dec, sc 1] 3x, sc 10 (42)
Round 35 :
[sc 4, dec] 7x (35)
Round 36 :
[sc 3, dec] 7x, stuff firmly (28)
Round 37 :
[sc 2, dec] 7x (21)
Round 38 :
[sc 1, dec] 7x (14)
Info :
Break the yarn, weave in the last 7 sts (pic 10).
— Eyes (Yarn B, X2) :
Round 1 :
sc 5 into a magic loop (5)
Round 3 :
[sc 1, inc] 5x (15)
Round 4-5 :
sc 15 (2 rnds) (15)
Info :
Break the yarn with a long rest to sew later. Insert 5mm safety eyes in the middle of the eyes.
— Eyes Cover (Yarn A, X2) :
Round 1 :
sc 6 into a magic loop (6)
Round 3 :
[sc 1, inc] 6x (18)
Round 4 :
[sc 5, inc] 3x (21)
Info :
Break the yarn with a long rest to sew later. Sew the eyes on the covers (pic 11), sew the eyes on the body (pic 12).
— Small Claw (Yarn A, X2) :
Round 1 :
sc 4 into a magic loop (4)
Round 2 :
sc 1, inc 2, sc 1 (6)
Round 3 :
sc 2, inc 2, sc 2 (8)
Round 4 :
sc 3, inc 2, sc 3 (10)
Round 5 :
sc 4, inc 2, sc 4 (12)
Round 6 :
sc 5, inc 2, sc 5 (14)
Round 7-8 :
sc 14 (2 rnds) (14)
Info :
Break the yarn with a long rest to sew later.
— Big Claw (Yarn A, X2) :
Round 1-6 :
Repeat rnd 1-6 of the Small Claw (14)
Round 7 :
sc 6, inc 2, sc 6 (16)
Round 8 :
sc 7, inc 2, sc 7 (18)
Round 9 :
sc 8, inc 2, sc 8 (20)
Round 10-11 :
sc 20 (2 rnds) (20)
Info :
Do not break the yarn, join with the Small Claw (pic 13) and continue to crochet the following rnds:
Round 12 :
sc 14 (on the small claw), sc 20 (on the big claw) (34)
Round 13 :
[sc 15, dec] 2x (32)
Round 14 :
[sc 7, dec, sc 7] 2x (30)
Round 15 :
[sc 3, dec] 6x, stuff firmly (24)
Round 16 :
[sc 2, dec] 6x (18)
Round 17 :
[sc 1, dec] 6x (12)
Round 18 :
[sc 2, dec] 3x (9)
Round 19-21 :
sc 9 (3 rnds) (9)
Info :
Break the yarn with a long rest to sew later. Make the 2nd pieces the same way (pic 14).
— Legs (Yarn A, X6) :
Round 1 :
sc 6 into a magic loop (6)
Round 2-5 :
sc 6 (4 rnds) (6)
Info :
Break the yarn with a long rest to sew later.
— Belly (Yarn C) :
Round 1 :
ch 7, start on the 2nd st from the hook, sc 5, (sc 3) on the last st, continue to crochet on the other side, sc 4, inc (14)
Round 2 :
inc, sc 4, inc 3, sc 4, inc 2 (20)
Round 3 :
sc 1, inc, sc 4, [sc 1, inc] 3x, sc 4, [sc 1, inc] 2x (26)
Round 4 :
sc 1, inc, sc 5, [sc 1, inc, sc 1] 3x, sc 4, [sc 1, inc, sc 1] 2x (32)
Round 5 :
sc 3, inc, sc 4, [sc 3, inc] 3x, sc 4, [sc 3, inc] 2x (38)
Round 6 :
sc 2, inc, sc 6, [sc 2, inc, sc 2] 3x, sc 4, [sc 2, inc, sc 2] 2x (44)
Round 7 :
sc 5, inc, sc 4, [sc 5, inc] 3x, sc 4, [sc 5, inc] 2x (50)
Round 8 :
sc 3, inc, sc 7, [sc 3, inc, sc 3] 3x, sc 4, [sc 3, inc, sc 3] 2x (56)
Info :
Break the yarn with a long rest to sew later. Sew the belly on the body (pic 16-17-18-19).
— Cheeks (Yarn C, X4) :
Round 1 :
sc 6 into a magic loop (6)
Info :
Break the yarn with a long rest to sew later. Sew the cheeks & 6 legs on the body (pic 20).
— Sea Shell (Yarn D) :
Round 1 :
sc 6 into a magic loop (6)
Round 2 :
(blo) [sc 1, inc] 3x (9)
Round 3 :
(blo) [sc 2, inc] 3x (12)
Round 4 :
(blo) [hdc 2, hdc inc] 4x (16)
Round 5 :
(blo) [hdc 3, hdc inc] 4x (20)
Round 6 :
(blo) [hdc 4, hdc inc] 4x (24)
Round 7 :
(blo) [dc 3, dc inc] 6x (30)
Round 8 :
(blo) [dc 2, dc inc, dc 2] 6x (36)
Info :
Break the yarn (pic 21), join yarn B on rnd 2, slst on the flo sts from rnd 2-8 (pic 22-23). Place 2 markers at the 34th st & the 5th st of rnd 8 on the shell (pic 24). Join yarn D on the marked st, crochet 28 chs and slst on the next 3 sts from the marked st (pic 25&26). Continue to crochet 28 chs on the other marked st, and slst on the next 3 sts from the marked st (pic 28).
— Crayons (Yarn D, X2) :
Round 1 :
sc 6 into a magic loop (6)
Round 3-6 :
sc 6 (4 rnds), change to yarn B (6)
Round 7 :
[sc 1, dec] 2x, break yarn B, change to yarn D (4)
Info :
Break the yarn, weave in the last 4 sts. Wear the shell on the crab. Put the crayons inside the shell. Put the crayons on the claws.
— TURTLE :
— Body (Yarn A) :
Round 1 :
sc 6 into a magic loop (6)
Round 2 :
[sc 1, (sc 3) on the next st] 3x (12)
Round 3 :
sc 2, (sc 3) on the next st, [sc 3, (sc 3) on the next st] 2x, sc 1 (18)
Round 4 :
sc 3, (sc 3) on the next st, [sc 5, (sc 3) on the next st] 2x, sc 2 (24)
Round 5 :
sc 4, (sc 3) on the next st, [sc 7, (sc 3) on the next st] 2x, sc 3 (30)
Round 6 :
sc 5, (sc 3) on the next st, [sc 9, (sc 3) on the next st] 2x, sc 4 (36)
Round 7 :
sc 6, (sc 3) on the next st, [sc 11, (sc 3) on the next st] 2x, sc 5 (42)
Round 8-16 :
sc 42 (9 rnds) (42)
Round 17 :
sc 3, [sc 2, dec, sc 2] 6x, sc 3 (36)
Round 18 :
sc 3, [sc 3, dec] 6x, sc 3, stuff firmly (30)
Round 19 :
sc 3, [sc 1, dec, sc 1] 6x, sc 3 (24)
Round 20 :
sc 3, [sc 1, dec] 6x, sc 3 (18)
Round 21 :
sc 3, dec 6, sc 3 (12)
Round 22-23 :
sc 12 (2 rnds) (12)
Round 24 :
sc 4, sc 4 blo, sc 4 (12)
Round 25 :
sc 2, sc 8 blo, sc 2 (pic 1) (12)
Round 26 :
sc 2, sc 2 in the flo of the next 2sts on rnd 25 (pic 2-3), sc 4 in the flo of the next 4sts on rnd 24, sc 2 in the flo of the next 2sts on rnd 25, sc 2 (pic 4) (leave the remaining sts inside, we will not crochet on these sts-pic 5) (12)
Round 27 :
inc 3, sc 6, inc 3 (18)
Round 28 :
[sc 1, inc] 3x, sc 6, [sc 1, inc] 3x (24)
Round 29 :
[sc 1, inc, sc 1] 3x, sc 6, [sc 1, inc, sc 1] 3x (30)
Round 30 :
[sc 3, inc] 3x, sc 6, [sc 3, inc] 3x (30)
Round 31 :
[sc 2, inc, sc 2] 3x, sc 6, [sc 2, inc, sc 2] 3x (36)
Round 32 :
[sc 5, inc] 3x, sc 6, [sc 5, inc] 3x (42)
Round 33-42 :
sc 48 (10 rnds) (48)
Round 43 :
[sc 6, dec] 6x (42)
Round 44 :
[sc 5, dec] 6x (36)
Round 45 :
[sc 4, dec] 6x (30)
Round 46 :
[sc 3, dec] 6x, stuff firmly (24)
Round 47 :
[sc 2, dec] 6x (18)
Round 48 :
[sc 1, dec] 6x (12)
Info :
Break the yarn, weave in the last 6 sts (pic 6).
— Shell (Yarn B) :
Round 1 :
sc 6 into a magic loop (6)
Round 3 :
[Dc Tr-Double Treble- it’s just like Treble st, but you yarn over 3 times -4 loops on the hook-pic 7&8, inc] 6x (18)
Round 4 :
[sc 1, inc, sc 1] 6x (24)
Round 5 :
[sc 2, Dc Tr, inc] 6x (30)
Round 6 :
[sc 2, inc, sc 2] 6x (36)
Round 7 :
[Dc Tr, sc 4, inc] 6x (42)
Round 8 :
[sc 3, inc, sc 3] 6x (48)
Round 9 :
[sc 4, Dc Tr, sc 2, inc] 6x (54)
Round 11 :
[Dc Tr, sc 8] 6x (54)
Round 13 :
sc 4, [Dc Tr, sc 8] 5x, Dc Tr, sc 4 (54)
Round 15 :
[Dc Tr, sc 8] 6x, break yarn B, change to yarn C (pic 10) (54)
Round 16 :
(flo) [sc 4, inc, sc 4] 6x (60)
Round 17 :
[sc 9, inc] 6x (66)
Round 18-19 :
sc 66 (2 rnds) (66)
Round 20 :
[sc 9, dec] 6x (60)
Round 21 :
[sc 4, dec, sc 4] 6x (pic 11) (54)
Info :
Do not break the yarn, slst 54 on the blo sts of rnd 16 (pic 12-13), stuffing firmly along crocheting (pic 14), hide the remaining yarn (pic 15-16). Wear the shell on the body (pic 17).
— Front Legs (Yarn A, X2) :
Round 1 :
sc 6 into a magic loop (6)
Round 3 :
[sc 1, inc] 6x (18)
Round 4 :
[sc 1, inc, sc 1] 6x (24)
Round 6 :
ch 1, fold the legs in half, crochet 2 edges together, sc 12 (12)
Info :
Break the yarn with a long rest to sew later.
— Behind Legs (Yarn A, X2) :
Round 1 :
sc 6 into a magic loop (6)
Round 3 :
[sc 1, inc] 6x (18)
Round 5 :
ch 1, fold the legs in half, crochet 2 edges together, sc 9 (9)
Info :
Break the yarn with a long rest to sew later. Sew 2 fronts legs & behind legs on the body (pic 18-19).
— Belly (Yarn D) :
Round 1 :
sc 6 into a magic loop (6)
Round 3 :
[sc 1, inc] 6x (18)
Round 4 :
[sc 1, inc, sc 1] 6x (24)
Round 5 :
[sc 3, inc] 6x (30)
Round 6 :
[sc 2, inc, sc 2] 6x (36)
Round 7 :
[sc 5, inc] 6x (42)
Info :
Break the yarn, sew the belly on the body (pic 20).
— Eyes (Yarn D, X2) :
Round 1 :
sc 5 into a magic loop (5)
Round 3 :
[sc 1, inc] 5x (15)
Round 4-5 :
sc 15 (2 rnds), break yarn D, change to yarn A, turn (pic 21) (15)
Round 6-7 :
sc 15 (2 rnds) (pic 22-23) (15)
Info :
Break the yarn with a long rest to sew later, fold the eyes as pic 24. Sew 2 eyes on the head (pic 25).
— Captain’s Hat (Yarn D) :
Round 1 :
sc 6 into a magic loop (6)
Round 2 :
[sc 1, inc] 3x (9)
Round 3 :
[sc 1, inc, sc 1] 3x (12)
Round 4 :
[sc 3, inc] 3x (15)
Round 5 :
[sc 2, inc, sc 2] 3x (18)
Round 6 :
[sc 5, inc] 3x, break yarn D, change to yarn E, turn (pic 26) (21)
Round 7 :
[sc 3, inc, sc 3] 3x (24)
Info :
Break the yarn with a long rest to sew later, fold the hat as pic 28. Sew the hat on the head (pic 29).
— Scarf (Yarn F) :
Round 1 :
sc 5 into a magic loop, ch 1, turn (5)
Round 2 :
(blo) (sc 3) on the 1st st, sc 1, (sc 3) on the next st, sc 1, (sc 3) on the last st, ch 1, turn (11)
Round 3 :
(blo) (sc 3) on the 1st st, sc 4, (sc 3) on the next st, sc 4, (sc 3) on the last st, ch 1, turn (17)
Round 4 :
(blo) (sc 3) on the 1st st, sc 7, (sc 3) on the next st, sc 7, (sc 3) on the last st, ch 1, turn (23)
Round 5 :
(blo) (sc 3) on the 1st st, sc 10, (sc 3) on the next st, sc 10, (sc 3) on the last st, ch 1, turn (30)
Round 6 :
(blo) (sc 3) on the 1st st, sc 13, (sc 3) on the next st, sc 13, (sc 3) on the last st, ch 1, turn (36)
Info :
Break the yarn (pic 30), crochet 26 chs, start on the 2nd st from the hook, slst 25, join with the scarf (pic 31), continue to crochet sc across the scarf (pic 32), ch 26, start on the 2nd st from the hook, slst 25, break the yarn, hide the remaining yarn (pic 33). Join yarn D on the 6th rnd of the scarf (pic 34), slst 36, break the yarn, hide the remaining yarn, wrong side: pic 35, right side: pic 36.
— Fishes (any color you like, X3) :
Round 1 :
ch 6, start on the 2nd st from the hook, sc, hdc, (dc 2), hdc, sc on the last st, [ch 4, start on the 3rd st from the hook, (hdc 2), slst on the next st, slst on the last st of the 6 chs] 2x, continue to crochet on the opposite side, sc, hdc, (dc 2), hdc, sc
Info :
Break the yarn, hide the remaining yarn. Wear the scarf for the turtle. Sew the fishes on the shell, we have finished the Captain Turtle!
These aquatic friends are ready to splash into your heart! 🌊
With their quirky costumes and charming details, they make the perfect handmade gift set.
Grab your hook and let's dive in! 🧶💙