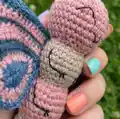
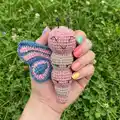
Create a sweet, handcrafted butterfly amigurumi you will love to make and gift. This pattern guides you through making the body, wings, and antennae with clear steps and helpful finishing notes. Designed with Lion Brand Wool-Ease, it produces a cuddly 7 in (18 cm) tall butterfly with delightful color stripes. Perfect for gifting, nursery decor, or a fun pocket-sized project.
Progress Tracker
0% Complete
— Notes :
Infos :
1. Butterfly is worked in 5 pieces: Body, 2 Wings, and 2 Antennae. Pieces are sewn together. 2. Body is worked in continuous rnds (spiral) from the head downwards in 5 sections. Do not join first st of rnds to last st with a sl st. Do not turn at the beg of rnds. Body sections are worked with different yarn colors. 3. Each Wing is made from 2 panels that are crocheted together. Wing panels are made in 2 sections. The lower section is worked in 3 joined rnds. Do not turn at beg of rnds. Join last st of each rnd to first st with a sl st. Work first st of each rnd into the same (first) st as the joining sl st. The upper section is worked back and forth in rows. 4. To change yarn color and join at end of a rnd, insert hook in first sc, yarn over with new color and draw through all loops on hook to complete joining sl st. Fasten off old color. Proceed with new color. 5. To change yarn color at the end of a row or continuous (spiral) rnd, work last st of old color to last yarn over. Yarn over with new color and draw through all loops on hook to complete st. Fasten off old color. Proceed with new color. 6. Exact gauge is not essential for this project. We worked tightly with a small hook so that stuffing wouldn't show through.
Info :
SAFETY NOTE: If Butterfly is intended for a baby or child, be certain that all pieces have been very securely sewn together. Don't leave a baby or child unattended with the Butterfly!
— Body :
Info :
First Section (Head) With larger hook and A, make a magic ring.
Round 1 :
(RS) Work 8 sc in ring; do not join, work in continuous rnds (spiral). (8)
Info :
Gently but firmly, pull tail to tighten center of ring. Place a marker in last st made to indicate end of rnd. Move marker up as each rnd is completed.
Round 2 :
Work 2 sc in each st around – you will have 16 sc in this rnd. (16)
Round 3 :
* Sc in next st, 2 sc in next st; rep from * around – 24 sc. (24)
Round 4 :
* Sc in next 2 sts, 2 sc in next st; rep from * around – 32 sc. (32)
Round 5-10 :
Sc in each st around. (32)
Round 11 :
* Sc in next 2 sts, sc2tog; rep from * around – 24 sc. (24)
Round 12 :
* Sc in next st, sc2tog; rep from * around; change to B in last st – 16 sc. (16)
Infos :
Second Section With B, working in front loops only.
Round 13 :
With B, working in front loops only, * sc in next st, 2 sc in next st; rep from * around – 24 sc. (24)
Info :
Begin stuffing piece and continue stuffing until piece is complete.
Round 14 :
* Sc in next 3 sts, 2 sc in next st; rep from * around – 30 sc. (30)
Round 15-18 :
Sc in each st around. (30)
Round 19 :
* Sc in next st, sc2tog; rep from * around – 20 sc. (20)
Round 20 :
* Sc in next 3 sts, sc2tog; rep from * around; change to A in last st – 16 sc. (16)
Infos :
Third Section With A, working in front loops only.
Round 21 :
With A, working in front loops only, * sc in next st, 2 sc in next st; rep from * around – 24 sc. (24)
Round 22 :
* Sc in next 5 sts, 2 sc in next st; rep from * around – 28 sc. (28)
Round 23-25 :
Sc in each st around. (28)
Round 26 :
* Sc in next 2 sts, sc2tog; rep from * around – 21 sc. (21)
Round 27 :
* Sc in next st, sc2tog; rep from * around; change to B in last st – 14 sc. (14)
Infos :
Fourth Section With B, working in front loops only.
Round 28 :
With B, working in front loops only, * sc in next st, 2 sc in next st; rep from * around – 21 sc. (21)
Round 29-31 :
Sc in each st around. (21)
Round 32 :
* Sc in next st, sc2tog; rep from * around – 14 sc. (14)
Round 33 :
* Sc2tog; rep from * around; change to A in last st – 7 sc. (7)
Infos :
Fifth Section With A, working in front loops only.
Round 34 :
With A, working in front loops only, 2 sc in each st around – 14 sc. (14)
Round 35 and 36 :
Sc in each st around. (14)
Round 37 :
* Sc2tog; rep from * around – 7 sc. (7)
Info :
Fasten off, leaving a long yarn tail. Thread tail through top of sts of last rnd. Pull tail to close opening and knot securely.
— Wings :
Info :
Make 2 panels per Wing (Panel I and Panel II). Each panel has a Lower Section worked in joined rnds and an Upper Section worked back and forth in rows.
Panel I Lower Section - Round 1 :
With larger hook and C, ch 8. Sc in 2nd ch from hook, sc in next 2 ch, hdc in next ch, (hdc, dc) in next ch, 2 dc in next ch, 4 dc in next ch; working along opposite side of beg ch-8, 2 dc in next ch, (dc, hdc) in next ch, hdc in next ch, sc in next 3 ch; join with sl st in first sc and change to A – 20 sts. (20)
Panel I Lower Section - Round 2 :
With A, do NOT turn, sc in same st as joining sl st, sc in next 3 sts, hdc in next 2 sts, 2 hdc in next st, 2 dc in next st, dc in next st, 2 dc in each of next 2 sts, dc in next st, 2 dc in next st, 2 hdc in next st, hdc in next 2 sts, sc in last 4 sts; join with sl st in first sc and change to C – 26 sts. (26)
Panel I Lower Section - Round 3 :
With C, do NOT turn, sc in same st as joining sl st, sc in next 8 sts, 2 sc in next st, hdc in next st, 2 dc in each of next 4 sts, hdc in next st, 2 sc in next st, sc in last 9 sts; join with sl st in first sc – 32 sts. Do not fasten off. (32)
Panel I Upper Section - Row 1 :
Work back and forth in rows. Do NOT turn before working Row 1. Row 1 of panel I is worked with front (RS) of lower section facing you. With C, do NOT turn, sc in same st as joining sl st, sc in next 4 sts, hdc in next 3 sts, 2 hdc in next st, 2 dc in each of next 3 sts and change to A in last st; leave remaining sts unworked – 16 sts. (16)
Panel I Upper Section - Row 2 :
With A, ch 2 (does not count as a st), TURN, 2 dc in first st, dc in next 5 sts, hdc in next 5 sts, sc in next 5 sts and change to C in last st – 17 sts. (17)
Panel I Upper Section - Row 3 :
With C, ch 1, TURN, sc in first 10 sts, hdc in next 3 sts, dc in next 3 sts, 2 dc in next st and change to A in last st – 18 sts. (18)
Panel I Upper Section - Row 4 :
With A, ch 2 (does not count as a st), TURN, dc2tog, dc in next 3 sts, hdc in next 3 sts, sc in next 10 sts and change to C in last st – 17 sts. (17)
Panel I Upper Section - Row 5 :
With C, ch 1, TURN, sc in first 10 sts, hdc in next 3 sts, dc in next 2 sts, dc2tog – 16 sts. Fasten off. (16)
Panel II Lower Section :
Work same as lower section of Panel I. Do not fasten off. (See Panel I Lower Section rounds above)
Panel II Upper Section :
Work back and forth in rows. TURN at the beg of Row 1. Row 1 of Panel II is worked with back (WS) of lower section facing you. Rows 1-5: Work same as Rows 1-5 of upper section of Panel I, except beg Row 1 with WS of lower section facing you. Rows 1, 3, and 5 will be worked with WS of lower section facing you and Rows 2 and 4 will be worked with RS of lower section facing you. Do not fasten off.
— Join Panels :
Info :
Hold panels I and II together with sts and rows matching. Working through both thicknesses, sl st evenly spaced all the way around outer edges of Wing; join with sl st in first sl st. Fasten off. Rep to make second Wing.
— Antennae :
Info :
Make 2. With smaller hook and black embroidery floss of cotton crochet thread, make a magic ring.
Round 1 :
Work 6 sc in ring. Gently but firmly, pull tail to tighten center of ring and then ch 8. Fasten off, leaving a long tail for sewing Antennae to Body. Rep to make second Antenna. (6)
— Finishing :
Info :
Using photograph as a guide and yarn tails still attached to pieces whenever possible, assemble the Butterfly as follows:
Instruction :
Sew Wings to back of Body, between Rnds 12 and 19, and about 6 sts apart.
Instruction :
With black embroidery floss or cotton crochet thread, embroider straight st eyes between Rnds 5 and 8, about 4 sts apart. Embroider mouth below eyes.
Instruction :
With black embroidery floss or cotton crochet thread, embroider 2 straight st legs between Rnds 14 and 19, and 2 legs between Rnds 21 and 26.
Instruction :
With yarn tails, sew Antennae to top of head between Rnds 1 and 2.
Instruction :
Weave in ends.
— Abbreviations :
Infos :
beg = begin(ninig). ch = chain. dc = double crochet. hdc = half double crochet. rep = repeat. rnd(s) = round(s). RS = right side. sc = single crochet. sl st = slip stitch. st(s) = stitch(es). WS = wrong side.
Ava the Butterfly is a sweet little amigurumi that makes a perfect handmade gift for children or nursery decor. The pattern uses simple shaping and panel construction to create lovely layered wings and a chunky segmented body. Make one today and enjoy the bright smiles it brings! 🧶🦋