🧢 Beautiful ✨ Detailed πŸ’ Adorable

Baby Bear Vest Amigurumi Pattern

Baby Bear Vest Amigurumi Pattern
3.9β˜… Rating
5-7 Hours Time Needed
1.7K Made This
βœ‚οΈ

Intermediate Level

Ideal for those with basic crochet experience, featuring slightly more advanced stitches and techniques to expand your skills.

⏱️

Weekend Treat

Takes 5-7 hours, making it an enjoyable project to finish over a couple of days.

πŸ§₯

Layered Comfort

Perfect for cozy, stylish layering through changing seasons with versatile, mix-and-match potential.

About This Baby Bear Vest Amigurumi Pattern

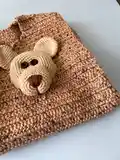
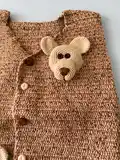
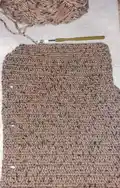
This pattern creates a snug baby vest sized for 12-18 months with an adorable bear head applique sewn to the front. You will crochet two front panels and a back panel in single crochet rows and make small amigurumi pieces for the bear head, ears and nose. The finished vest combines texture and small toy-making skills for a special handmade gift.

Baby Bear Vest Amigurumi Pattern crochet pattern - detailed view of completed project

Detailed round-by-round instructions are included for each piece, with materials and abbreviations listed for clarity. The pattern uses a 2.5 mm hook (or one that suits your yarn) and simple shaping to achieve the finished look.

Why You'll Love This Baby Bear Vest Amigurumi Pattern

I absolutely love this pattern because it blends practical baby clothing with a sweet toy-like applique that children adore. I enjoy making garments that feel special, and the little bear head brings personality and charm to an otherwise simple vest. The construction is satisfying β€” straight rows for the body and small amigurumi techniques for the bear β€” so you get quick wins and a cute finish. It is also versatile: you can change colors or button placement to create different looks and gifts.

Baby Bear Vest Amigurumi Pattern step 1 - construction progress Baby Bear Vest Amigurumi Pattern step 2 - assembly progress Baby Bear Vest Amigurumi Pattern step 3 - details and accessories Baby Bear Vest Amigurumi Pattern step 4 - final assembly and finishing

Switch Things Up

I love adapting this pattern by changing the colors to suit the child or nursery decor, swapping the Light Brown for pastels or bright tones.

I sometimes make the vest larger by using thicker yarn and a larger hook to convert it into a toddler or child size version.

I like to replace the buttons used for eyes with safety eyes or embroidered eyes for a softer, baby-safe finish.

To create a mini keychain version, I use thinner yarn and a smaller hook and only make the bear head, skipping the vest.

I often add small crocheted accessories like a tiny bow or scarf to the bear for seasonal or gender-neutral details.

If I want a reversible effect, I crochet both sides using alternate color panels and sew them together for a two-tone vest.

I sometimes embroider small facial expressions to change the bear's personality and make each piece unique.

For texture variety, I experiment with different stitches for the vest body while keeping the bear pieces in single crochet to maintain proportions.

I recommend testing a small gauge swatch when changing yarn weight so the bear head and vest proportions remain balanced.

Finally, I encourage trying different button placements and numbers for the front closure to achieve the look and fit you prefer.

Common Mistakes & How to Fix Them

βœ— Skipping the stitch counts when following the row reductions will make the vest asymmetrical; always check the stitch totals listed in parentheses after each round to confirm accuracy.
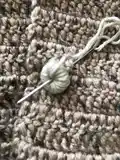
 βœ— Not leaving a long thread to sew the amigurumi pieces causes difficulty when attaching them later; leave a generous tail at the end of finishing rounds specifically for sewing and assembly. βœ— Overstuffing the bear head or nose makes shaping difficult and can distort the applique; stuff gradually and lightly, adding small amounts until the shape matches the photos. βœ— Failing to straighten and flatten ears before finishing will make them bulky when sewn; follow the instruction to "Straighten it. sink the needle into both layers" and shape before fastening off. βœ— Not using a hook size that matches the yarn can change gauge and finished size; use the recommended 2.5 mm hook or adjust hook size to match the yarn and check the look as you go.

Baby Bear Vest Amigurumi Pattern

This cozy baby vest pattern combines wearable warmth with a charming crocheted bear applique to create a delightful handmade piece for little ones. You will work simple single crochet rows for the vest and small amigurumi-style pieces for the bear head, ears and nose. The pattern includes complete round-by-round instructions and clear finishing notes so you can reproduce the exact look shown in the photos.

Intermediate 5-7 Hours

Materials Needed for Baby Bear Vest Amigurumi Pattern

β€” Main Fabric

  • 01
    Yarn - main yarn for vest and bear (type not specified)
  • 02
    Main Color: Light Brown & Dark Brown Mixed
  • 03
    A: Light Brown (for bear pieces and details)
  • 04
    Small quantities of Dark Brown for nose and facial detail

β€” Tools Required

  • 01
    Crochet hook size 2.5mm (or a size that fits your yarn)
  • 02
    Scissors
  • 03
    Stuffing (polyester fiberfill)
  • 04
    Tapestry needle
  • 05
    Stitch marker
  • 06
    Pins
  • 07
    Buttons for eyes (2)

Progress Tracker

0% Complete

β€” Front :

Info :

MAIN COLOR - make 2

Round 1-46 :

ch turn

Round 2-45 :

ch into sc(45 sc)1 ch turn

Round 3-7 :

-(5 times)sc into sc(45)1 ch turn

Round 8-9 :

sc into cr next inc(50 cr)2 ch turn

Round 9-35 :

-(27 times) cr into cr(50)2 ch turn

Round 36-45 :

cr into cr 2 ch turn

Round 37-43 :

-(7 times)cr into cr(45)2 ch turn

Round 44-44 :

cr into sc 1 ch turn

Round 45 :

-sc into sc 1 ch turn

Round 46-43 :

sc into sc 1 ch turn

Round 47 :

-sc into sc(43)

Round 48-42 :

sc into sc 1 ch turn

Round 49 :

-sc into sc(42)

Round 50-41 :

sc into sc 1 ch turn

Round 51 :

-sc into sc(41)

Round 52-40 :

sc into sc 1 ch turn

Round 53 :

-sc into sc(40)

Round 54-39 :

sc into sc 1 ch turn

Round 55 :

-sc into sc(39)

Round 56-38 :

sc into sc 1 ch turn

Round 57 :

-sc into sc(38)

Round 58-37 :

sc into sc 1 ch turn

Round 59 :

-sc into sc(37)

Round 60-36 :

sc into sc 1 ch turn

Round 61 :

-sc into sc(36)

Round 62-35 :

sc into sc 1 ch turn

Round 63 :

-sc into sc(35)

Round 63-34 :

sc into sc 1 ch turn

Round 64 :

-sc into sc(34)

Round 65-33 :

sc into sc 1 ch turn

Round 66 :

-sc into sc(33)

Round 67-32 :

sc into sc 1 ch turn

Round 68 :

-sc into sc(32)

Round 69-31 :

sc into sc 1 ch turn

Round 70 :

-sc into sc(31)

Round 71-30 :

sc into sc 1 ch turn

Round 72 :

-sc into sc(30)

Round 73-29 :

sc into sc 1 ch turn

Round 74 :

-sc into sc(29)

Round 75-28 :

sc into sc 1 ch turn

Round 76 :

-sc into sc(28)

Round 77-27 :

sc into sc 1 ch turn

Round 78 :

-sc into sc(27)

Round 79-26 :

sc into sc 1 ch turn

Round 80 :

-sc into sc(26)

Round 81-25 :

sc into sc 1 ch turn

Round 82 :

-sc into sc(25)1 ch turn

Round 83-24 :

sc into sc 1 ch turn

Round 84-22 :

sc into cr(22 cr)

Round 85-88 :

-(4 ring)cr into cr fo.

β€” Back :

Round 1-81 :

ch.turn

Round 2-80 :

ch into sc 1 ch turn

Round 3-7 :

-(5 times)sc into sc(80)1 ch turn

Round 8-37 :

-(30 times)cr into cr(80)2 ch turn

Round 39-4 :

cr into sc 72 cr into cr(72)2 ch turn

Round 40-56 :

-(17 times)cr into cr(72)2 ch turn

Round 57-58 :

-(2 times)22 cr into cr 2 ch turn fo.

β€” Bear - head :

Info :

A COLOR

Round 1-6 :

sc in a mr

Round 2-6 :

sc inc(12)

Round 3 :

-(6 times)1 sc into sc next inc(18)

Round 4 :

-(6 times)2 sc into sc next inc(24)

Round 5 :

-(6 times)3 sc into sc next inc(30)

Round 6 :

-(6 times)4 sc into sc next inc(36)

Round 7 :

-(6 times)5 sc into sc next inc(42)

Round 8 :

-(6 times)6 sc into sc next inc(48)

Round 9-13 :

-(5 ring)sc into sc(48)fo.Leave a long thread end to sew.

β€” Bear - ears :

Info :

A COLOR - make 2

Round 1-6 :

sc in a mr

Round 2-6 :

sc inc(12)

Round 3 :

-(6 times)1 sc into sc next inc(18)

Round 4 :

-(6 times)2 sc into sc next inc(24)

Round 5-10 :

-(6 ring)sc into sc(24)

Round 11 :

Straighten it. sink the needle into both layers. 11 sc fo.

Info :

Leave a long thread end to sew.

β€” Bear - nose :

Info :

A COLOR - make 2

Round 1-6 :

sc in a mr

Round 2-6 :

sc inc(12)

Round 3 :

-(6 times)1 sc into sc next inc(18)

Round 4 :

-(6 times)2 sc into sc next inc(24)

Round 5 :

-(6 times)3 sc into sc next inc(30)

Round 6-9 :

-(4 ring)sc into sc(30)fo.Fill the nose.

Info :

Leave a long thread end to sew.

Assembly Instructions

  • Leave a long thread end to sew (Head): After completing Rnd 9-13 on the head, leave a long thread end to sew the head to the vest.
  • Ears finishing and joining: Straighten it, sink the needle into both layers, make 11 sc and fasten off; leave a long thread end to sew the ears in place.
  • Nose finishing: Fill the nose (after Rnd 6-9), fasten off and leave a long thread end to sew the nose to the head.
  • Make two front pieces: The pattern instructs MAIN COLOR - make 2 for the front pieces; complete both fronts and join them with the back according to your preferred seaming method.

Important Notes

  • πŸ’‘Use a 2.5 mm hook or a size that fits your yarn to keep the small amigurumi pieces neat and proportionate.
  • πŸ’‘Leave long thread ends on the head, ears and nose to simplify sewing and secure attachment to the vest.
  • πŸ’‘Straighten and flatten ear pieces before finishing and sink the needle into both layers to shape them for a tidy appearance.

This charming baby bear vest is handmade with love and thoughtful details to delight little ones and their families. The textured vest and small amigurumi bear applique make it a memorable gift or heirloom piece. Enjoy creating this cozy layered essential and make it your own with color or button variations. 🧢🧸

You ask,

we answer.

FAQs

What size will the finished piece be?

The finished vest is sized for 12/18 months and measures approximately 18-19 inches (45-48 cm) across the longest measurement as noted in the pattern.

Can I use different yarn weights for this pattern?

Yes, you can use different yarn weights, but this will change the finished size. Use an appropriate hook for your chosen yarn and adjust to keep proportions for the amigurumi bear pieces.

Do I need prior crochet experience for this pattern?

This pattern is rated intermediate, so familiarity with single crochet, increasing, decreasing, working in magic ring and basic amigurumi techniques is recommended for best results.

How long does this project typically take to complete?

Most crocheters complete this vest and bear applique in about 5-7 hours, though time may vary depending on experience and working speed.