🧢 Beautiful ✨ Detailed πŸ’ Adorable

Baby Deer Amigurumi Pattern

Baby Deer Amigurumi Pattern
4.2β˜… Rating
5-7 Hours Time Needed
4.1K Made This
βœ‚οΈ

Intermediate Level

Ideal for those with basic crochet experience, featuring slightly more advanced stitches and techniques to expand your skills.

⏱️

Weekend Treat

Takes 5-7 hours, making it an enjoyable project to finish over a couple of days.

🧸

Cute Companion

An adorable friend to cherish, handcrafted with love to bring comfort and joy for years to come.

About This Baby Deer Amigurumi Pattern

This pattern creates a small, adorable baby deer amigurumi with a red sweater, tiny antlers and embroidered details. You will crochet the main body/head in the round with color changes, then make arms, ears, nose and horns separately. The instructions include exact rounds, placement notes and simple finishing tips to help you assemble a neat, durable toy.

Baby Deer Amigurumi Pattern crochet pattern - detailed view of completed project

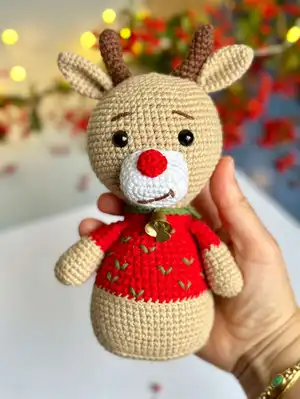
Designed to finish at approximately 15 cm using the same yarn and hook listed, this pattern is detailed and photo-assisted. It uses common amigurumi techniques like magic ring, single crochet increases and decreases.

Why You'll Love This Baby Deer Amigurumi Pattern

I absolutely love this pattern because it combines classic amigurumi shaping with a playful sweater detail that really brings the character to life. I enjoy the way the color changes add a cozy personality to the piece and how small embroidered stitches turn a simple toy into something special. The shaping rounds give a satisfying progression from base to head that feels rewarding to complete. I also love that the finished deer is compact and gift-ready, making it easy to share handmade joy with friends and family.

Baby Deer Amigurumi Pattern step 1 - construction progress Baby Deer Amigurumi Pattern step 2 - assembly progress Baby Deer Amigurumi Pattern step 3 - details and accessories Baby Deer Amigurumi Pattern step 4 - final assembly and finishing

Switch Things Up

I love how easy it is to customize this pattern with color choices; try pastel shades for a softer, nursery-friendly deer or classic brown tones for a realistic look.

I often change the sweater color and add tiny stripes or polka dots by working simple color-changes in the rounds.

You can make the deer larger or smaller by switching yarn weight and hook size; bulky yarn with a larger hook creates a plush version while finer yarn makes a mini keychain-sized friend.

I sometimes replace safety eyes with embroidered eyes for a fully child-safe toy, or use 6 mm eyes for a subtler expression.

Try embroidering different mouth and eyebrow shapes to give unique personalities β€” a small smile, surprised look, or sleepy face all work well.

I like to add a tiny bell, scarf, or crocheted props like a miniature star or heart to personalize each finished piece.

If you want posability, add a short length of wire inside each arm before stuffing so you can bend the arms slightly for poses.

For a festive version, embroider little V-shaped holly leaves with green yarn and add a tiny bead for berries to the sweater design.

I sometimes crochet a removable sweater by leaving the body top open and making a fastened collar so the deer can have interchangeable outfits.

Don’t be afraid to experiment with facial placement; moving the eyes up or down a row changes the character dramatically, so pin pieces in place before sewing to find the perfect look.

Common Mistakes & How to Fix Them

βœ— Skipping stuffing as you go can make shaping difficult later; stuff each section gradually while crocheting to maintain the desired form. βœ— Forgetting to change colors exactly where indicated will create visible transitions; follow the change color notes and secure yarn ends neatly to avoid gaps. βœ— Not counting stitches after increases and decreases leads to uneven shaping; count every round, especially after shaping rounds like (8 sc, dec) repeats. βœ— Placing eyes without checking row placement can alter the face expression; attach eyes between rows 43 and 44 and space them 9 stitches apart as instructed.

Baby Deer Amigurumi Pattern

Make a charming baby deer amigurumi with this complete step-by-step crochet pattern. You will create a cuddly little deer with a red sweater, tiny antlers, ears and a sweet embroidered face. The pattern includes full rounds, color changes and assembly guidance so you can follow along easily. Perfect as a handmade gift or a cozy decoration for the holidays.

Intermediate 5-7 Hours

Materials Needed for Baby Deer Amigurumi Pattern

β€” Main Fabric

  • 01
    Beige yarn (YarnArt Jeans or similar) - quantity sufficient for body and head (approx 50-100g depending on size)
  • 02
    White yarn - small amount for nose/muzzle
  • 03
    Brown yarn - small amount for horns and eyebrow details
  • 04
    Green yarn - small amount for embroidered sweater details
  • 05
    Red yarn - amount for sweater and small nose detail
  • 06
    YarnArt Jeans brand yarn was used in the project (recommended)

β€” Tools Required

  • 01
    Crochet hook size 1.80-2.00 mm
  • 02
    Needle (sewing/embroidery needle)
  • 03
    Fiberfill stuffing
  • 04
    8 mm safety eyes (2 pieces)
  • 05
    Little bell

Progress Tracker

0% Complete

β€” Body :

Round 1 :

15 ch, starking from 2nd ch inc, 12 sc, 3 sc in 1 stitch (work on the other side of tihe chain) 13 sc. (30)

Round 2 :

2 inc, 12 sc, 3 inc, 12 sc, inc. (36)

Round 3 :

(sc, inc) 2 times, 13 sc, (inc, inc) 3 times, 12 sc, inc. (42)

Round 4 :

(2 sc, inc) 2 times, 14 sc, (inc, 2 sc) 3 times,12 sc, inc. (48)

Round 5 :

BLO sc around. (48)

Round 6 :

sc around. (48)

Round 7 :

(7 sc, inc) 6 times. (54)

Round 8-13 :

sc around. (54)

Info :

change color (red)

Round 14 :

sc around. (54)

Round 15 :

(7 sc, dec) 6 times. (48)

Round 16-17 :

sc around. (48)

Round 18 :

(6 sc,dec) 6 times. (42)

Round 19-20 :

sc around. (42)

Round 21 :

(5 sc, dec) 6 times. (36)

Round 22-23 :

sc around. (36)

Round 24 :

(4 sc, dec) 6 times. (30)

Round 25-26 :

sc around. (30)

Round 27 :

(3 sc, dec) 6 times. (24)

Round 28-29 :

sc around. (24)

Info :

change color (beige)

Round 30 :

(3sc, inc) 6 times. (30)

Round 31 :

(4 sc, inc) 6 times.(36)

Round 32 :

(5 sc, inc) 6 times.(42)

Round 33 :

(6 sc,inc) 6 times. (48)

Round 34 :

(7 sc,inc) 6 times. (54)

Round 35 :

(8 sc,inc) 6 times. (60)

Round 36-48 :

sc around. (60)

Info :

Attach the eyes to the 43rd and 44th rows, 9 stitches apart.

Round 49 :

(8 sc,dec) 6 times. (54)

Round 50 :

(7 sc,dec) 6 times. (48)

Round 51 :

(6 sc,dec) 6 times.(42)

Round 52 :

(5 sc,dec) 6 times.(36)

Round 53 :

(4 sc,dec) 6 times. (30)

Round 54 :

(3 sc,dec) 6 times. (24)

Round 55 :

(2 sc,dec) 6 times. (18)

Round 56 :

(sc,dec) 6 times. (12)

Round 57 :

(dec) 6 times.

β€” Arms :

Info :

Start with beige color.

Round 1 :

6 sc into a magic ring. (6)

Round 2 :

(inc) 6 times. (12)

Round 3 :

(sc,inc) 6 times. (18)

Round 4 :

BLO sc around. (18)

Round 5-7 :

sc around. (18)

Round 8 :

(4 sc,dec) 3 times. (15)

Round 9-10 :

sc around. (15)

Info :

change color (red)

Round 11 :

sc around. (15)

Round 12 :

(3 sc,dec) (12)

Info :

Crochet the two edges together at the same time.

β€” Ears :

Info :

Start with beige color.

Round 1 :

6 sc into a magic ring. (6)

Round 2 :

(sc,inc) 3 times. (9)

Round 3 :

sc around. (9)

Round 4 :

(2 sc,inc) 3 times. (12)

Round 5 :

sc around. (12)

Round 6 :

(3 sc,inc) 3 times. (15)

Round 7-12 :

sc around. (15)

Info :

Crochet the two edges together at the same time.

β€” Nose :

Info :

Start whit white color.

Round 1 :

1. 6 ch, starking from 2nd ch inc, 3 sc, 3 sc in 1 stitch (work on the other side of tihe chain) 4 sc . (12)

Round 2 :

2 inc, 3 sc,3 inc, 3 sc, inc. (18)

Round 3 :

( sc, inc) 2 times, 4 sc, (inc) 3 times, 3 sc, inc. (24)

Round 4 :

BLO sc. (24)

Round 5-7 :

sc around. (24)

Red nose (P1) :

Round 1.6 sc into q magic ring. (6) Round 2. (inc) 6 times.

β€” Horns :

Info :

Start with brown color.

Round 1 :

6 sc into a magic ring.(6)

Round 2 :

(sc, inc) 3 times. (9)

Round 3-5 :

sc around. (9)

Round 6 :

10. 3 sc, inc, 4 sc, dec. (9)

β€” Assembly :

Info :

Plant the antlers between rows 53 and 55.

Info :

Sew the ears between rows 50 and 51.

Info :

Sew the sleeves between rows 25 and 26.

Info :

Sew the nose between rows 32 and 39.

Assembly Instructions

  • Attach the eyes to the head: place the eyes between rows 43 and 44, spaced 9 stitches apart, and secure them firmly.
  • Sew the ears between rows 50 and 51 on top sides of the head, ensuring symmetry and even spacing on both sides.
  • Plant (attach) the antlers between rows 53 and 55 and stitch them securely so they stand upright.
  • Sew the sleeves (arms) to the body between rows 25 and 26, positioning them slightly forward for a natural pose.
  • Sew the white nose/muzzle between rows 32 and 39, then attach the small red nose centered on the muzzle and embroider the mouth.

Important Notes

  • πŸ’‘Remember to fill in the pieces as you go to achieve consistent shaping and avoid lumps in the finished toy.
  • πŸ’‘The size of the doll will vary depending on the yarn used; using the same yarn listed will produce an approximate finished size of 15 cm.
  • πŸ’‘Follow color change notes carefully to keep sweater transitions neat and weave in ends securely after finishing each color section.

This sweet Baby Deer amigurumi pattern is full of personality and handmade charm. Create a delightful little friend with a cozy red sweater and tiny antlers that make the perfect gift. Enjoy the satisfying shaping and fun details as you crochet your own cuddly deer. 🧢🧡

You ask,

we answer.

FAQs

What size will the finished piece be?

The finished amigurumi measures approximately 15 cm tall when using the recommended yarn (YarnArt Jeans) and a 1.8-2.0 mm hook.

Can I use different yarn weights for this pattern?

Yes, you can use different yarn weights, but this will affect the final size; use an appropriate hook for your chosen yarn and expect the finished measurements to change.

Do I need prior crochet experience for this pattern?

This pattern is rated intermediate, so basic knowledge of amigurumi techniques, magic ring, increases and decreases is recommended for best results.

How long does this project typically take to complete?

Most crocheters complete this project in 5-7 hours, depending on experience and pace, including assembly and embroidery details.