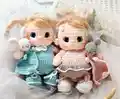
Create these adorable twin baby dolls with a complete wardrobe and accessories! This comprehensive pattern includes instructions for the 19cm doll, plus a diaper, bodysuit, booties, cocoon, hat, headband, and even a tiny bunny comforter. Perfect for gifting or keeping as a treasured set, these dolls feature sculpted faces and sweet embroidered details.
Progress Tracker
0% Complete
— Legs (Make 2) :
Round 1 :
6 sc in a magic ring (6)
Round 2 :
6 increases (12)
Round 3 :
(1 sc, increase) x 6 (18)
Round 5 :
3 sc, 6 decreases, 3 sc (12)
Round 6 :
(1 sc, decrease) x 4 (8)
Info :
Stuff lower part of the leg, do not stuff top part.
Rounds 7-10 :
8 sc (4 rounds)
Info :
Crochet 1 sc to shift, put the work together and crochet 4 sc through the stitches of both sides. Cut and fasten off the yarn.
— Arms (Make 2) :
Round 1 :
6 sc in a magic ring (6)
Round 2 :
(1 sc, increase) x 3 (9)
Round 4 :
(1 sc, decrease) x 3 (6)
Rounds 5-9 :
6 sc (5 rounds)
Info :
Do not stuff. Put the work together and crochet 3 sc through the stitches of both sides. Cut and fasten off.
— Body :
Round 1 :
Make ch6, crochet from the 2nd stitch from hook: increase, 3 sc, 4 sc into one stitch, continue into unused loops on opposite side: 3 sc, increase (14)
Round 2 :
2 increases, 3 sc, 4 increases, 3 sc, 2 increases (22)
Round 3 :
(1 sc, increase) x 2, 3 sc, (1 sc, increase) x 4, 3 sc, (1 sc, increase) x 2 (30)
Info :
Connect the legs and body in the next round.
Round 5 :
Place the leg and crochet 4 sc through the stitches of the leg and the body simultaneously, 8 sc (the belly), crochet 4 sc through the stitches of the 2nd leg and the body simultaneously, 14 sc (30)
Rounds 6-7 :
30 sc (2 rounds)
Round 8 :
18 sc, (decrease, 1 sc) x 4 (26)
Rounds 9-10 :
26 sc (2 rounds)
Round 11 :
2 sc, (1 sc, decrease) x 4, 12 sc (22)
Round 12 :
(3 sc, decrease) x 2, (4 sc, decrease) x 2 (18)
Info :
Connect the arms and body in the next round.
Round 13 :
1 sc, crochet 3 sc through the stitches of the arm and body simultaneously, 4 sc, crochet 3 sc through the stitches of the 2nd arm and body simultaneously, 7 sc (18)
Round 14 :
17 sc, do not finish last stitch (start next round from the 18th stitch, shift marker one stitch back) (17)
Info :
Stuff the body, continue making the head.
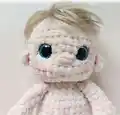
— Head :
Round 15 :
5 increases, 4 sc, 5 increases, 4 sc (28)
Round 16 :
1 sc, (1 sc, increase) x 4, 5 sc, (increase, 1 sc) x 4, 6 sc (36)
Rounds 17-25 :
36 sc (9 rounds)
Info :
Install eyes between Rounds 21 and 22 with 6 stitches distance between them.
Round 26 :
3 sc, (1 sc, decrease) x 4, 5 sc, (1 sc, decrease) x 4, 4 sc (28)
Round 27 :
3 sc, 4 decreases, 6 sc, 4 decreases, 3 sc (20)
Round 28 :
1 sc, 4 decreases, 2 sc, 4 decreases, 1 sc (12)
Round 29 :
6 decreases (6)
Info :
Pull opening closed; hide yarn tail inside head.
— Ears (Make 2) :
Info :
Crochet ears directly on the head surface. Step 2 cm to the side from each eye on the eyes line.
Step 1 :
Grab one stitch, crochet sc to fasten off, make ch1, work into the same stitch: 3 hdc, ch1, fasten yarn into same stitch. Pull tails to wrong side, knot and hide.
— Hair :
Info :
Use fluffy yarn (Lanoso Single).
Step 1 :
Find last stitch of Round 28 on top of head. Attach yarn and crochet sc for 2 or 3 rounds in a continuous spiral. Fasten off and hide tail.
Step 2 :
Take a slicker brush and comb hair well.
— Decoration :
Step 1 :
Do eyes and mouth sculpting. Use white plush yarn to embroider lines under eyes. Embroider black lines and eyebrows. Embroider nose in the middle between eyes. Make belly button and buttocks sculpting. Tint cheeks, nose, and joints with soft pastel.
— Diaper :
Info :
Work in flat rows with dc. Ch2 at beginning of each row (counts as first stitch/into 1st stitch).
Row 1 :
Ch14 + ch2, 14 dc (14)
Row 2 :
Ch2, decrease dc, 10 dc, decrease dc (12)
Row 3 :
Ch2, decrease dc, 8 dc, decrease dc (10)
Row 4 :
Ch2, decrease dc, 6 dc, decrease dc (8)
Row 6 :
Ch2, increase dc, 6 dc, increase dc (10)
Row 7 :
Ch2, 2 increases dc, 6 dc, 2 increases dc (14)
Row 8 :
Ch2, increase dc, 12 dc, increase dc (16)
Row 9 :
Ch2, increase dc, 14 dc, increase dc (18)
Row 10 :
Ch2, increase dc, 16 dc, increase dc (20)
Info :
Cut and fasten off yarn.
Row 11 :
Make ch8, crochet 20 sc from the side where you fastened off, make ch8 (36)
Rows 12-14 :
Ch2, 36 dc (3 rounds)
Info :
Continue making sc around the work. Crochet sl st along the edge. Sew buttons.
— Bodysuit :
Info :
Work in flat rows with dc. Ch2 at start (into 3rd stitch from hook).
Row 1 :
Ch34 + ch5 (button loop), from 6th stitch: 5 dc, (1 dc, ch1, 1 dc) in one stitch, 5 dc, (1 dc, ch1, 1 dc) in one stitch, 10 dc, (1 dc, ch1, 1 dc) in one stitch, 5 dc, (1 dc, ch1, 1 dc) in one stitch, 5 dc (42)
Row 2 :
Ch2, 6 dc, (1 dc, ch1, 1 dc) in one stitch, 7 dc, (1 dc, ch1, 1 dc) in one stitch, 12 dc, (1 dc, ch1, 1 dc) in one stitch, 7 dc, (1 dc, ch1, 1 dc) in one stitch, 6 dc (50)
Row 3 :
Ch1, 8 sc, ch6, skip 9 stitches, 16 sc, ch6, skip 9 stitches, 8 sc (44)
Rows 4-5 :
Ch2, 44 dc (2 rounds)
Row 6 :
Sl st to connect, ch2, 44 dc (for skirt work into BLO), sl st (44)
Row 7 :
Ch2, 44 dc, sl st (44)
Info :
Cut and fasten off.
— Bodysuit Back Part :
Info :
Step 9 stitches to both sides and place markers. Use these 18 stitches.
Row 9 :
Ch2, decrease dc, 14 dc, decrease dc (16)
Row 10 :
Ch2, decrease dc, 12 dc, decrease dc (14)
Row 11 :
Ch2, decrease dc, 10 dc, decrease dc (12)
Row 12 :
Ch2, 2 decreases dc, 4 dc, 2 decreases dc (8)
Info :
Cut and fasten off.
— Bodysuit Front Part :
Info :
On back part step 8 stitches to both sides, use remaining 10 center stitches.
Row 9 :
Ch2, decrease dc, 6 dc, decrease dc (8)
Info :
Crochet sc around edge. Sew buttons. For Skirt (optional): Work into front loops of Row 5: Ch5, 2 treble crochet into each stitch, sl st.
— Booties (Make 2) :
Round 1 :
Magic ring, ch2, 12 dc in ring, sl st (12)
Round 2 :
Ch2, 12 increases dc, sl st (24)
Round 3 :
Ch2, 24 dc into BLO, sl st (24)
Round 4 :
Ch2, 3 dc, (1 dc, decrease dc) x 6, 3 dc, sl st (18)
Round 5 :
Ch2, 18 dc, sl st (18)
Info :
Cut and fasten off. Crochet sl st into front loops of round 2 in bright color. Use same yarn to ch50 and draw through gaps in round 5 as laces.
— Cocoon :
Round 1 :
Magic ring, ch2, 12 dc in ring, sl st (12)
Round 2 :
Ch2, 12 increases dc, sl st (24)
Round 3 :
Ch2, (1 dc, increase dc) x 12, sl st (36)
Round 4 :
Ch2, (2 dc, increase dc) x 12, sl st (48)
Round 5 :
Ch2, (7 dc, increase dc) x 6, sl st (54)
Rounds 6-10 :
Ch2, 54 dc, sl st (5 rounds)
Round 11 :
Ch2, (7 dc, decrease dc) x 6, sl st (48)
Round 12 :
Ch1, 18 sc, 1 hdc, increase dc, 8 dc, increase dc, 1 hdc, 18 sc, sl st (50)
Round 13 :
Ch1, 19 sc, 1 hdc, increase dc, 9 dc, increase dc, 1 hdc, 18 sc, sl st (52)
Info :
Cut and fasten off yarn. Continue flat rows.
Row 14 :
Make ch10, step 18 stitches to the right from yarn tail, work on front: 2 sc, 2 hdc, 28 dc, 2 hdc, 2 sc, make ch12 (58)
Row 15 :
Ch1, from 2nd stitch: 5 sc, 2 hdc, 5 dc along chain, 36 dc, (3 dc, 2 hdc, 5 sc along chain) (58)
Row 16 :
Ch2, 12 dc, (decrease dc, 4 dc) x 6, 10 dc (52)
Row 17 :
Ch1, 6 sc, 2 hdc, 2 dc, (3 dc, decrease) x 6, 4 dc, 2 hdc, 6 sc (46)
Info :
Crochet sc from front side around edge.
— Hood (for Cocoon) :
Round 1 :
Magic ring, ch2, 12 dc in ring, sl st (12)
Round 2 :
Ch2, 12 increases dc, sl st (24)
Round 3 :
Ch2, (1 dc, increase dc) x 12, sl st (36)
Round 4 :
Ch2, (2 dc, increase dc) x 12, sl st (48)
Round 5 :
Ch2, (7 dc, increase dc) x 6, sl st (54)
Row 6 :
Ch2, decrease dc, 42 dc, decrease dc (44)
Rows 7-10 :
Ch1, 4 sc, 2 hdc, 32 dc, 2 hdc, 4 sc (44)
Info :
Sew hood on top part of cocoon. Sew button.
— Head Band :
Info :
Crochet sc in flat rows BLO. Make ch11 and crochet 10 sc from 2nd stitch (54 rows). Connect sides with sl st.
— Cat Ears (Make 2) :
Round 1 :
6 sc in magic ring (6)
Round 2 :
(1 sc, increase) x 3 (9)
Round 3 :
(2 sc, increase) x 3 (12)
Round 4 :
(3 sc, increase) x 3 (15)
Round 5 :
(4 sc, increase) x 3 (18)
Info :
Sew ears on head band.
— Hat :
Ribbing :
Make ch8, crochet 7 sc BLO for 54 rows. Connect with sl st.
Round 1 :
Ch1, 54 sc, sl st (54)
Rounds 2-3 :
Ch2, 54 dc, sl st (54)
Round 4 :
Ch2, (3 dc, decrease dc) x 10, 4 dc, sl st (44)
Round 5 :
Ch2, (2 dc, decrease dc) x 11, sl st (33)
Round 6 :
Ch2, (1 dc, decrease dc) x 11, sl st (22)
Round 7 :
Ch2, 11 decreases dc, sl st (11)
— Bunny Ears for Hat (Make 2) :
Round 1 :
6 sc in magic ring (6)
Round 2 :
6 increases (12)
Round 3 :
(3 sc, increase) x 3 (15)
Round 4 :
(4 sc, increase) x 3 (18)
Round 5 :
(5 sc, increase) x 3 (21)
Round 10 :
(5 sc, decrease) x 3 (18)
Round 11 :
(4 sc, decrease) x 3 (15)
Round 12 :
(3 sc, decrease) x 3 (12)
Round 13 :
(2 sc, decrease) x 3 (9)
Info :
Sew ears on hat after Round 3.
— Bunny Comforter :
Row 1 :
Ch14, ch2, 14 dc (14)
Rows 2-4 :
Ch2, 14 dc (14)
Row 5 :
Ch2, decrease dc, 10 dc, decrease dc (12)
Row 6 :
Ch2, decrease dc, 8 dc, decrease dc (10)
Info :
Crochet sc around edge. In corners: (1 sl st, ch3, 3 incomplete dc closed together, ch4, sl st) into one stitch.
— Comforter Bunny Ears (Make 2) :
Round 1 :
6 sc in magic ring (6)
Round 2 :
(1 sc, increase) x 3 (9)
Round 4 :
(2 sc, increase) x 3 (12)
Round 8 :
(2 sc, decrease) x 3 (9)
Round 9 :
(1 sc, decrease) x 3 (6)
— Comforter Bunny Head :
Round 1 :
6 sc in magic ring (6)
Round 2 :
6 increases (12)
Round 3 :
(3 sc, increase) x 3 (15)
Round 4 :
(4 sc, increase) x 3 (18)
Round 5 :
(5 sc, increase) x 3 (21)
Round 6 :
3 sc, place front part of body and crochet 3 sc through stitches of head and body simultaneously, 15 sc (21)
Round 9 :
12 sc, crochet 3 sc through head and ear, 2 sc, crochet 3 sc through head and 2nd ear, 1 sc (21)
Round 10 :
(5 sc, decrease) x 3 (18)
Round 11 :
(1 sc, decrease) x 6 (12)
Info :
Stuff head, close opening. Embroider eyes and nose.
This incredible set is more than just a pattern; it's a miniature world waiting to be created. With endless outfit combinations and adorable accessories, you'll enjoy every stitch of this project. It makes the perfect heartfelt gift for a little one or a charming addition to any collection! 🧶👶✨