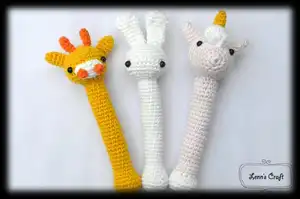
Make adorable baby rattles in three charming styles — bunny, giraffe, and unicorn. This friendly pattern guides you through simple amigurumi shaping, step-by-step rounds, and easy assembly so you can create a sweet handmade gift. Perfect for anyone who loves small crochet toys and quick, satisfying projects.
Progress Tracker
0% Complete
— General Info :
Info :
The size of finished doll is approximately 14 cm tall from bottom to head not include ears. Diameter rattle 1.5 cm- 2 cm.
Info :
Size of dolls depends on size of yarn and crochet hook. It will still work fine with different size of hook and yarn. Only the the end of finished doll will different slightly.
Info :
This is original design by Lenn's Craft. For personal use only please do not duplicate , redistribute, resell or share this pattern or part of this pattern.
— Abbreviations :
Info :
Ch : chain. Sc : single crochet. Hdc : half double crochet. Dc : double crochet. Inc : increase. Dec : decrease. St : stitch. Sl : slip stitch.
— Materials :
Info :
Soft Cotton yarn (white, soft pink, yellow, orange). 2.25 mm crochet hook (3/0). Fiberfill for stuffing. Safety eyes 6 mm. Pins, scissor, and needle.
— Bunny Rattle :
— Head :
Round 1 :
6sc in magic ring (6)
Round 2 :
(inc) repeat 6 times (12)
Round 3 :
(sc in next st , inc) repeat 6 times (18)
Round 4 :
(sc in next 2 sts , inc) repeat 6 times (24)
Round 5 :
(sc in next 3 sts , inc) repeat 6 times (30)
Round 6 :
(sc in next 5 sts , inc) repeat 5 times (35)
Round 7-10 :
sc in each st (35)
Round 11 :
(sc in next 3 sts , dec) repeat 7 times (28)
Round 12 :
(sc in next 2 sts , dec) repeat 7 times (21)
Round 13 :
(sc in next st , dec) repeat 7 times (14) , fasten off and stuff.
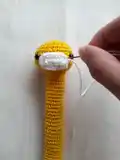
Info :
Insert safety eyes between rnd 8 and rnd 9 and 8 stitches between each eye.
— Body :
Round 1 :
6sc in magic ring (6)
Round 2 :
(inc) repeat 6 times (12)
Round 3 :
(sc in next st , inc) repeat 6 times (18)
Round 4 :
(sc in next 2 sts , inc) repeat 6 times (24)
Round 5 :
sc in each st (24)
Round 6 :
(sc in next 3 sts , dec) repeat 4 times, sc in next 4 st (20)
Round 7 :
(sc in next 2 sts , dec) repeat 5 times (15)
Round 8 :
sc in each st (15)
Round 9 :
(sc in next 4 sts , dec) repeat 2 times, sc in next 3 st (13)
Round 10-33 :
sc in each st (13). Fasten off and leave tail for sewing and stuff.
— Ears :
Info :
Make 2 ears using white yarn
Round 1 :
6sc in magic ring (6)
Round 2 :
(inc) repeat 6 times (12)
Round 3 :
(sc in next st , inc) repeat 6 times (18)
Round 4 :
(sc in next 1 st , dec) repeat 6 times (12)
Round 5-10 :
sc in each st (12), fasten off and leave tail for sewing.
Info :
Sew body rattle onto head and sew the ears too
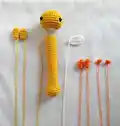
— Giraffe Rattle :
— Head :
Round 1 :
6sc in magic ring (6)
Round 2 :
(inc) repeat 6 times (12)
Round 3 :
(sc in next st , inc) repeat 6 times (18)
Round 4 :
(sc in next 2 sts , inc) repeat 6 times (24)
Round 5 :
(sc in next 3 sts , inc) repeat 6 times (30)
Round 6 :
(sc in next 5 sts , inc) repeat 5 times (35)
Round 7-10 :
sc in each st (35)
Round 11 :
(sc in next 3 sts , dec) repeat 7 times (28)
Round 12 :
(sc in next 2 sts , dec) repeat 7 times (21)
Round 13 :
(sc in next st , dec) repeat 7 times (14) , fasten off and stuff.
Info :
Insert safety eyes between rnd 7 and rnd 8. Leave 8 stitches between each eye.
— Body :
Round 1 :
6sc in magic ring (6)
Round 2 :
(inc) repeat 6 times (12)
Round 3 :
(sc in next st , inc) repeat 6 times (18)
Round 4 :
(sc in next 2 sts , inc) repeat 6 times (24)
Round 5 :
sc in each st (24)
Round 6 :
(sc in next 3 sts , dec) repeat 4 times, sc in next 4 st (20)
Round 7 :
(sc in next 2 sts , dec) repeat 5 times (15)
Round 8 :
sc in each st (15)
Round 9 :
(sc in next 4 sts , dec) repeat 2 times, sc in next 3 st (13)
Round 10-33 :
sc in each st (13). Fasten off and leave tail for sewing and stuff.
— Ears :
Info :
Make 2 ears using yellow yarn
Round 1 :
4 sc in magic ring (4)
Round 2 :
(sc in next st , inc) repeat 2 times (6)
Round 3-5 :
sc in each st (6) fasten off and leave tail for sewing.
— Mouth :
Step :
Ch 6, start from 2nd ch from hook
Step :
Sc in next 4 sc, inc in last st (6)
Step :
Working on opposite side of chain sc in each st (5)
Step :
Work continuously , sc in each st and then fasten off. Leave tail for sewing
— Nostrils (make 2) :
Step :
Ch 2, st 3 in first ch , sl. Fasten off and leave tail.
— Short horns (make 2) :
Round 1 :
4 sc in magic ring (4)
Round 2-4 :
sc in each st (4). Fasten off and leave tail. Stuff carefully.
— Unicorn Rattle :
— Head :
Round 1 :
6sc in magic ring (6)
Round 2 :
(inc) repeat 6 times (12)
Round 3 :
(sc in next st , inc) repeat 6 times (18)
Round 4-5 :
sc in each st (18)
Round 6 :
(sc in next 2 sts , inc) repeat 6 times (24)
Round 7 :
(sc in next 3 sts , inc) repeat 6 times (30)
Round 8 :
(sc in next 9 sts , inc) repeat 3 times, sc in next 3 sts (33)
Round 9-12 :
sc in each st (33)
Round 13 :
(sc in next 5 sts , dec) repeat 4 times, sc in next 5 st (29)
Round 14 :
(sc in next 4 sts , dec) repeat 4 times, sc in next 5 st (25)
Round 15 :
(sc in next 3 sts , dec) repeat 5 times (20)
Round 16 :
(sc in next 2 sts , dec) repeat 5 times (15)
Round 17 :
(sc in next st , dec) repeat 5 times (10), start stuffing
Round 18 :
dec in each st (5), fasten off.
Info :
Insert safety eye between rnd 7 and 8. Leave 8 stitches between each eye
— Body :
Round 1 :
6sc in magic ring (6)
Round 2 :
(inc) repeat 6 times (12)
Round 3 :
(sc in next st , inc) repeat 6 times (18)
Round 4 :
(sc in next 2 sts , inc) repeat 6 times (24)
Round 5 :
sc in each st (24)
Round 6 :
(sc in next 3 sts , dec) repeat 4 times , sc in next 4 st (20)
Round 7 :
(sc in next 2 sts , dec) repeat 5 times (15)
Info :
Switch to soft pink yarn for rounds below
Round 8 :
sc in each st (15)
Round 9 :
(sc in next 4 sts , dec) repeat 2 times , sc in next 3 st (13)
Round 10-33 :
sc in each st (13). Fasten off and leave tail for sewing and stuff.
— Ears :
Info :
Make 2 ears using soft pink yarn
Round 1 :
3 sc in magic ring (3)
Round 2 :
(sc in next st , inc) (4)
Round 3 :
(sc in next 2 sts , inc) , sc in next st (5)
Round 4 :
(sc in next 3 sts , inc) , sc in next st (6)
Round 5-6 :
sc in each st (6). Fasten off and leave tail for sewing.
— Horn :
Round 1 :
4 sc in magic ring (4)
Round 2 :
(sc in next st , inc) repeat 2 times (6)
Round 3-6 :
sc in each st (6)
— Front Rolling mane :
Step :
Ch 12 , 6 hdc each st.
— Mane :
Step :
Ch 29, hdc start from 3rd ch from hook . hdc each st (27)
Info :
Place the rolling mane in the middle between the eye like a picture above
Info :
Place mane on back with pins like picture above, make sure you make zig zag as natural as possible.
These tiny rattles are perfect for gifting or keeping as sweet handmade keepsakes. Create a trio of characters or mix colors to make them your own. Have fun stitching, personalizing, and giving little soft hugs! 🧶🧸