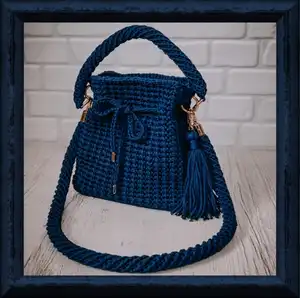
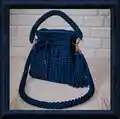
Make a chic, structured pouch-style bag using 3 mm cord and simple single crochet techniques. This pattern guides you step-by-step through the bottom panels, walls, I-cord strap, handle, tassel and final assembly so you can create a professional-looking bag at home. Perfect for gifting or for adding a handmade staple to your accessory collection. Clear photos and practical finishing tips are included to help you every stitch of the way.
Progress Tracker
0% Complete
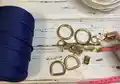
— Materials and Tools :
Infos :
Any cord (cotton, polyester, t-shirt) 3 mm, 330 yards/300 m (used polyester cord, navy blue). Hook N4 = 4 mm. 2 semi-rings (D-rings). 1 snap hook. 2 holders for handle. 2 snap hook rings. 2 tips (end-pieces). 4 legs (bag feet). Lighter (if crochet with polyester cord). Scissors. 4 markers. Small Phillips screwdriver. Small Phillips screwdriver and superglue or colorless nail polish to fix screws.
— Finished Size and Gauge :
Info :
Finished bag from the specified materials: length - 9 1/2 inches (24 cm), width - 4 inches (10 cm), height - 10 1/2 inches (27 cm). Handle - 16 inches (40 cm), shoulder strap - 39 inches (1 m). Gauge: 8-10 stitches and 8-10 row = 4*4 inches (10*10 cm).
— Abbreviation :
Infos :
MR - magic ring (circle). CH - chain stitch. SlSt - slip stitch. SC - single crochet. Inc - increase (2 SC in 1). Dec - decrease (2 SC together).
— Crochet the bottom(*2) :
Info :
Attention: when crochet SC, pull the working loop to the level of the hook. Then tighten loop on the hook. Then the canvas will be without holes.
Round 2 :
1 row. 10 SC with the 2nd loop from the hook, CH. Turn.
Info :
Insert the hook trough the last SC. Over hook the end of the thread and pull it. Crochet in the end of the thread in the next row.
Round 3 :
2 row. 10 SC, CH. Turn.
Round 4 :
3 row. 10 SC, CH. Turn.
Round 5 :
4 row. 10 SC, CH. Turn.
Round 6-24 :
5-24 rows. 10 SC, CH. Turn.
Round 25 :
25 row. 10 SC, cut the thread, pull in the loop. Hide the end on the wrong side, process it with fire. Hide the end of beginning of the bottom. Process with fire.
Info :
Similarly, crochet the 2nd bottom.
Info :
Insert legs on one of the bottoms. Count 2 SC and 2 row from the corners. Insert the screw between the legs of the SC. Tighten with your fingers, then tighten with a small Phillips screwdriver.
Info :
Fold the bottoms with the wrong sides to each other, legs facing you. Counting 4 rows on the left, insert the hook.
Info :
Leave the end of the thread 78 inches (2 m) long. With the end of this thread we will close this one, and all the subsequent rows.
Round 26 :
Pull the loop, crochet CH. Crochet 19 SC in the each row. Next, crochet 3 SC in 1 on the corner of the bottom, 8 SC, 3 SC in 1, 23 SC, 3 SC in 1, 8 SC, 3 SC in 1, 3 SC.
Info :
Crochet last SC with the end of the thread. Pull the end in the loop, insert hook under 1st loop, pull the thread, tighten back in the last loop. There are 74 loops in this row now.
Info :
Steam the bottom with iron trough the damp cloth, if you crochet with cotton cord.
— Crochet the walls :
Info :
Count 7 loops along the long side from the corners, place markers in the 8th loop. We will make the increases in these places and in the corners of the bottom.
Info :
Insert the hook in the last loop of the previous row on the back loop and jumper only.
Round 1 :
Pull the loop, crochet CH. Next, crochet this row on the back loop and jumper only. 1 row. SC, Inc, 11 SC, Inc, 5 SC, Inc, SC, Inc, 8 SC, Inc, SC, Inc, 5 SC, Inc, 11 SC, Inc, 5 SC, Inc, SC, Inc, 8 SC, Inc, SC, Inc, 3 SC.
Info :
Crochet last SC with the end of the thread. Pull the end in the loop, insert hook under 1st loop, pull the thread, tighten back in the last loop. There are 86 loops in this row now.
Round 2 :
2 row. Insert the hook under the last loop of the previous row. Pull the loop, crochet CH.
Round 2 continued :
Dec, CH, Dec, CH, repeat to the end of the row.
Info :
Skip the last SC of the previous row. Crochet last CH with the end of the thread. Pull the end in the loop, insert hook under 1st loop, pull the thread, tighten back in the last loop. There are 85 loops in this and all subsequent rows.
Round 3-26 :
3 - 26 row. Insert the hook under the last loop of the previous row. Pull the loop, crochet CH. Dec, CH, Dec, CH, repeat to the end of the row. Crochet last CH with the end of the thread. Pull the end in the loop, insert hook under 1st loop, pull the thread, tighten back in the last loop.
Info :
Crochet the base trim. Insert the hook under the last loop of the previous row. Pull the loop. Crochet SlSt in the each loop of the previous row. Cut and pull the end. Insert the hook under 1st SlSt of the row, pull the end, tighten back in the last loop. Tie a knot on the wrong side. Strengthen, hide the ends and process with fire.
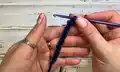
— Crochet the I-cord :
Round 2 :
Pull the loop in the 2nd loop of the hook. There are 2 loops on the hook now.
Round 3 :
Hold the the loops with the fingers and pull the hook out of the 2nd loop. Pull the loop, insert the hook into the 2nd loop, and pull another loop. There are 2 loops on the hook now.
Info :
Repeat the steps, until the cord is of the required length, about 39 inches (1 m).
Round last :
Last row crochet with SlSt. Pull the end of the thread, strengthen, hide and process with fire.
Info :
Put the tips on the ends of the I-cord.
Info :
To do this, push the ends of the I-cord inside the tips. Gently push with a screwdriver. When the ends of the I-cord completely fill the space, tighten the screws.
— Crochet the handle :
Info :
Twist the thread clockwise. The end of the thread with front in.
Info :
Pull the loop trough the semi-ring.
Round 2 :
1 row. Crochet 3 SC trough the semi-ring. Crochet in the end of the thread, CH. Turn.
Round 3 :
2 row. Crochet 3 SC on the back loop only, turn, crochet 3 SC on the front loop only. Pull the end in the middle, strengthen and process with fire. Next, crochet in a spiral.
Round 4 :
3 row. 6 SC on the left leg SC only of the previous row.
Info :
After the 3rd row, the left leg SC will be visible parallel to the handle section.
Round 5 :
4 row. 6 SC on the left leg SC only of the previous row.
Round 6 :
5 row, and all subsequent rows: 6 SC on the left leg SC only of the previous row. Crochet to the required length of the handle, about 16 inches (40 cm).
Info :
Connect the edges of the handle.
Info :
Crochet 3 SC through the 2nd semi-rind with handle. Cut the thread, pull in the last loop, strengthen and hide the end.
— Crochet the shoulder strap :
Round 1 :
Make MR. Pull the loop, crochet CH.
Round 2 :
1 row. 6 SC in MR, tighten the ring. Next, crochet in a spiral.
Round 3 :
2 row. 6 SC. Strengthen the end of the thread and process with fire.
Round 4 :
3 row. 6 SC on the left leg SC only of the previous row.
Round 5 :
After the 3rd row, the left leg SC will be visible parallel to the handle section.
Round 6 :
4 row, and all subsequent rows: 6 SC on the left leg SC only of the previous row. Crochet to the required length of the shoulder strap, about 39 inches (1 m).
Round final :
Crochet 3 Dec, SlSt. Cut the end of the thread, strengthen and process with fire.
Info :
Put the holders of the handle. Insert the ends into the holders and gently push inward with scissors. Make sure that the scissors do not break the cord. Tighten the bolts with a small Phillips screwdriver.
Info :
Fix all the screws with a drop of superglue or colorless nail polish.
— Make the tassel :
Round 1 :
Cut the pieces of cord 16 inches (40 cm) long.
Round 2 :
Intercept with a longer cord in the middle. Put a snap hook on the cord, tie a knot. Wrap the bundle with a long cord several times.
Round 3 :
Tie the ends, hide them under the turns. Spread the tassel with hands, cut off the ends exactly. Process with fire.
— Assembly :
Step 1 :
Count from the top of the bag 5 rows. In the 6th row, insert the I-cord. Leave 8 SC in the middle between the ends.
Step 2 :
Insert one of the ends of the I-cord. Then skip 4-5 SC, tighten the cord with a snake. Get to the other side. Straighten the I-cord. Pull up slightly so that the edge lies beautifully in waves. Tie the ends.
Step 3 :
Put a snap hook rings on top of the side parts of the bag. Put on the shoulder strap, then the handle. We hang the tassel on one side.
Step 4 :
Cut the lining to fit the bag. Insert it inside, straighten it with our hands and sewing it on top with hidden stitches.
Info :
Congratulations! Your gorgeous bag is ready.
This stylish cord bag pattern guides you from two simple panel pieces to a finished, lined purse with hardware and a tassel accent. It combines clean single crochet stitchwork with smart finishing techniques to create a lovely everyday bag. 🧶✨