๐Ÿงถ Beautiful โœจ Detailed ๐Ÿ’ Adorable

Ballerina Doll Amigurumi Pattern

Ballerina Doll Amigurumi Pattern
4.7โ˜… Rating
5-7 Hours Time Needed
2.1K Made This
โœ‚๏ธ

Intermediate Level

Ideal for those with basic crochet experience, featuring slightly more advanced stitches and techniques to expand your skills.

โฑ๏ธ

Weekend Treat

Takes 5-7 hours, making it an enjoyable project to finish over a couple of days.

๐Ÿงธ

Cute Companion

An adorable friend to cherish, handcrafted with love to bring comfort and joy for years to come.

About This Ballerina Doll Amigurumi Pattern

This pattern teaches you how to crochet a delicate ballerina doll complete with a ruffled dress, bow and tied shoes. You will work in rounds to shape smooth limbs and a neat head, then add layered hair and decorative details. The instructions include stitch counts, notes for assembly and photo guidance to help you along.

Ballerina Doll Amigurumi Pattern crochet pattern - detailed view of completed project

Perfect for gifting or display, this doll measures small and sweet when made with the recommended hook and yarn. The pattern covers hair construction, dress details and finishing tips for a professional look.

Why You'll Love This Ballerina Doll Amigurumi Pattern

I absolutely love this pattern because it balances simple amigurumi shaping with pretty finishing details like the ruffled dress and layered hair. I enjoy how each element comes together โ€” the legs and body join smoothly, and the little bow adds charming personality. I take pleasure in designing stitch sequences that produce neat curves and tidy joins. I hope you feel inspired to customize colors or accessories and make each doll uniquely yours.

Ballerina Doll Amigurumi Pattern step 1 - construction progress Ballerina Doll Amigurumi Pattern step 2 - assembly progress Ballerina Doll Amigurumi Pattern step 3 - details and accessories Ballerina Doll Amigurumi Pattern step 4 - final assembly and finishing

Switch Things Up

I love to change colors to give the ballerina a fresh personality; try pastel pinks and mint greens for a soft nursery look.

I often make a mini version by switching to fingering weight yarn and a smaller hook for a keychain-sized dancer.

I also recommend experimenting with metallic or sparkly yarn for the dress to create a stage-ready costume effect.

I sometimes embroider different facial expressions โ€” a smiling mouth or open eyes can change the doll's mood instantly.

I like adding tiny crocheted accessories like a scarf, tiara or small bouquet to give each doll a unique character.

I occasionally reinforce the limbs with thin wire inside for a posable doll; this is great if you want the arms to hold a pose.

I suggest swapping the bow for a crocheted flower or lace trim to vary the costume style.

I also try different hairstyles: low buns, braided buns, or loose ponytails by varying the hair strand lengths and placement.

I change the shoe style by altering the last shoe rounds for Mary Jane or boot shapes to match seasonal outfits.

I sometimes create matching sets by making two dolls in complementary color palettes for a charming gift pair.

Common Mistakes & How to Fix Them

โœ— Skipping stitch counts during increases and decreases can lead to misshapen limbs; count stitches every round to ensure you match the pattern exactly. โœ— Forgetting to stuff gradually causes lumps or uneven shaping in the body; stuff a little at a time and shape as you go for a smooth finish. โœ— Leaving tails too short when fastening off means you cannot sew parts securely; leave a long thread for sewing and weaving in ends. โœ— Not using stitch markers around joins or beginning of rounds leads to lost starting points; place a marker at the first stitch of each round and move it up.

Ballerina Doll Amigurumi Pattern

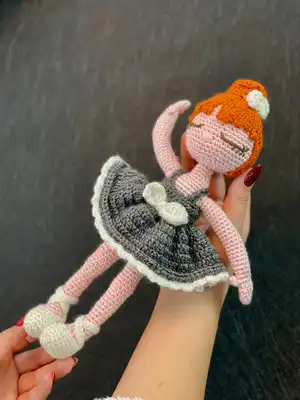
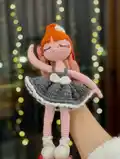
Create a sweet ballerina amigurumi with this detailed pattern designed for makers who enjoy a little shaping and assembly. You will crochet the legs, body, arms, head, hair, shoes and a charming dress with step-by-step rounds. The pattern includes clear abbreviations, materials and helpful photos to guide your progress. Perfect as a handmade gift or keepsake to display.

Intermediate 5-7 Hours

Materials Needed for Ballerina Doll Amigurumi Pattern

โ€” Main Fabric

  • 01
    Yarn (unspecified weight) - choose a yarn that matches 2.5 mm hook tension
  • 02
    Main Color: Light Pink (body and limbs)
  • 03
    Color A: Black (detail or optional)
  • 04
    Color B: Gray (dress main color)
  • 05
    Color C: Mustard (hair / accent color)

โ€” Tools Required

  • 01
    Crochet hook size 2.5 mm (or a size that fits your yarn)
  • 02
    Scissors
  • 03
    Polyester stuffing
  • 04
    Tapestry needle for sewing and weaving ends
  • 05
    Stitch marker
  • 06
    Pins for assembly

Progress Tracker

0% Complete

โ€” Abbreviation/US terminology :

Infos :

blo - back loop. ch - chain. cr - crochet. dc - double crochet. dc3tog - double crochet three together. dec - decrease. flo - front loop. hdc - half double crochet. FO - Fasten Off. inc - increase. rnd(s) - round(s). sc - single crochet. sc3tog - single crochet three together. slst - slip stitch. st - stitch. tr - treble stitch. (...) - number in parentheses indicates the number of stitches at the end of the round. [...] - repeat instructions x times or to the end of the round. (...) - work the stitches all into the same stitch.

โ€” Materials :

Info :

- Yarn. - 2.5 mm hook size or a size that fits your yarn. - Scissors, stuffing, tapestry needle, stitch marker and pins. Main Color: Light Pink A: Black B: Gray C: Mustard

Info :

FINISHED SIZE Around 20 cm in circumference, about 10 cm in length.

โ€” LEGS & BODY :

Round 1-10 :

ch.10 ch into 20 sc

Round 2-5 :

(4 ring)sc into sc(20)

Round 6-7 :

sc into sc(6 sc dec)7 sc into sc(14)

Round 7-5 :

sc into sc(4 sc dec)5 sc into sc(10)

Round 8-4 :

sc into sc(2 sc dec)4 sc into sc(8)

Round 9-16 :

(8 ring)sc into sc(8)

Round 17-2 :

sc inc(10)

Round 18-21 :

(4 ring)sc into sc(10)

Round 22-2 :

sc inc(12)

Round 23-30 :

(8 ring)sc into sc(12)

Round 31-2 :

sc inc(14)

Round 32-35 :

(4 ring)sc into sc(14)fo.

Info :

Bring the legs together. make 2 ch between

Round 36-14 :

sc into sc 2ch into sc 14 sc into sc(30 sc)

Round 37-43 :

(7 ring)sc into sc(30 sc)

Round 44-(6 times) :

3 sc into sc next dec(24)

Round 45 :

sc into sc(24)

Round 46-(6 times) :

3 sc into sc next inc(30)

Info :

Fill the body. Keep filling as you go.

Round 47-53 :

(7 ring)sc into sc(30)

Round 54-5 :

sc into sc join the first arm (5 sc)10 sc into sc join the second arm (5 sc)5 sc into sc(30 sc)

Round 55-(6 times) :

3 sc into sc next dec(24)

Round 56-(6 times) :

2 sc into sc next dec(18)

Round 57 :

sc into sc(18)

Round 58-(6 times) :

1sc into sc next dec(12)

Round 59-62 :

(4 ring)sc into sc(12)fo.Leave a long thread to sew on.

โ€” ARMS :

Info :

MAIN COLOR

Round 1-6 :

sc in a mr

Round 2-6 :

(5 ring)sc into sc (6)

Round 7-3 :

ch.turn.3ch into sc 6 sc into sc

Round 8-(4 times) :

sc inc(10 sc)

Round 9-28 :

(20 ring)sc into sc(10)fo. Fill the sleeves.

Item Name (P1) - FLOWER BUCKLE :

Rnd 1-18 ch.

Round 2-(6 times) :

1 ch into 3 hdc 1 ch into sc

Round 3-(6 times) :

1 ch into 3 cr 1 ch into sc fo.

Info :

Leave a long thread to sew on.

โ€” DRESS :

Info :

B COLOR

Round 1-35 :

ch.

Round 2-35 :

ch into sc(35 sc)turn

Round 3-9 :

(7 ring)sc into sc(35)

Round 10-(35 times) :

1 sc into 3 cr(105 cr)

Round 11-15 :

(5 ring)cr into cr(105 cr)

Round 16 :

in blo cr into hdc(105 hdc)

Round 17 :

A COLOR - in flo along the ring 1 sc into sc 1 sc into 3 hdc fo.

โ€” BOW & HANGERS :

Item Name (P1) - BOW :

A color- 10 ch.

Round 2-(2 ring) :

10 ch into cr fo.Wrap it in the middle. sew it to the waist of the dress.

Item Name (P1) - HANGER :

MAKE 2

Round 1 :

21 ch.

Round 2 :

21 ch into sc fo.

Info :

Leave a long thread to sew on.

โ€” HEAD :

Info :

MAIN COLOR

Round 1-6 :

sc in a mr

Round 2-6 :

sc inc(12)

Round 3-(6 times) :

1 sc into sc next inc(18)

Round 4-(6 times) :

2 sc into sc next inc(24)

Round 5-(6 times) :

3 sc into sc next inc(30)

Round 6-(6 times) :

4 sc into sc next inc(36)

Round 7-(6 times) :

5 sc into sc next inc(42)

Round 8-17 :

(10 ring)sc into sc(42)

Round 18-(6 times) :

5 sc into sc next dec(36)

Round 19-(6 times) :

4 sc into sc next dec(30)

Round 20-(6 times) :

3 sc into sc next dec(24)

Round 21-(6 times) :

2 sc into sc next dec(18)

Round 22-(6 times) :

1 sc into sc next dec(12)

Round 23-6 :

sc dec (6 sc)fo.

Info :

Leave a long thread to sew on.

โ€” HAIRS :

Info :

C COLOR

Round 1-6 :

sc in a mr

Round 2-6 :

sc inc(12)

Round 3 :

1 sc into sc next inc(18)

Round 4-First Layer :

20 ch.ch into sc(20 sc)(12 hair strands)

Info :

13 ch.ch into sc(10 hair strands)

Info :

Top Layer-50 ch.ch into sc(5 hair strands)

Info :

Gather strands of hair, wrap and sew.

โ€” SHOES :

Info :

SHOES -A color-

Round 1-12 :

ch.

Round 2-12 :

ch inc(24 sc)

Round 3-6 :

(4 ring)sc into sc (24)

Round 7-8 :

sc into sc(4 sc dec)8 sc into sc(20)

Round 8-2 :

sc into sc 14 ch.Turn 14 ch into sc(14 sc)

Round 9-14 :

sc into sc 14 ch.Turn ch into sc fo.

Info :

Leave a long thread to sew on.

โ€” Final Notes :

Info :

You are welcome to sell items made from this pattern. I would be happy if you link back to my shop and give credit to me as the designer.

Assembly Instructions

  • Sew the head to the body using the long tail left from the head (leave a long thread to sew on), aligning the neck opening with the body top and whipstitching securely.
  • Attach the arms into the openings at the sides between rounds where the pattern instructs to join arms (join the first arm (5 sc)10 sc into sc join the second arm (5 sc)5 sc into sc) and sew firmly with a yarn needle.
  • Position and sew the shoes at the bottom of the legs; use the long thread left on each shoe to stitch them securely around the ankle area.
  • Gather and sew the hair strands to the top of the head as instructed (Gather strands of hair, wrap and sew), shaping the bun and securing the fringe pins before final stitches.
  • Wrap and sew the bow to the waist of the dress as directed (Wrap it in the middle. sew it to the waist of the dress) and position the hangers on the dress straps if using.
  • Pin all parts in place before permanent sewing to check symmetry, then stitch with small, neat whipstitches and weave in ends.

Important Notes

  • ๐Ÿ’กWork with a stitch marker at the beginning of each round to keep track of your rounds and any increases or decreases.
  • ๐Ÿ’กStuff parts gradually and test shape regularly to avoid overstuffing which can distort the silhouette.
  • ๐Ÿ’กLeave long sewing tails when fastening off so you have enough yarn to join pieces securely without adding new yarn.
  • ๐Ÿ’กPin hair, dress and bow placements before sewing to ensure correct symmetry and proportion.

This delightful ballerina doll is designed to be made with love and simple materials, perfect for gifting or displaying in a nursery. The layered hair, ruffled skirt and little bow bring so much personality to this tiny dancer. Try different colorways to match room decor or create a pair of dancing friends. ๐Ÿฉฐ๐Ÿงถ

You ask,

we answer.

FAQs

What size will the finished piece be?

The finished amigurumi measures around 20 cm in circumference and about 10 cm in length when made with the recommended hook and yarn.

Can I use different yarn weights for this pattern?

Yes, you can use different yarn weights but the finished size will change; use a suitable hook for your chosen yarn and adjust stuffing amounts.

Do I need prior crochet experience for this pattern?

This pattern is rated intermediate, so basic knowledge of crochet stitches and shaping (increases/decreases) is recommended for best results.

How long does this project typically take to complete?

Most crocheters complete this project in 5-7 hours, depending on experience level, customization and assembly detail.