🧢 Beautiful ✨ Detailed πŸ’ Adorable

Basic Sock Guide Pattern

Basic Sock Guide Pattern
4.7β˜… Rating
5-7 Hours Time Needed
2.4K Made This
βœ‚οΈ

Intermediate Level

Ideal for those with basic crochet experience, featuring slightly more advanced stitches and techniques to expand your skills.

⏱️

Weekend Treat

Takes 5-7 hours, making it an enjoyable project to finish over a couple of days.

🧢

Effortless Style

Simple lines for everyday wear, focusing on quality stitchwork and timeless appeal that never goes out of fashion.

About This Basic Sock Guide Pattern

This pattern guide teaches you how to knit socks from cuff to toe, including two heel options: short rows and cap-and-gusset. It covers casting on, ribbing, leg length, heel shaping, gusset decreases, foot shaping and toe finishing. The instructions reference size charts and tension swatches to get a perfect fit.

Basic Sock Guide Pattern crochet pattern - detailed view of completed project

The guide is suitable for 4-ply, 6-ply and 8-ply sock yarns and includes tension recommendations and needle ranges. Clear step-by-step row instructions help you work both in rows and in rounds with confidence.

Why You'll Love This Basic Sock Guide Pattern

I absolutely love this sock guide because it balances precision with flexibility, letting you adapt the sock to many sizes and yarns. I enjoy the two heel optionsβ€”short rows for a seamless fit and the cap-and-gusset for more structureβ€”because they let me choose based on wear and yarn. I also appreciate the clear emphasis on swatching; it saves time and ensures a great final fit. This pattern feels practical, rewarding and perfect for gifting or everyday use.

Basic Sock Guide Pattern step 1 - construction progress Basic Sock Guide Pattern step 2 - assembly progress Basic Sock Guide Pattern step 3 - details and accessories Basic Sock Guide Pattern step 4 - final assembly and finishing

Switch Things Up

I love how many ways you can customize this basic sock guide to make it your own.

You can change the ribbing from 1x1 to 2x2 or a twisted rib for a firmer cuff and different look.

Try striping or self-striping yarn to add color interest down the leg and foot without extra sewing.

If you want a chunkier sock, use a heavier yarn and larger needles and follow the tension guidance to recalculate stitch counts.

I often swap the short-row heel for a slip-stitch heel for extra durability depending on who will wear the socks.

For a dressier sock, add a simple lace or cable panel on the leg, making sure to keep the stitch multiple consistent across the needles.

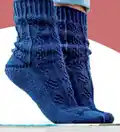
You can also experiment with toe styles: a rounded toe as shown, a wedge toe, or graft the toe with Kitchener stitch for a seamless finish.

I like to add a few rounds of slipped-stitch reinforcement across the heel and sole for longer wear in high-friction areas.

To make ankle socks or knee-highs, simply adjust the ribbing and leg length and refer to the size chart for foot length before beginning the toe.

Finally, add elastic thread through the ribbing or knit a folded hem to help socks stay up, and personalize with embroidered initials or small appliques for gifts.

Common Mistakes & How to Fix Them

βœ— Casting on wrong number of stitches for your chosen size leads to an incorrect fit; double-check the chart and count stitches before joining in the round. βœ— Skipping the swatch check causes the finished sock to be too large or too small; knit a 12 cm x 12 cm swatch and adjust needle size until tension matches the pattern. βœ— Forgetting to place the beginning of the round at the centre back of the sock can make the pattern and heel placement uneven; mark the centre back and maintain it each round. βœ— Neglecting to work both parts of wrapped stitches correctly will leave holes in the heel; when instructed, work both parts of the wrap together as one stitch on the next round to close the gap.

Basic Sock Guide Pattern

Make comfortable, well-fitting socks using this clear, practical guide. Youll find step-by-step instructions for ribbing, short-row heels, cap-and-gusset heels, and toe shaping. Suitable for making socks in 4-ply, 6-ply, or 8-ply sock yarn, the pattern helps you match tension and sizes for a professional finish.

Intermediate 5-7 Hours

Materials Needed for Basic Sock Guide Pattern

β€” Main Fabric

  • 01
    4-PLY sock yarn (Hot Socks 4-ply) β€’ Tension: 30 sts x 40 rows = 10 cm x 10 cm
  • 02
    6-PLY sock yarn β€’ Tension: 22 sts x 30 rows = 10 cm x 10 cm
  • 03
    8-PLY sock yarn β€’ Tension: 20 sts x 28 rows = 10 cm x 10 cm

β€” Tools Required

  • 01
    4 double-pointed needles (dpns) - size range 2.5 - 3.0 mm for 4-PLY
  • 02
    4 double-pointed needles (dpns) - size range 3.0 - 4.0 mm for 6-PLY
  • 03
    4 double-pointed needles (dpns) - size range 4.0 - 5.0 mm for 8-PLY
  • 04
    Stitch markers
  • 05
    Tapestry/yarn needle for weaving in ends
  • 06
    Scissors
  • 07
    Measuring tape
  • 08
    Waste yarn or stitch holder for holding stitches while shaping heel

Progress Tracker

0% Complete

β€” Ribbing and leg :

Info :

Cast on the amount of stitches as indicated in the chart for the size needed (for example 64 stitches) and divide the stitches evenly amongst the 4 double pointed needles (16 per needle). Work in rounds with the beginning of each round at the centre back of the sock.

Info :

Ribbing: Knit 1, purl 1 or knit 2, purl 2; rep to end of round. Continue this round until desired ribbing height is achieved.

Info :

Leg: knit all stitches

Info :

Work ribbing and leg to approximately 20 cm in height.

β€” Heel with 2 variations :

Info :

The heel is worked over the stitches on the 1st and 4th needle (32 stitches). Place these stitches on one needle and work in rows.

Row 1 :

knit all sts to end. Turn.

Row 2 :

work 1st st as a wrap stitch: with yarn in front, insert needle from the right into the next stitch knit-wise then slip stitch with the yarn together and pull stitch tight taking the yarn to the back of work. This forms a wrap stitch. Purl rest of row. Turn.

Row 3 :

Work 1st st as a wrap stitch, knit to end of row until wrapped stitch. Turn. (The wrapped stitches remain unworked on the needle).

Row 4 :

Work 1st st as a wrap stitch, purl all stitches to wrapped stitch. Turn.

Info :

These last two rows establish the pattern. Work continuously until only the centre third remains. (Each side 12 wrapped stitches and 8 sts in the centre).

Info :

Next round: Now work 2 rounds over all stitches on all needles working both parts of the wrapped stitches as for one stitch.

Info :

Next round: knit to end of 3rd needle. Then continue only over the heel stitches in rows. (32 stitches)

Row 1 :

Knit the sts of the side third panel (see chart: 11 stitches) and the stitches for the centre third panel (see chart: 10 stitches). Turn.

Row 2 :

Work a wrap stitch, purl following stitches to last stitch of panel. Turn.

Row 3 :

Work a wrap stitch, knit all sts to wrap stitches and work 1 wrap stitch as a knit stitch. Knit remaining side third panel. Turn.

Row 4 :

Work a wrap stitch, now purl all stitches until the wrap stitch and work 1 wrap stitch as a purl stitch. Purl remaining panel. Turn.

Info :

Repeat rows 3-4 continuously until all stitches are working. Then work foot in rounds until beginning of toe.

β€” Heel with cap and gusset :

Info :

The heel is worked over the 4th and 1st needle (32 stitches) in rows in stockinette stitch (right-side rows knit all stitches and wrong-side rows purl all stitches). Place all stitches for the heel on one needle and knit the 2nd and 3rd stitch as well as the 2nd and 3rd last stitch in each row. The stitches on the 2nd and 3rd needle remain unworked.

Info :

Work the number of rows as given in chart (30 rows). Then divide the stitches for the gusset in 3 (see chart). In our example 11 stitches on each edge and 10 stitches in the centre for the cap.

Next right-side row :

knit the 11 outer stitches and the 9 cap stitches. * Slip the last cap stitch knit-wise, knit the 1st stitch from the outer part and slip the stitch over the cap stitch and turn.

Next row :

Now slip the cap stitch purl-wise with yarn in front and purl all stitches to the last cap stitch. Purl this last stitch with the following stitch on the outer panel together. Turn. Slip the 1st cap stitch knit-wise and knit all cap stitches to end of row. Turn

Info :

Continue from * until all stitches have been worked and only the centre cap stitches (10 stitches) remain.

Info :

Continue in rounds over all stitches. The beginning of the round is in the centre of the cap stitches.

1st Needle :

With right side facing, pick up half of the number of cap stitches (5 stitches) plus the amount given in chart (16 stitches) along the side edge of the heel.

2nd and 3rd Needles :

knit all stitches.

4th Needle :

pick up half the number of cap stitches as given in chart (16 stitches) plus half of the cap stitches (5 stitches).

Info :

Then work the gusset as follows: The 1st and 4th needles have more stitches than on the 2nd and 3rd needles. These extra stitches are needed for the gusset decreases.

Info :

In the 3rd round on the 1st needle knit the 2nd and 3rd last stitches together and knit the last stitch. On the 4th needle: knit 1, slip one knit-wise, knit 1 then slip the slipped stitch over.

Info :

Continue these decreases every third row until the same amount of stitches remains on each of the 4 needles.

β€” Foot and toe shaping :

Info :

Work foot in rounds until length as given in chart is reached (= 22 cm) then begin with the toe.

1st and 3rd needles :

Knit the 2nd and 3rd last stitches together and

2nd and 4th needles :

Knit 1, slip one knit-wise, knit 1 then slip the slipped stitch over.

Info :

Continue these decreases as given in chart.

Info :

Break yarn and thread through the remaining stitches twice and pull tight. Weave in ends.

β€” Swatch :

Info :

To achieve the measurements in the patterns, it is very important to check your tension before starting your work. Make a swatch of at least 12 cm x 12 cm and double check the stitches and rows to make sure you have the same tension as stated in the pattern and if necessary change the needle size accordingly. This is the only way your work will be the size shown and the measurements, rows, stitches and yarn requirements will be correct.

Assembly Instructions

  • After completing the heel cap and gusset, pick up the indicated cap stitches along each side edge (half cap stitches on 1st and 4th needles plus the chart amount) to form the round; distribute stitches evenly across the 4 needles and begin working rounds from the centre of the cap stitches.
  • For the short-row heel variation, after completing the wrapped short-row section work two rounds over all stitches treating both parts of wrapped stitches as one, then continue on heel stitches in rows until the short-row heel is incorporated into the round.
  • Work gusset decreases by knitting the specified decreases on the 1st and 4th needles every third row until each needle has the same number of stitches; this evens out the stitch counts and shapes the foot.
  • Finish the toe by performing the decrease sequence across the 4 needles as shown (1st and 3rd needles: knit the 2nd and 3rd last stitches together; 2nd and 4th needles: knit 1, slip one knit-wise, knit 1 then slip the slipped stitch over), break yarn, thread through remaining stitches twice, pull tight and weave in ends.

Important Notes

  • πŸ’‘Make a tension swatch of at least 12 cm x 12 cm before starting to ensure correct gauge and final measurements.
  • πŸ’‘Begin each round at the centre back of the sock to keep heel and pattern placement consistent.
  • πŸ’‘When working wrapped short rows, make sure to work both parts of the wrapped stitch together on the next round to avoid holes.

This easy-to-follow sock guide helps you knit comfortable socks from cuff to toe with two heel options and clear size charts. Perfect for making gifts or everyday wear with 4-ply, 6-ply or 8-ply sock yarn. Give your feet a handmade treat and enjoy the cozy results! 🧦🧢

You ask,

we answer.

FAQs

What size will the finished piece be?

The finished sock size depends on the stitch count chosen from the size chart; for example 64 cast-on stitches yields the sample size referenced (shoe size 42/43) when using the recommended yarn and needle sizes.

Can I use different yarn weights for this pattern?

Yes, you can use different yarn weights, but this will affect the final size and tension; always knit a swatch and adjust needle size to match the stated tension for accurate sizing.

Do I need prior knitting experience for this pattern?

This pattern is rated intermediate because it includes shaping techniques like short rows, wrapped stitches, gusset decreases and picking up cap stitches; basic knowledge of knitting in the round and short-row techniques is recommended.

How long does this project typically take to complete?

Most knitters complete a pair of socks in about 5-7 hours depending on experience, yarn weight and the chosen heel variation.