🧢 Beautiful ✨ Detailed πŸ’ Adorable

Bear Applique Baby Vest Crochet Pattern

Bear Applique Baby Vest Crochet Pattern
4.5β˜… Rating
5-7 Hours Time Needed
4.0K Made This
βœ‚οΈ

Intermediate Level

Ideal for those with basic crochet experience, featuring slightly more advanced stitches and techniques to expand your skills.

⏱️

Weekend Treat

Takes 5-7 hours, making it an enjoyable project to finish over a couple of days.

πŸ‘•

Casual Chic

Relaxed style with a modern twist, perfect for everyday wear while maintaining that handcrafted uniqueness.

About This Bear Applique Baby Vest Crochet Pattern

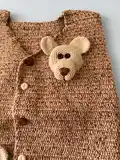
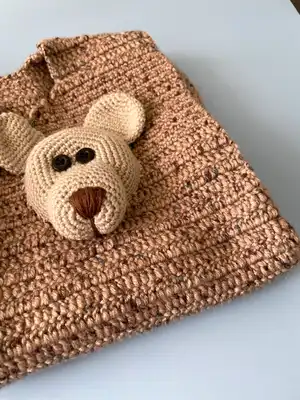
This pattern creates a baby vest with two adorable bear head appliques you crochet separately and sew on. It includes step-by-step round instructions for the front and back panels plus detailed rounds for the bear head, ears, and nose. The design uses a main mixed brown yarn for a warm, neutral finish and a lighter yarn for the bears.

Bear Applique Baby Vest Crochet Pattern crochet pattern - detailed view of completed project

Clear round-by-round instructions guide shaping and finishing for a neat, wearable result. Ideal for making personalized baby gifts and learning small amigurumi applique techniques.

Why You'll Love This Bear Applique Baby Vest Crochet Pattern

I absolutely love this pattern because it combines practical garment shaping with a playful crochet applique, giving you a functional piece that is also irresistibly cute. I enjoy how the small bear heads let you practice amigurumi-style rounds without committing to a full toy. Sewing the bears on gives every vest a handmade, personal touch that children and parents adore. This project is satisfying to finish in a weekend and makes a thoughtful, handmade gift.

Bear Applique Baby Vest Crochet Pattern step 1 - construction progress Bear Applique Baby Vest Crochet Pattern step 2 - assembly progress Bear Applique Baby Vest Crochet Pattern step 3 - details and accessories Bear Applique Baby Vest Crochet Pattern step 4 - final assembly and finishing

Switch Things Up

I love swapping colors to change the mood of this vest: try pastel blues or pinks for a softer baby look, or autumn browns and creams for a neutral palette.

I often make the bear applique in a contrasting color to make it pop against the vest body.

You can change the size by using a thicker yarn and larger hook to make a chunky version, or a finer yarn and smaller hook to make a mini keychain applique.

I sometimes replace the sewn-on bear with embroidered faces for a flatter, machine-washable option.

Consider swapping the button eyes for safety eyes or embroidered eyes depending on who the vest is for and safety needs.

Try adding small crocheted pockets below the bear faces to make the vest functional and playful at the same time.

I like to embellish with tiny crocheted bows or hats on the bears for seasonal or themed versions.

You can make a matching hat or booties using the same stitch repeats to create a coordinated set.

If you want a reversible look, work both front panels the same and use sewn-on appliques that can be removed and re-positioned with snaps.

Experiment with placing the bears at different heights or angles to give each vest a unique personality and character.

Common Mistakes & How to Fix Them

βœ— Skipping stitch counts when shaping the front or back can create uneven edges; recount stitches at the end of each round and mark the beginning of the row with a stitch marker. βœ— Not keeping consistent tension between the vest body and the bear applique results in mismatched scale; use the same hook and maintain even tension for both elements. βœ— Failing to leave a long yarn tail when finishing the bear pieces makes sewing difficult; always leave a long thread end specifically for secure stitching into place. βœ— Sewing parts without pinning first can lead to crooked placement; pin or baste the ears and nose in place, check symmetry, then sew securely using small whipstitches.

Bear Applique Baby Vest Crochet Pattern

Create a charming baby vest adorned with cute crocheted bear heads for a handmade heirloom. This pattern walks you through shaping the vest panels and making the little bear applique pieces. You will learn neat finishing and sewing techniques to attach the bears securely. Perfect for gifting or a cozy addition to baby wardrobe.

Intermediate 5-7 Hours

Materials Needed for Bear Applique Baby Vest Crochet Pattern

β€” Main Fabric

  • 01
    Yarn - Main Color: Light Brown & Dark Brown Mixed (as pictured)
  • 02
    A: Light Brown - for bear head, ears, and nose (small amounts required)

β€” Tools Required

  • 01
    Crochet hook size 2.5 mm or a size that fits your yarn
  • 02
    Scissors
  • 03
    Polyester stuffing
  • 04
    Tapestry needle for sewing
  • 05
    Stitch marker
  • 06
    Pins for assembly

Progress Tracker

0% Complete

β€” Front :

Info :

MAIN COLOR - make 2

Round 1-46 :

ch turn

Round 2-45 :

ch into sc(45 sc)1 ch turn

Round 3-7 :

(5 times)sc into sc(45)1 ch turn

Round 8-9 :

sc into cr next inc(50 cr)2 ch turn

Round 9-35 :

(27 times) cr into cr(50)2 ch turn

Round 36-45 :

cr into cr 2 ch turn

Round 37-43 :

(7 times)cr into cr(45)2 ch turn

Round 44-44 :

cr into sc 1 ch turn

Round 45 :

sc into sc 1 ch turn

Round 46-43 :

sc into sc 1 ch turn

Round 47 :

sc into sc(43)

Round 48-42 :

sc into sc 1 ch turn

Round 49 :

sc into sc(42)

Round 50-41 :

sc into sc 1 ch turn

Round 51 :

sc into sc(41)

Round 52-40 :

sc into sc 1 ch turn

Round 53 :

sc into sc(40)

Round 54-39 :

sc into sc 1 ch turn

Round 55 :

sc into sc(39)

Round 56-38 :

sc into sc 1 ch turn

Round 57 :

sc into sc(38)

Round 58-37 :

sc into sc 1 ch turn

Round 59 :

sc into sc(37)

Round 60-36 :

sc into sc 1 ch turn

Round 61 :

sc into sc(36)

Round 62-35 :

sc into sc 1 ch turn

Round 63 :

sc into sc(35)

Round 63-34 :

sc into sc 1 ch turn

Round 64 :

sc into sc(34)

Round 65-33 :

sc into sc 1 ch turn

Round 66 :

sc into sc(33)

Round 67-32 :

sc into sc 1 ch turn

Round 68 :

sc into sc(32)

Round 69-31 :

sc into sc 1 ch turn

Round 70 :

sc into sc(31)

Round 71-30 :

sc into sc 1 ch turn

Round 72 :

sc into sc(30)

Round 73-29 :

sc into sc 1 ch turn

Round 74 :

sc into sc(29)

Round 75-28 :

sc into sc 1 ch turn

Round 76 :

sc into sc(28)

Round 77-27 :

sc into sc 1 ch turn

Round 78 :

sc into sc(27)

Round 79-26 :

sc into sc 1 ch turn

Round 80 :

sc into sc(26)

Round 81-25 :

sc into sc 1 ch turn

Round 82 :

sc into sc(25)1 ch turn

Round 83-24 :

sc into sc 1 ch turn

Round 84-22 :

sc into cr(22 cr)

Round 85-88 :

(4 ring)cr into cr fo.

β€” Back :

Info :

MAIN COLOR

Round 1-81 :

ch.turn

Round 2-80 :

ch into sc 1 ch turn

Round 3-7 :

(5 times)sc into sc(80)1 ch turn

Round 8-37 :

(30 times)cr into cr(80)2 ch turn

Round 39-4 :

cr into sc 72 cr into cr(72)2 ch turn

Round 40-56 :

(17 times)cr into cr(72)2 ch turn

Round 57-58 :

(2 times)22 cr into cr 2 ch turn fo.

β€” Bear - head :

Info :

A COLOR

Round 1-6 :

sc in a mr

Round 2 :

6 sc inc(12)

Round 3 :

(6 times)1 sc into sc next inc(18)

Round 4 :

(6 times)2 sc into sc next inc(24)

Round 5 :

(6 times)3 sc into sc next inc(30)

Round 6 :

(6 times)4 sc into sc next inc(36)

Round 7 :

(6 times)5 sc into sc next inc(42)

Round 8 :

(6 times)6 sc into sc next inc(48)

Round 9-13 :

(5 ring)sc into sc(48)fo.Leave a long thread end to sew.

β€” Bear - ears :

Info :

A COLOR - make 2

Round 1-6 :

sc in a mr

Round 2 :

6 sc inc(12)

Round 3 :

(6 times)1 sc into sc next inc(18)

Round 4 :

(6 times)2 sc into sc next inc(24)

Round 5-10 :

(6 ring)sc into sc(24)

Round 11 :

Straighten it. sink the needle into both layers. 11 sc fo.

Info :

Leave a long thread end to sew.

β€” Bear - nose :

Info :

A COLOR - make 2

Round 1-6 :

sc in a mr

Round 2 :

6 sc inc(12)

Round 3 :

(6 times)1 sc into sc next inc(18)

Round 4 :

(6 times)2 sc into sc next inc(24)

Round 5 :

(6 times)3 sc into sc next inc(30)

Round 6-9 :

(4 ring)sc into sc(30)fo.Fill the nose.

Info :

Leave a long thread end to sew.

Assembly Instructions

  • Leave a long thread end on the bear head, ears, and nose pieces to sew them to the vest securely.
  • Straighten the ear pieces and sink the needle into both layers as instructed, then place and pin ears to the head before sewing.
  • Position the finished bear heads on the front panels where shown in photos, pin in place, and sew with the tapestry needle using the long tail.
  • Fill the nose with stuffing before finishing round 6-9 and sew the nose onto the bear head, securing it with tight, even stitches.
  • Pin the bear appliques symmetrically on the front panels, step back to check placement, then sew through both vest fabric and applique base for stability.

Important Notes

  • πŸ’‘Use stitch markers to mark the beginning of each row when working the front and back panels for consistent shaping.
  • πŸ’‘Stuff the small nose and head pieces firmly but not overly tight to keep the shape smooth and avoid distortion.
  • πŸ’‘Leave long yarn tails at the fasten off points of the applique pieces to make sewing easier and stronger.

This baby vest pattern pairs cozy wearable shaping with charming bear appliques for an extra-special finish. Each vest becomes a cuddly keepsake, perfect for gifting or keepsakes. Enjoy stitching and personalizing every little detail to make it uniquely yours. 🧢✨🧡

You ask,

we answer.

FAQs

What size will the finished piece be?

The finished vest fits approximately 12/18 months and measures about 18-19 inches (45-48 cm) across when using the recommended yarn and hook size.

Can I use a different hook size or yarn weight?

Yes, you can change yarn weight and hook size, but this will alter the final size and drape; adjust measurements and check gauge as needed.

Do I need to sew the bear pieces on by hand?

Yes, the bear head, ears, and nose are finished separately with long tails left to sew by hand onto the vest using a tapestry needle.

Is this pattern suitable for beginners?

This pattern is rated intermediate because it includes garment shaping and small applique assembly, so basic crochet experience is recommended.