🧢 Beautiful ✨ Detailed πŸ’ Adorable

Big Bag Crochet Pattern

Big Bag Crochet Pattern
4.4β˜… Rating
5-7 Hours Time Needed
2.5K Made This
βœ‚οΈ

Intermediate Level

Ideal for those with basic crochet experience, featuring slightly more advanced stitches and techniques to expand your skills.

⏱️

Weekend Treat

Takes 5-7 hours, making it an enjoyable project to finish over a couple of days.

✨

Stylish Touch

An elegant detail to elevate any look, combining traditional techniques with contemporary design sensibilities.

About This Big Bag Crochet Pattern

This pattern teaches you how to crochet round raffia elements and assemble them into a large, colorful bag. It includes full circle instructions, a decorative trim, and step-by-step assembly using PVA glue and rivets. The finished bag is sturdy and full of texture β€” perfect for everyday use or a statement accessory.

Big Bag Crochet Pattern crochet pattern - detailed view of completed project

You will make multiple circles, steam and shape them, then join them into a 4 by 10 canvas for the bag body. The pattern also covers finishing details like piping, bottom attachment, and edge decoration.

Why You'll Love This Big Bag Crochet Pattern

I absolutely love this pattern because it turns simple round crochet motifs into a striking, usable bag with personality. The combination of raffia yarn and colorful trims creates a warm, tactile finish I find irresistible. I enjoy the assembly process β€” arranging the checkerboard layout feels like making a textile puzzle. The use of rivets and PVA glue adds structure, letting me create a lightweight but durable accessory I proudly carry and gift.

Big Bag Crochet Pattern step 1 - construction progress Big Bag Crochet Pattern step 2 - assembly progress Big Bag Crochet Pattern step 3 - details and accessories Big Bag Crochet Pattern step 4 - final assembly and finishing

Switch Things Up

I love customizing this pattern by changing colors for a striking checkerboard look; try alternating two contrasting shades for a bold graphic effect.

If you want a smaller or larger bag, change your yarn weight and hook size β€” bulky yarn with a larger hook will give you a chunkier bag, while thinner yarn creates a lighter mini version.

I often swap raffia for recycled fabric strips for a soft, slouchy texture that still holds structure when glued and riveted.

Try adding an inner lining sewn in place for extra durability and to hide glue and rivet backs β€” a cotton canvas lining works wonderfully.

Embellish with beads or braided raffia ties at the corners for a boho vibe, or keep it minimal with matching trims for a sophisticated finish.

Use leather or faux-leather handles and attach them with the same rivets for a mixed-material look that feels premium.

Adjust the number of circles and layout to create different bag shapes β€” a square tote, a rounded bucket, or even a wide clutch.

Experiment with decorative stitches on the trim row β€” try picots or small shells for a feminine edge, or simple chains for a modern clean line.

I sometimes sew small interior pockets before final assembly so the bag is more functional and organized for daily use.

Don't be afraid to mix yarn brands and textures in the circles for a patchwork-style bag that tells a story and uses scraps beautifully.

Common Mistakes & How to Fix Them

βœ— Skipping the placement of the stitch marker after round 2 can make counting rounds difficult; place the marker in the first loop of round 2 and move it each round to keep your place. βœ— Crocheting with inconsistent tension causes circles to be uneven and not lay flat; maintain steady, moderate tension and check your gauge frequently for consistent circles. βœ— Cutting and hiding ends before securing them can lead to loose trims later; always knot, pull ends to the wrong side, strengthen with PVA glue and hide thoroughly. βœ— Not steaming and shaping the raffia circles will leave them floppy and uneven; steam lightly with an iron and shape with your hands to achieve the correct 13-14 cm diameter. βœ— Forgetting to glue and properly secure rivets can cause them to shift; apply PVA glue and then hammer or secure rivets with a special tool once glue is dry.

Big Bag Crochet Pattern

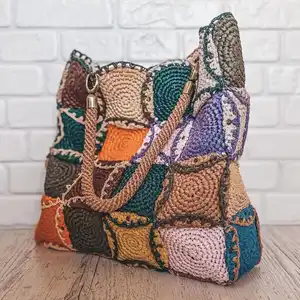
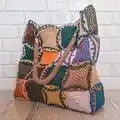
Make a colorful, handcrafted raffia circle bag with this intermediate crochet pattern. You will learn to crochet sturdy circles, add a decorative trim, assemble a checkerboard canvas and finish with rivets and raffia ties. This pattern is perfect if you love vibrant, tactile accessories and want a useful project with lots of visual impact.

Intermediate 5-7 Hours

Materials Needed for Big Bag Crochet Pattern

β€” Main Fabric

  • 01
    Raffia yarn, any colors, approx. 490 yards (450 meters) total
  • 02
    One circle uses about 10-12 grams of raffia yarn
  • 03
    Recommended examples: Raffia Fibranatura and Ispie (used in sample)
  • 04
    Make 44 circles total (instructions indicate to crochet more 43 circles after the first; 40 for the bag base and 4 for the bottom)

β€” Tools Required

  • 01
    Crochet hook 3 - 3.5 mm
  • 02
    Stitch marker (1)
  • 03
    PVA glue, 200 ml
  • 04
    Rivets, 6 mm diameter, about 100 pieces (allow margin for defects)
  • 05
    4 holders for handles, 5 mm diameter
  • 06
    Scissors
  • 07
    Small Phillips screwdriver
  • 08
    Iron for steaming and shaping
  • 09
    Hammer or rivet-setting tool
  • 10
    Pins for positioning pieces
  • 11
    Yarn needle for hiding ends

Progress Tracker

0% Complete

β€” Materials and tools :

Infos :

Raffia yarn, any colors, 490 yards (450 meters). One circle takes 10-12 grams of raffia yarn. In my example, I'm using raffia Fibranatura and Ispie. Hook 3 - 3.5 mm. 1 marker. PVA glue, 200 ml. Rivets, 6 mm diameter, about 100 pieces (with a small margin for defect and damage). 4 holders for handles, 5 mm diameter. Scissors. Small Phillips screwdriver. Iron.

Infos :

Finished bag from the specified materials: length - 16 inches (40 cm), width - 4 inches (10 cm), height - 16 inches (40 cm). Length the crocheting part of the handles - 22 inches (55 cm). Gauge: 16 stitches and 16 rows = 4*4 inches (10*10 cm). You can view this master class and, based on it, change the number of elements and the shape of the bag.

Infos :

Abbreviations: CH - chain stitch, SlSt - slip stitch, SC - single crochet, Inc - increase (2 SC in 1), Dec - decrease (2 SC together).

β€” Recommendation for working with raffia yarn :

Infos :

1. Before crocheting with raffia, it must be straightened. If you have Fibranatura, then you need to "fluff" the yarn with your hands. If you have Ispie, you can steam yarn with an iron. 2. When crocheting with raffia, so that there are no holes in the canvas when crocheting the SC, we pull the working thread to the level of the hook. 3. When the thread runs out, you need to take a new skein and straighten the end of the thread. Put on the end of the working thread and the thread from a new skein with a clearance of 5 mm. Glue together with PVA glue. After drying, lightly wrap the thread. 4. If you had to rip out your work, steam thread with an iron. The yarn will return to its original shape.

β€” Crochet the circle :

Round 1 :

Crochet 2 CH. Crochet 8 SC in the 2nd loop from the hook. Next crochet a spiral. (8)

Round 2 :

1 Inc * 8 = 16. Place the marker in the 1st loop of this row. Then, rearrange the marker in the 1st loop of each subsequent row. (16)

Round 3 :

(1 SC, 1 Inc) * 8 = 24. (24)

Round 4 :

(3 SC, 1 Inc) * 6 = 30. Crochet +2 SC, and repeat this in each subsequent row. Thus, the circle will come out in the correct form. (30)

Round 5 :

(4 SC, 1 Inc) * 6 = 36; +2 SC. (36)

Round 6 :

(5 SC, 1 Inc) * 6 = 42; +2 SC. (42)

Round 7 :

(6 SC, 1 Inc) * 6 = 48; +2 SC. (48)

Round 8 :

(7 SC, 1 Inc) * 6 = 54; +2 SC. (54)

Info :

Cut the thread, pull out the end. Skip one loop. Insert the hook under the 2nd loop of the row, pull out the end, tighten the end back to the wrong side. Strengthen and hide the end.

β€” Base trim :

Info :

Crochet the base trim. Take the raffia in different color. Insert the hook in any loop of the circle. Pull up the loop, crochet CH.

Round 1 :

Next crochet: 2 CH, skip 1 loop, 1 SC, 2 CH. Repeat to the end of the row. Cut the thread, pull out the end. Insert the hook under the 1st loop of the row, pull out the end, tighten the end back to the wrong side.

Info :

Tie the knot with both ends. Strengthen and hide the ends. Then, glue on all ends with PVA glue on the wrong side.

β€” Finishing and shaping :

Info :

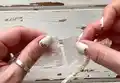
Steam the circle with an iron. Don't press hard on the face, but steam workability. Shape with hands. The finished circle should be about 5 - 5 1/2 inches (13-14 cm) in diameter. Similarly crochet more 43 circles (40 - for base of the bag, 4 - for bottom of the bag).

β€” Assembly :

Step 1 :

Lay out the 40 circles in a checkerboard pattern one on the other. Canvas should be 4 by 10 circles. How to assemble the canvas is shown in the example of assembling 9 circles.

Step 2 :

Bend the upper circles into a square with a side of 9 cm. The arc of the upper square should follow the shape of the lower circle. All circles should be parallel and perpendicular to the centre of the circles.

Step 3 :

Glue on all parts with PVA glue. Install the rivets until the glue is dry. The rivets should be parallel and perpendicular to each other. The rivets must be secured with a hammer or a special tool.

Step 4 :

Then, take the pieces of raffia yarn of the desired colors, 20 cm long. Pass the hook on the front side through the corners of the squares. Tighten the ends on the wrong side. The piece of the raffia yarn must be passed through four elements. Tie the knot on the wrong side. Hide and fix all ends with PVA glue.

Step 5 :

Steam the canvas on the wrong side. Step by step assemble the canvas 4 by 10 elements. Next, connect the seam to make a "pipe". Put the rivets and fasten with the pieces of the raffia yarn. Steam the seam.

β€” Bottom :

Step 1 :

The bottom is made up of four elements. Connect the circles with PVA glue and rivets. Then, connect the bottom to the base of the bag with PVA glue on one side. Put the rivets.

Step 2 :

Similarly connect the bottom to the base of the bag with PVA glue on the other side. Put the rivets. Place a rolled-up towel inside for convenience. Tie the knots with the pieces of the raffia yarn in three places. Hide and fix the ends with PVA glue on the wrong side.

Step 3 :

Connect the side parts with the base, bending the elements to the bottom. Glue on with PVA glue and put the rivets. Connect the corners with the pieces of the raffia yarn. The piece of the raffia yarn must be passed through three elements.

Step 4 :

Turn the bag inside out. Hide and fix the ends with PVA glue on the wrong side. Steam all folds from the front side.

β€” Decorate the edge :

Info :

Pass the pieces along the edge of the bag. The piece of the raffia yarn must be passed through two elements. Tie the knots. Add holders for handles and attach handles with rivets as desired. Install any additional hardware and finish all ends with PVA glue.

Assembly Instructions

  • Lay out the 40 circles in a checkerboard pattern (4 by 10) and glue them together with PVA glue before installing rivets to hold the layout securely.
  • Install rivets at the joined edges while the glue dries, ensuring rivets are parallel and perpendicular to each other for a neat finish.
  • Join the assembled canvas seam to form the bag body (a "pipe"), then glue and rivet the bottom (made of 4 circles) to the base, reinforcing corners with raffia ties.
  • Pass 20 cm pieces of raffia yarn through the corners of adjacent circles (front side), pull ends to the wrong side, tie knots and hide ends, then reinforce knots with PVA glue.
  • After assembling and riveting all sides, turn the bag inside out, steam and shape folds, then attach handle holders and handles using rivets and glue as needed.
  • Decorate the edge by passing raffia pieces along the perimeter through two elements, tying knots at intervals and fixing ends with PVA glue.

Important Notes

  • πŸ’‘Use a stitch marker and move it to the first loop of each round starting with round 2 to keep track of the start of rounds.
  • πŸ’‘Steam and shape each circle gently with an iron β€” do not press hard on the face β€” to achieve the correct 13-14 cm diameter.
  • πŸ’‘Glue and hide all ends on the wrong side, and strengthen joins with PVA glue before adding rivets to ensure a secure finish.
  • πŸ’‘When joining pieces, position and pin them first to check alignment, then glue, rivet and tie raffia reinforcements for best stability.

Create a stunning Big Bag using simple rounds of raffia yarn and a few finishing touches to bring it all together. This project turns yarn into durable, practical art you can use every day. Have fun mixing colors, adding rivets and shaping your bag into a one-of-a-kind statement piece. 🧢✨

You ask,

we answer.

FAQs

What size will the finished bag be?

The finished bag measures approximately 16 inches (40 cm) long, 4 inches (10 cm) wide, and 16 inches (40 cm) high using the recommended materials and gauge.

How many circles do I need to crochet?

You will crochet a total of 44 circles according to the pattern notes: make the sample circle then similarly crochet 43 more circles (40 for the bag base and 4 for the bottom).

Do I need special tools to set the rivets?

Yes, rivets should be secured with a hammer or a special rivet-setting tool after the glue has dried to ensure they stay in place.

Can I use a different yarn instead of raffia?

You can substitute other sturdy yarns, but your finished size, stiffness and texture will change; choose a yarn and hook that achieves a similar gauge and be prepared to steam or shape accordingly.