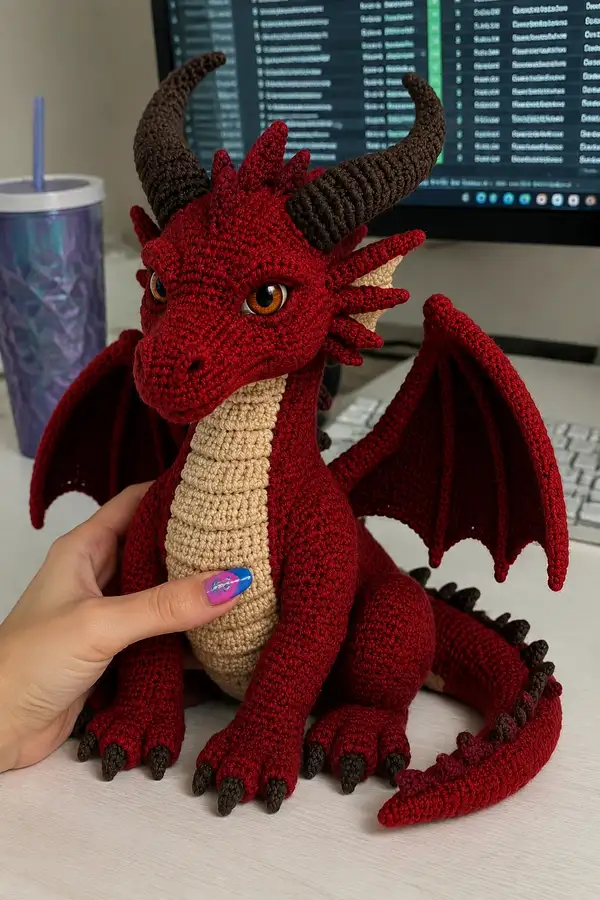
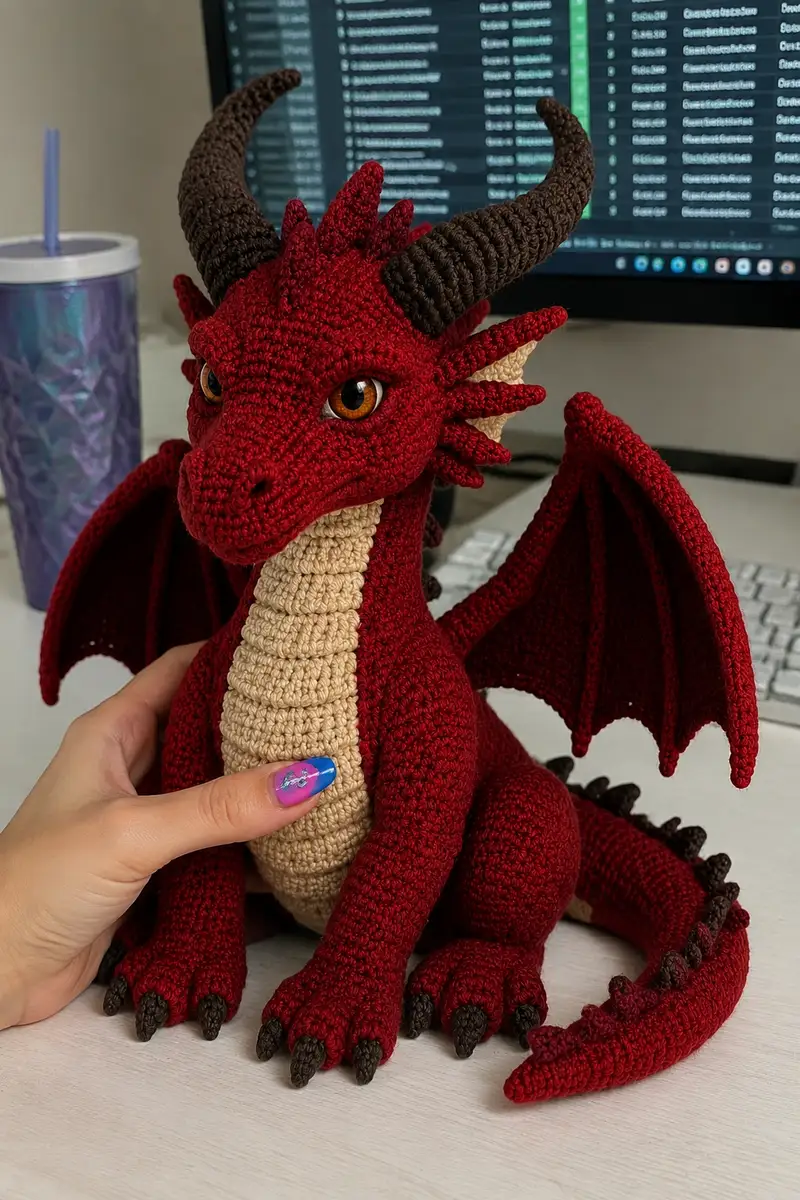
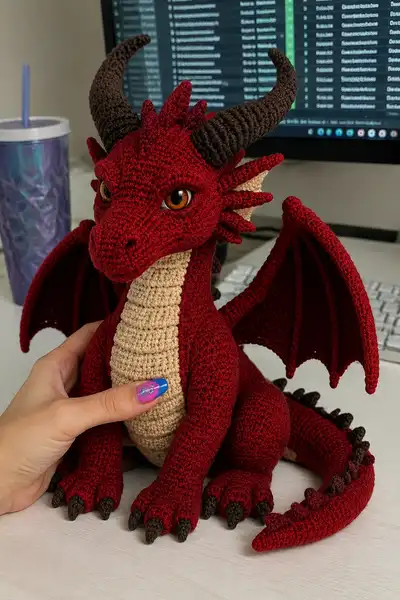
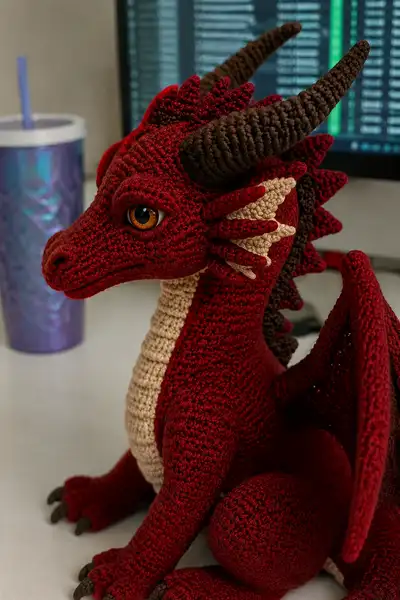
Create a dramatic, poseable crimson dragon with curved brown horns, a beige belly, articulated wings and a spiky ridge down its back. This pattern recreates the detailed facial shaping, layered ear frills, tapered tail and clawed paws seen in the photos. Suitable for intermediate crocheters who enjoy shaping and assembly, the finished doll stands as a striking decorative piece or a treasured handmade gift.
Progress Tracker
0% Complete
— Head & Snout :
Round 1 :
6 sc in magic ring (6)
Round 3 :
(1 sc, inc) x 6 (18)
Round 4 :
(2 sc, inc) x 6 (24)
Round 5 :
(3 sc, inc) x 6 (30)
Round 6 :
(4 sc, inc) x 6 (36)
Round 7 :
(5 sc, inc) x 6 (42)
Round 8 :
(6 sc, inc) x 6 (48)
Round 9 :
(7 sc, inc) x 6 (54)
Round 10 :
(8 sc, inc) x 6 (60)
Round 11-14 :
1 sc in each st (60)
Info :
Place safety eyes between rounds 13-14, approximately 14-16 stitches apart depending on desired expression; pin placement from outside and check symmetry before locking eyes securely
Round 15 :
1 sc in each st (60)
Round 16 :
(8 sc, dec) x 6 (54)
Round 17 :
(7 sc, dec) x 6 (48)
Info :
Start sculpting the snout now by working slightly flatter stitches on the front—use smaller hook for the first 3 rounds of the snout tip if you want a tighter, more defined nose
Round 18 :
(6 sc, dec) x 6 (42)
Round 19 :
(5 sc, dec) x 6 (36)
Round 20 :
(4 sc, dec) x 6 (30)
Info :
Begin stuffing head firmly but not overpacked. Work small amounts of stuffing into snout tip first, then add more to forehead and cheeks to keep shape even
Round 21 :
(3 sc, dec) x 6 (24)
Round 22 :
(2 sc, dec) x 6 (18)
Round 23 :
(1 sc, dec) x 6 (12)
Round 24 :
6 dec (6) — leave inner space open for neck shaping (do NOT fasten off)
Info :
Do not fasten off. You will continue up to form the lower jaw and then tube outwards for the neck. Keep stuffing and adjust firmness so jaw sits naturally under snout
Round 25 :
Pick up stitches around snout opening: 1 sc in each st (6) working around to create the lower jaw foundation, then continue working in continuous rounds to elongate the lower jaw (6)
Round 26 :
Working along front of snout, inc evenly every other stitch to shape muzzle: (1 sc, inc) x 6 (9)
Round 27 :
(2 sc, inc) x 3 across the front, then 1 sc in each remaining st around (12)
Round 28 :
Continue shaping front nose: 1 sc in each st (12)
Info :
Use embroidery or tightly sewn loops for nostrils: with burgundy or darker yarn, make small embroidered vertical stitches on the front tip at round 27-28 positions to define nostrils
Round 29 :
Join head-to-neck transition: 1 sc in each st (12)
Round 30 :
Inc in every other stitch to widen neck base: (1 sc, inc) x 6 (18)
Round 31 :
(2 sc, inc) x 6 (24)
Round 32-34 :
1 sc in each st (24)
Info :
Final head shaping: check eye symmetry, smooth forehead by adjusting stuffing. Leave long tail for sewing. Neck tube will be attached to body later — keep 24 st opening even
Round 35 :
(4 sc, inc) x 4 + 1 sc in last 8 sts to adjust tension (28) — optional minor widen to help join body
Round 36 :
1 sc in each st (28) — fasten off leaving 30 cm tail for sewing
— Cheek Spikes & Frills (Make 6 small frills per side) :
Round 1 :
Using crimson, 6 sc in magic ring (6)
Round 2 :
(1 sc, inc) x 3 (9)
Round 3 :
1 sc in each st (9)
Round 4 :
Switch to beige inner frill: 1 sc in each st (9)
Round 5 :
Edge sculpt: (1 sc, dec) x 3 (6) — fasten off leaving tail for sewing
Info :
Make 6 frills for each cheek (12 total) in staggered sizes: arrange them from largest at center of cheek to smaller toward jaw. Sew them layered beneath the horn base and around the eye to replicate pictured frill
— Horns (Make 2) :
Info :
Work horns in spiral using deep brown. Crochet tightly and stuff lightly as you go; you can insert thin wire for curve support if you want a poseable curl. Start at tip and increase to base then taper slightly.
Round 1 :
6 sc in magic ring (6)
Round 3 :
(1 sc, inc) x 6 (18)
Round 4 :
(2 sc, inc) x 6 (24)
Round 5 :
1 sc in each st (24)
Round 6 :
1 sc in each st (24)
Round 7 :
(3 sc, inc) x 6 (30)
Round 8-10 :
1 sc in each st (30)
Info :
Begin gentle stuffing from round 5 outward. If using wire, slide it in now and bend gradually to shape the curved horn; continue crocheting around the wire to hide it
Round 11 :
(4 sc, inc) x 6 (36)
Round 12-14 :
1 sc in each st (36)
Round 15 :
(4 sc, dec) x 6 (30)
Round 16 :
(3 sc, dec) x 6 (24)
Round 17 :
(2 sc, dec) x 6 (18)
Round 18 :
(1 sc, dec) x 6 (12)
Round 19 :
6 dec (6) — finish, leave long tail for sewing
Info :
Sew horns to head at the base behind the frill crest. Make left horn curve mirrored to right by positioning wire accordingly. Reinforce stitches after placement with multiple passes for strength
— Neck & Belly Panel (Flat Tube for Belly) :
Info :
The beige belly is crocheted as a flat strip in spirals/rows to create the segmented look. This strip will be sewn to the front of the body and up into the neck to meet the head. Work in continuous rounds (no join) to create a tube that can be folded slightly for the segmented ribbed effect.
Round 1 :
Chain 12, join to work in the round with sl st to create a small tube, then 12 sc around (12)
Round 2 :
1 sc in each st (12)
Round 3 :
1 sc in BLO in each st to create a ridge (12)
Round 4-30 :
1 sc in each st (12) — continue until belly length reaches from lower jaw to belly base (approx 26-30 rows depending on yarn tension)
Info :
Create visible ribs by working every 2nd row in BLO; when sewing to body, flatten slightly and stitch along long edges to secure ribs in place so the belly looks segmented
— Body :
Round 1 :
6 sc in magic ring (6)
Round 3 :
(1 sc, inc) x 6 (18)
Round 4 :
(2 sc, inc) x 6 (24)
Round 5 :
(3 sc, inc) x 6 (30)
Round 6 :
(4 sc, inc) x 6 (36)
Round 7 :
(5 sc, inc) x 6 (42)
Round 8 :
(6 sc, inc) x 6 (48)
Round 9 :
(7 sc, inc) x 6 (54)
Round 10 :
(8 sc, inc) x 6 (60)
Round 11-16 :
1 sc in each st (60)
Info :
If you want a slightly chubbier body, add two extra rounds of 1 sc in each st here. Attach belly panel to front later; leave top opening even to accept the head neck tube (24 sts goal after decreases)
Round 17 :
(8 sc, dec) x 6 (54)
Round 18 :
(7 sc, dec) x 6 (48)
Round 19 :
(6 sc, dec) x 6 (42)
Info :
Begin stuffing body now. Stuff firmly in lower belly but leave top portion less firmly stuffed to allow for head attachment and easier sewing
Round 20-22 :
1 sc in each st (42)
Round 23 :
(3 sc, dec) x 6 (30)
Round 24 :
(2 sc, dec) x 6 (24)
Round 25 :
(1 sc, dec) x 6 (18)
Round 26 :
6 dec (6) — leave opening large enough to insert tail base; do not fasten off if you will close around tail later
Info :
Keep tail base inserted and secure; final rounds will be used to close around tail or to attach a separate tail tube. The belly panel will be sewn on after body and neck are joined so you can shape it to the final seam
— Hind Legs (Make 2) :
Round 1 :
6 sc in magic ring (6)
Round 3 :
(1 sc, inc) x 6 (18)
Round 4 :
(2 sc, inc) x 6 (24)
Round 5 :
(3 sc, inc) x 6 (30)
Round 6 :
(4 sc, inc) x 6 (36)
Round 7 :
(5 sc, inc) x 6 (42)
Round 8-12 :
1 sc in each st (42) — create foot sphere bulk
Info :
Stuff foot firmly during rounds 9-12. Make sure the foot bottom is round and flat enough for the dragon to sit steadily. Add more stuffing to front of foot for a rounded toe area
Round 13 :
(5 sc, dec) x 6 (36)
Round 14 :
(4 sc, dec) x 6 (30)
Round 15 :
(3 sc, dec) x 6 (24)
Round 16 :
(2 sc, dec) x 6 (18)
Round 17 :
1 sc in each st (18) — work a short leg tube
Round 18 :
1 sc in each st (18)
Round 19 :
(1 sc, inc) x 6 (24) — flare slightly for hip join
Round 20 :
1 sc in each st (24)
Round 21 :
(2 sc, dec) x 6 (18)
Round 22 :
1 sc in each st (18) — leave tail long for sewing into hip area
Info :
Sew hind legs to body at lower sides — position the top flared round to align with body rounds 8-12. Add extra pass-through stitches through body to secure weight-bearing legs
— Front Legs / Forearms (Make 2) :
Round 1 :
6 sc in magic ring (6)
Round 3 :
(1 sc, inc) x 6 (18)
Round 4-9 :
1 sc in each st (18) — elongate for forearm length
Info :
Stuff hand/paw firmly at rounds 6-9 so fingers will hold shape. Flatten palm slightly if you want the forearm to sit on the ground
Round 10 :
(2 sc, inc) x 6 (24) — create wrist bulge
Round 11-13 :
1 sc in each st (24)
Round 14 :
(3 sc, dec) x 6 (18)
Round 15 :
1 sc in each st (18)
Round 16 :
(2 sc, dec) x 6 (12)
Round 17 :
1 sc in each st (12)
Round 18 :
Fasten off leaving long tail for sewing shoulder into body at rounds 16-20
Info :
When sewing arms to body, angle them so the elbow naturally bends; pad seam with a few stitches to keep shoulders bulky and stable
— Claws / Toenails (Make 16) :
Round 1 :
Using brown, 4 sc in magic ring (4)
Round 3 :
1 sc in each st (8)
Round 4 :
(1 sc, dec) x 2 (6)
Round 5 :
1 sc in each st (6)
Round 6 :
Dec to 3 sts and fasten off leaving a tail for sewing (3)
Info :
Make 4 claws for each foot (16 total). Sew claws tightly to the front of each toe; overlap claws slightly so they appear to originate from the toe pads
— Tail :
Round 1 :
6 sc in magic ring (6)
Round 3 :
(1 sc, inc) x 6 (18)
Round 4 :
(2 sc, inc) x 6 (24)
Round 5 :
(3 sc, inc) x 6 (30)
Round 6-12 :
1 sc in each st (30) — lengthen for tapered tail base
Info :
Optionally insert floral wire down the center of the tail from round 6 to the tip for poseable shaping. Leave a small extra length of wire at the base to anchor within the body
Round 13 :
(3 sc, dec) x 6 (24)
Round 14 :
(2 sc, dec) x 6 (18)
Round 15 :
(1 sc, dec) x 6 (12)
Round 16-20 :
1 sc in each st (12) — tapering tube to shape tail length
Round 21 :
(1 sc, dec) x 4 (8)
Round 22 :
2 dec (2) then fasten off leaving long tail for sewing to body
Info :
Sew the tail into the opening left at the bottom of the body (body round 26). Reinforce with sewing around the base in a spiral pattern to evenly distribute stress
— Dorsal Spikes (Make 12-14 small spikes) :
Round 1 :
4 sc in magic ring (4)
Round 3 :
(1 sc, dec) x 2 (6)
Round 4 :
1 sc in each st (6)
Round 5 :
Dec to 3 sts and fasten off leaving a tail for sewing
Info :
Make 12-14 spikes in a mix of crimson and darker burgundy for contrast. Arrange along back and tail from head to tail tip; sew spikes with bases spaced 6-8 stitches apart depending on body shape
— Wing Frame (Make 2) :
Info :
Wings are built as two pieces: a curved bone/rib frame worked in the round and a separate flat membrane panel worked in rows which is then sewn to the ribs to create the puffy, structured wing. Work ribs tightly to keep structure.
Round 1 :
6 sc in magic ring (6)
Round 3 :
(1 sc, inc) x 6 (18)
Round 4 :
1 sc in each st (18)
Round 5 :
(2 sc, inc) x 6 (24)
Round 6-10 :
1 sc in each st (24)
Info :
Curve the ribs by increasing on the outer edge every few rounds. After round 10, begin shaping the rib tips with occasional decreases so they taper to points. Make 4-6 ribs per wing (make each as a short tube) and arrange them along the top of the flat membrane
Round 11 :
(3 sc, inc) x 6 (30)
Round 12-14 :
1 sc in each st (30)
Round 15 :
(3 sc, dec) x 6 (24)
Round 16 :
1 sc in each st (24) — fasten off leaving tail for sewing
— Wing Membrane (Make 2 flat panels) :
Round 1 :
Ch 36, sc in 2nd ch from hook and across, 34 sc, ch 1 turn (34)
Round 2 :
Work in continuous rounds (no join) or join and continue rows: 34 sc across, turn
Round 3-18 :
1 sc in each st for 16 rows (34 each) — you will create a triangular shaping at the outer edge later
Round 19 :
Decrease along the outer edge to form wing tip: dec at end of row, continue across (32)
Round 20-24 :
1 sc in each st, alternatively work a few rows in BLO to create ribs where you will sew the wing bones (30-28-26 depending on taper)
Info :
Sew the rib tubes to the membrane on their top edge first, spacing them evenly. Then sew the inner curve to the dragon’s shoulder area and seam the lower inner wing edge to the body. Use piping or wire in the leading edge if you want a very stiff wing
— Ear Frills (Inner Layer Beige, Outer Layer Crimson, Make 2 pairs) :
Round 1 :
6 sc in magic ring with beige (6)
Round 2 :
(1 sc, inc) x 3 (9)
Round 3 :
Switch to crimson and work (1 sc, inc) x 4 + 1 sc in last st (13)
Round 4 :
Edge sculpt: *sc in next 2, ch 3, sl st in base* rep across to create little points (creates frilly look)
Info :
Sew inner beige frill under outer frill so beige shows between crimson points as in the photo. Pin to head and adjust angles — frills are positioned roughly at head rounds 7-10 on each side
— Assembly & Finishing Touches :
Info :
Before final assembly, weave in all short tails, block flat elements like belly and wing membrane gently with steam (avoid wetting safety eyes), and roughly position parts with pins. Use consistent stitch patterns when sewing to avoid visible bunching.
Step 1 :
Attach belly panel to front of body: align top of belly tube with the neck opening on the body and sew down the length with mattress or whip stitch so ribs are visible and centered.
Step 2 :
Sew neck opening of head (round 32-36) to the top of the body. Use tail from head and body to mattress stitch evenly; make several passes to strengthen the joint.
Step 3 :
Sew hind legs to body at lower flanks: align the flared round (tail left on each leg) to body rounds 8-12. Use long sewing tail to stitch through the body and leg securely; tuck extra stuffing so seam is snug.
Step 4 :
Sew front legs to chest area (body rounds 16-20). Angle slightly outward and down so the dragon can sit naturally. Reinforce with extra passes through the body and shoulders.
Step 5 :
Sew dorsal spikes along the seam from head to tail — begin just behind the horns and space spikes by approx 6 stitches along the back and down the tail, using darker accent spikes near the tail tip.
Step 6 :
Attach horns centered behind frill crest: pin in place and sew through inner base multiple times. Hide starting and ending tails inside the head by weaving through a few stitches.
Step 7 :
Sew wing bones to the membrane first, then attach the inner wing seam to the body between shoulder rounds 12-18. Sew lower inner wing edge to body so wing can fold naturally. Add a few stitches to the wing root to lock in position.
Step 8 :
Attach claws to toes: position four claws per foot and sew through base into the foot pad. Reinforce with a second pass for durability.
Step 9 :
Embroider small mouth line and nostril details with darker yarn if desired. Add a couple small backstitches under the eyes for a fierce expression, adjusting tension to avoid pulling fabric.
Info :
If any seams look loose after first pass, add a second row of stitches. Tuck and weave remaining tails inside the body or through the seam to hide them
This bold crimson dragon combines sculpted shaping with charming details to create a show-stopping handmade friend. The step-by-step guidance ensures each section (head, horns, wings, tail) comes together seamlessly for a dramatic finished piece. With patience and tidy finishing, your dragon will be a proud display or a cherished gift. 🧶🐉 Enjoy every stitch — the result is truly magical! ✨