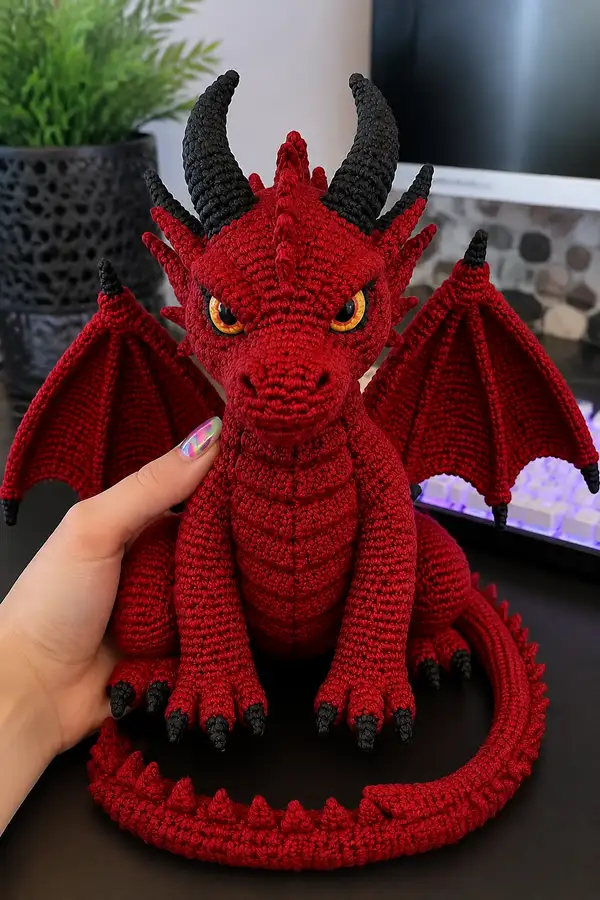
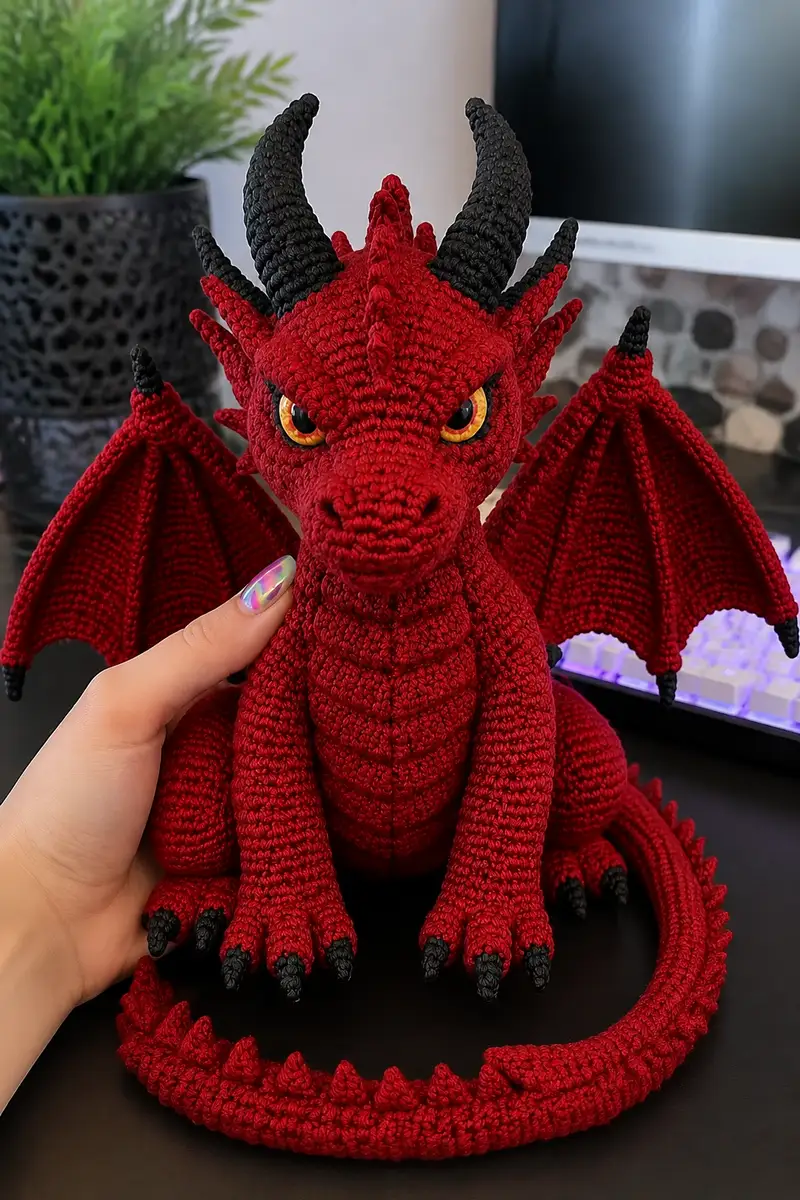
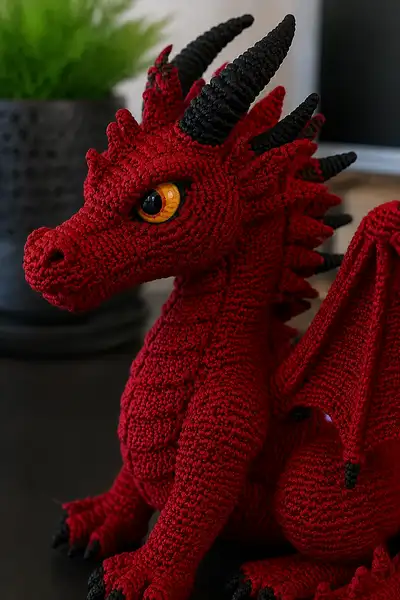
Make your own fierce yet cuddly red dragon with this complete amigurumi pattern. The design features a long snout, dramatic black horns, articulated wings, a segmented belly, and textured dorsal spikes. Pattern includes detailed round-by-round instructions, assembly tips, and finishing touches so you can recreate the exact look shown in the photos.
Progress Tracker
0% Complete
— Head & Snout :
Round 3 :
(1 sc, inc) x 6 (18)
Round 4 :
(2 sc, inc) x 6 (24)
Round 5 :
(3 sc, inc) x 6 (30)
Round 6 :
(4 sc, inc) x 6 (36)
Round 7 :
(5 sc, inc) x 6 (42)
Round 8 :
(6 sc, inc) x 6 (48)
Info :
Work tightly. Place stitch marker in first stitch of each rnd. These rounds form the back of the skull. Keep head slightly oval by working all stitches evenly and not pulling too tight on increases.
Round 9 :
1 sc in each st (48)
Round 10 :
1 sc in each st (48)
Round 11 :
1 sc in each st (48)
Round 12 :
1 sc in each st (48)
Info :
Place safety eyes between rnds 13-14 (see below). For the look in the photo place eyes at Rnd13, leaving 10-12 sts between centers depending on desired expression. If using glass or large eyes, position slightly lower to maintain snout proportions.
Round 13 :
1 sc in each st (48)
Round 14 :
1 sc in each st (48)
Info :
Insert safety eyes now. Count stitches from center front (snout) to ensure even spacing: find center front by creating a short marker chain at center base later for mounting. Eyes in photos sit approximately 11 stitches apart (from outer edge to outer edge about 12-13 sts), but adjust for your chosen eyes.
Round 15 :
(6 sc, inc) x 6 (54)
Round 16 :
1 sc in each st (54)
Round 17 :
1 sc in each st (54)
Round 18 :
(7 sc, inc) x 6 (60)
Info :
These increases add width to the cheek area so the snout sits proportionally. Start keeping track of front center stitches; you will pick up front rounds for snout shaping.
Round 19 :
1 sc in each st (60)
Round 20 :
1 sc in each st (60)
Round 21 :
(8 sc, inc) x 6 (66)
Round 22 :
1 sc in each st (66)
Info :
We will now begin forming the snout by working only around the front half of the head. Mark the first stitch of the front center; you will work short rows around the muzzle and join back to the head. Use a contrasting scrap to mark the dividing stitches.
Round 23 :
Work 30 sc across front half (starting 15 sts left of center and ending 15 sts right of center) - leave remaining sts unworked for this round (30)
Round 24 :
Rotate and work 30 sc around the same front half (30)
Round 25 :
(4 sc, dec) x 6 across the central front section shaping the snout (24)
Round 26 :
(3 sc, dec) x 6 (18)
Info :
Begin stuffing snout lightly now, adding more as you shape. Use small pieces of fiberfill to maintain sculpted shape and define nostril area. Do not overstuff—snout should remain sculpted and slightly firm but not rock-hard.
Round 27 :
(2 sc, dec) x 6 (12)
Round 28 :
(1 sc, dec) x 6 (6)
Round 29 :
6 sc around (6) - this round forms the very tip of the snout. Fasten off leaving long tail for sewing into the head if you worked snout separately; if snout worked in continuous front half, simply continue to the next head rounds.
Round 30 :
Return to unworked back half of head and join at the base with 1 sc across back half (complete remaining 30 sts) so head is whole again (count back to match full 66-60 depending on earlier counts)
Info :
Finish stuffing the skull area firmly but leave neck opening slightly less filled to allow for a snug join to the body. If head is oval and longer than desired, add a couple of extra even rounds before beginning neck decreases to lengthen the head slightly.
Round 31 :
(8 sc, dec) x 6 (60)
Round 32 :
(7 sc, dec) x 6 (54)
Round 33 :
(6 sc, dec) x 6 (48)
Round 34 :
1 sc in each st (48)
Round 35 :
1 sc in each st (48)
Round 36 :
(5 sc, dec) x 6 (42)
Info :
Fasten off leaving long tail for neck attachment. If you made the snout as a separate small piece, whip stitch snout into place now, using yarn end to create smooth seam. Re-shape and add small amounts of stuffing through the neck opening as needed.
— Eye Rims & Brows :
Round 1 :
Using black yarn, 6 sc in mr (6)
Round 3 :
1 sc in each st (12)
Round 4 :
1 sc in each st (12)
Round 5 :
Fold raw edge inward and sl st through back loops to create slight ridge (12)
Info :
Make 2. These are thin rims sewn around the safety eyes to accentuate the amberglass—position behind the eye on the inside of the head and sew down through surrounding stitches to lock eyes securely. You can substitute embroidered black rims if preferred.
— Neck :
Round 1 :
Join red to neck opening and 1 sc in each st around (42) - this is dependent on head final count; use the same number as head base
Round 2 :
1 sc in each st (42)
Round 3 :
(5 sc, inc) x 6 (48)
Round 4 :
1 sc in each st (48)
Round 5 :
1 sc in each st (48)
Info :
Work ribbing texture for neck by doing alternating rounds of FLO: Round 6 work 1 sc in each st FLO to create subtle ridges that match the sculpted belly ridges. This helps the neck look segmented like the body.
Round 6 :
1 sc in each st FLO (48)
Round 7 :
1 sc in each st (48)
Round 8 :
(7 sc, dec) x 6 (42)
Round 9 :
1 sc in each st (42)
Info :
Leave neck opening with a long tail for later secure join to body. Do not overstuff the neck; body will provide support. If you plan to add internal wire for poseable neck, tack wire near base before final stuffing.
— Body :
Round 3 :
(1 sc, inc) x 6 (18)
Round 4 :
(2 sc, inc) x 6 (24)
Round 5 :
(3 sc, inc) x 6 (30)
Round 6 :
(4 sc, inc) x 6 (36)
Round 7 :
(5 sc, inc) x 6 (42)
Round 8 :
(6 sc, inc) x 6 (48)
Info :
These increase rounds create the full belly. The seated pose requires a broad base: increase another round if you prefer a wider body. Keep counting accurate for later attachment points of legs and arms.
Round 9 :
1 sc in each st (48)
Round 10 :
1 sc in each st (48)
Round 11 :
1 sc in each st (48)
Round 12 :
1 sc in each st (48)
Info :
Begin working belly ridges: on the front center of the body, we will create 7 horizontal ridged segments by working alternating FLO rounds that create raised ribs. Mark the center line for even placement.
Round 13 :
1 sc in each st BLO to begin lower edge ridge (48)
Round 14 :
1 sc in each st (48)
Round 15 :
1 sc in each st BLO (48)
Round 16 :
1 sc in each st (48)
Round 17 :
1 sc in each st BLO (48)
Round 18 :
1 sc in each st (48)
Info :
Start stuffing the body lightly from the bottom now. For a seated pose, stuff base firmly. Stop stuffing before the top opening so you can join the neck snugly and shape shoulder area.
Round 19 :
1 sc in each st BLO (48)
Round 20 :
1 sc in each st (48)
Round 21 :
(6 sc, inc) x 6 (54) - add a bit of shaping for the shoulder/upper chest so neck attaches smoothly
Round 22 :
1 sc in each st (54)
Round 23 :
1 sc in each st (54)
Round 24 :
(6 sc, dec) x 6 (48)
Round 25 :
(5 sc, dec) x 6 (42)
Round 26 :
1 sc in each st (42)
Info :
Attach the head now by tacking the neck tail from the head to the body opening. Pin and test position: head in photo sits slightly forward and high. Sew around with strong ladder stitch ensuring even tension so head sits stable.
Round 27 :
(4 sc, dec) x 6 (36)
Round 28 :
(3 sc, dec) x 6 (30)
Round 29 :
(2 sc, dec) x 6 (24)
Round 30 :
(1 sc, dec) x 6 (18)
Info :
Fasten off leaving a long tail for closing bottom or to use when attaching pelvis region to a felt base if you prefer to add weight for stability. We recommend adding a small bag of poly pellets in the bottom for seated balance (inside a small fabric pouch) before fully closing.
— Arms (Make 2) :
Round 3 :
(1 sc, inc) x 6 (18)
Round 4 :
(2 sc, inc) x 6 (24)
Info :
These first rounds form the hand base. Keep the palm slightly wider with the increases. We will sculpt 3 toes later by shaping in the last rounds of the hand portion.
Round 5 :
1 sc in each st (24)
Round 6 :
1 sc in each st (24)
Round 7 :
1 sc in each st (24)
Round 8 :
1 sc in each st (24)
Info :
Begin tapering wrist: dec evenly around one round to create wrist shaping. If you want poseable arms, add thin wire inside now and continue stuffing around it to keep shape.
Round 9 :
(3 sc, dec) x 6 (18)
Round 10 :
1 sc in each st (18)
Round 11 :
1 sc in each st (18)
Round 12 :
(2 sc, inc) x 6 (24)
Round 13 :
1 sc in each st (24)
Round 14 :
1 sc in each st (24)
Round 15 :
(4 sc, inc) x 4, (3 sc, inc) x 2 to sculpt shoulder bulge = (28) - if you prefer slightly thicker shoulders use (5 sc, inc) x 4 etc.
Round 16 :
1 sc in each st (28)
Round 17 :
(4 sc, dec) x 4, (3 sc, dec) x 2 (24)
Round 18 :
1 sc in each st (24)
Round 19 :
Fasten off leaving long tail. Stuff hand portion firmly and sew through arm opening attaching to body at rounds 20-23 on the side seams. Repeat for second arm.
Info :
For claws make 3 small black cones (see Claws section) and sew to the three front digits of each paw. The arms are sculpted to lean forward in the seated pose - sew with a slight forward angle to replicate photo posture.
— Legs & Feet (Make 2) :
Round 3 :
(1 sc, inc) x 6 (18)
Round 4 :
(2 sc, inc) x 6 (24)
Round 5 :
(3 sc, inc) x 6 (30)
Info :
These rounds create a broad foot. Work firmly. Keep the base rounded for weight bearing. Stuff the foot base firmly before continuing up the leg.
Round 6 :
1 sc in each st (30)
Round 7 :
1 sc in each st (30)
Round 8 :
(4 sc, dec) x 6 (24)
Round 9 :
1 sc in each st (24)
Round 10 :
(2 sc, inc) x 6 (30)
Round 11 :
1 sc in each st (30)
Round 12 :
1 sc in each st (30)
Round 13 :
(5 sc, dec) x 5 + (4 sc, dec) x 1 to shape calf (24)
Round 14 :
1 sc in each st (24)
Round 15 :
(3 sc, inc) x 6 (30)
Round 16 :
1 sc in each st (30)
Round 17 :
1 sc in each st (30)
Round 18 :
Dec 6 evenly across top of leg to make hip narrowing (24)
Round 19 :
1 sc in each st (24)
Round 20 :
Fasten off leaving long tail. Stuff leg firmly with heavier fill at foot and moderate fill in leg. Sew legs to body at lower rounds 2-6 of the body base, spacing to produce a stable seated posture.
Info :
Pin legs in position before sewing. The dragon sits with knees forward and feet turned slightly outward — use reference photo to angle appropriately. Add extra stitches around the thigh join for stability.
— Claws (Make 10 small cones) :
Round 1 :
4 sc in mr (4) - use black yarn
Round 3 :
(1 sc, inc) x 2 (6)
Round 5 :
(2 sc, inc) x 2 (8)
Round 7 :
(2 sc, dec) x 2 (6)
Round 8 :
6 sc (6) - stuff lightly
Round 9 :
6 dec (3) - finish stuffing and close, leaving tail for sewing
Info :
Make 10: 3 claws per front paw and 2-3 per back paw depending on appearance. Sew claws pointing slightly down and outward. Use black yarn for tips to create contrast like the photo.
— Horns (Make 2 large horns and 4 small horns) :
Large Horn Round 1 :
6 sc in mr (6) - use black yarn
Round 3 :
(1 sc, inc) x 3 (9)
Round 4 :
1 sc in each st (9)
Round 5 :
(2 sc, inc) x 3 (12)
Round 6-8 :
1 sc in each st (12)
Round 9 :
(2 sc, dec) x 3 (9)
Round 10 :
1 sc in each st (9)
Round 11 :
(1 sc, dec) x 3 (6)
Round 12 :
6 sc (6) - taper by working few rounds without stuffing to make a curved tip
Round 13 :
Fasten off leaving long tail for sewing. Shape by sewing down base into head and angle backward and slightly outward. Make 2 large horns.
Small Horn Round 1 :
4 sc in mr (4)
Small Horn Round 2 :
4 sc (4)
Small Horn Round 3 :
(1 sc, inc) x 2 (6)
Small Horn Round 4 :
6 sc (6)
Small Horn Round 5 :
(1 sc, dec) x 2 (4)
Small Horn Round 6 :
4 sc (4) - fasten off leaving tail. Make 4-6 of these for decorative horns down the neck like in the photo.
Info :
Sew large horns into the top rear of the head and smaller horns along the crest down the neck and back. Angle each horn so they form a jagged crown. Use a little stuffing to keep horns firm but small amount to preserve curvature.
— Dorsal Spikes (Make 12-16) :
Spike Round 1 :
6 sc in mr (6)
Round 3 :
1 sc in each st (12)
Round 4 :
(2 sc, dec) x 3 (9)
Round 5 :
(1 sc, dec) x 3 (6)
Round 6 :
6 sc (6) - fasten off leaving tail. Make 12-16 spikes varying sizes slightly to achieve the layered look on the dragon's back and neck.
Info :
Sew spikes along center back from top of head down to tail base. Place larger spikes near the shoulder and mid-back and smaller toward head and tail. Use a ladder stitch to sew through the body loops so spikes sit upright.
— Wings (Make 2) :
Info :
Wings are worked in rows to create a bat-like structure, then edged and given a slight curve. Work in red yarn for main wing and small black tips along outer edges. Optionally insert thin wire into the leading edge for poseability.
Row 1 :
Ch 36, sc in 2nd ch from hook and across (35)
Row 2 :
Ch1, turn, sc across (35)
Row 3 :
Ch1, turn, sc across (35)
Row 4 :
Ch1, turn, (sc 4, dec) repeat across to shape pointy leading edge - end with 1 sc (approx 28)
Row 5 :
Ch1, turn, sc across (28)
Row 6 :
Ch1, turn, sc across (28)
Row 7 :
Ch1, turn, sc across (28)
Row 8 :
Ch1, turn, sc in BLO across to create the wing membrane ridge (28)
Row 9 :
Ch1, turn, sc across (28)
Row 10 :
Ch1, turn, (sc 3, dec) repeat across to create scalloped lower edge (approx 21)
Row 11 :
Ch1, turn, sc across (21)
Row 12 :
Ch1, turn, sc across (21)
Info :
Edge the wing with black by joining at the perimeter and sl st around for a tidy outline. Add black points at the wing tip by crocheting small black cones (use the Claw cone pattern) and sewing them to the three outer points of the wing.
Finishing Row :
Working in rounds, sc evenly around wing perimeter, add 3-4 evenly spaced increases at base so wing attaches flat to body (approx final perimeter count depends on shaping). Fasten off leaving long tail for sewing.
Info :
Make 2. Attach wings to upper back just behind shoulders, positioning so the wing membrane curves slightly outward. If adding wire, insert it into folded leading edge and close with whip stitch.
— Tail :
Round 3 :
(1 sc, inc) x 3 (9)
Round 4 :
1 sc in each st (9)
Round 5 :
(2 sc, inc) x 3 (12)
Round 6 :
1 sc in each st (12)
Round 7 :
(3 sc, inc) x 3 (15)
Round 8-18 :
1 sc in each st (15) - continue lengthening the tail to desired length by repeating even rounds. Add any additional increases spaced to create taper at base if desired.
Round 19 :
(3 sc, dec) x 3 (12)
Round 20 :
1 sc in each st (12)
Round 21 :
(2 sc, dec) x 3 (9)
Round 22 :
1 sc in each st (9)
Round 23 :
(1 sc, dec) x 3 (6)
Info :
Make 1 long tail. If you want a poseable tail, insert flexible wire or pipe cleaner along interior before the tail gets fully closed. Sew dorsal spikes along tail top, starting medium near base then reducing to smaller spikes toward tip. For the tip finish with small black cone.
— Finishing Small Details & Texture :
Round :
Use surface single crochet to create belly segmentation lines: with the yarn needle and yarn held, surface sc horizontally across belly segments matching the photo pattern—make 6-8 ribs spaced evenly.
Info :
Use a second strand of red or subtle darker shade to create deeper shadow lines in the belly ribs. Work from bottom to top so each rib slightly overlaps the one above, giving a layered effect.
Round :
Sew all body parts together: attach head, then arms, then legs, wings and tail. Tuck ends and weave through several stitches to secure. Add glass eyes or embroider eyes if desired and add small embroidered nostrils using brown-black yarn.
Info :
For the angry brow look, make small 8-10 stitch ridges above each eye using short surface sc or tiny raised stitches; this exaggerates expression as in the photo. Slightly stuff cheeks to hold the crease lines.
This bold red dragon amigurumi brings together sculpted shaping, dramatic horns, and intricate little spikes to create a one-of-a-kind handmade companion. Each section is designed to be satisfying and sculptural—perfect for experienced crocheters who love character work. The finished dragon looks great on a shelf or as a showpiece, and the detailed pattern teaches many useful techniques. 🧶🐉 Share your finished dragon with pride and enjoy the creative journey! 🎨