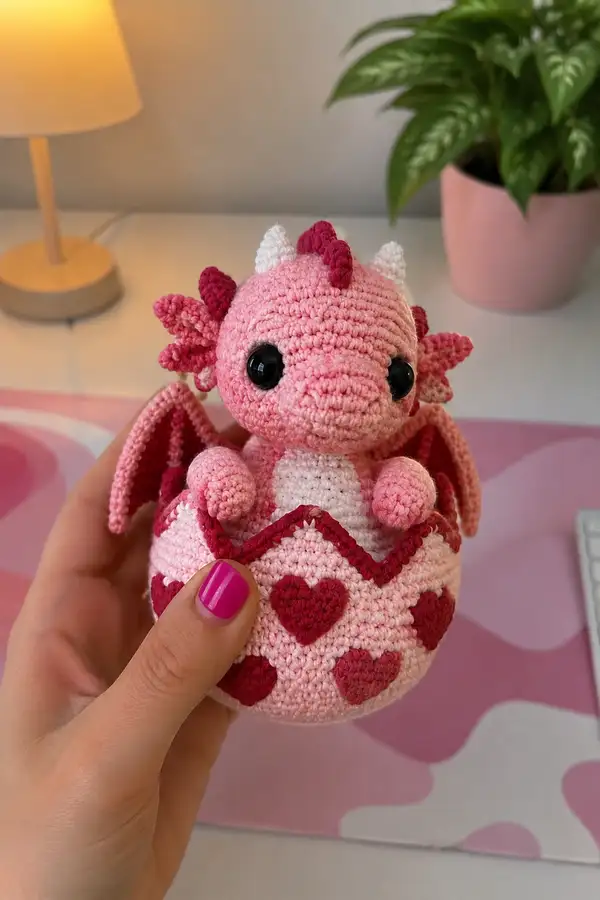
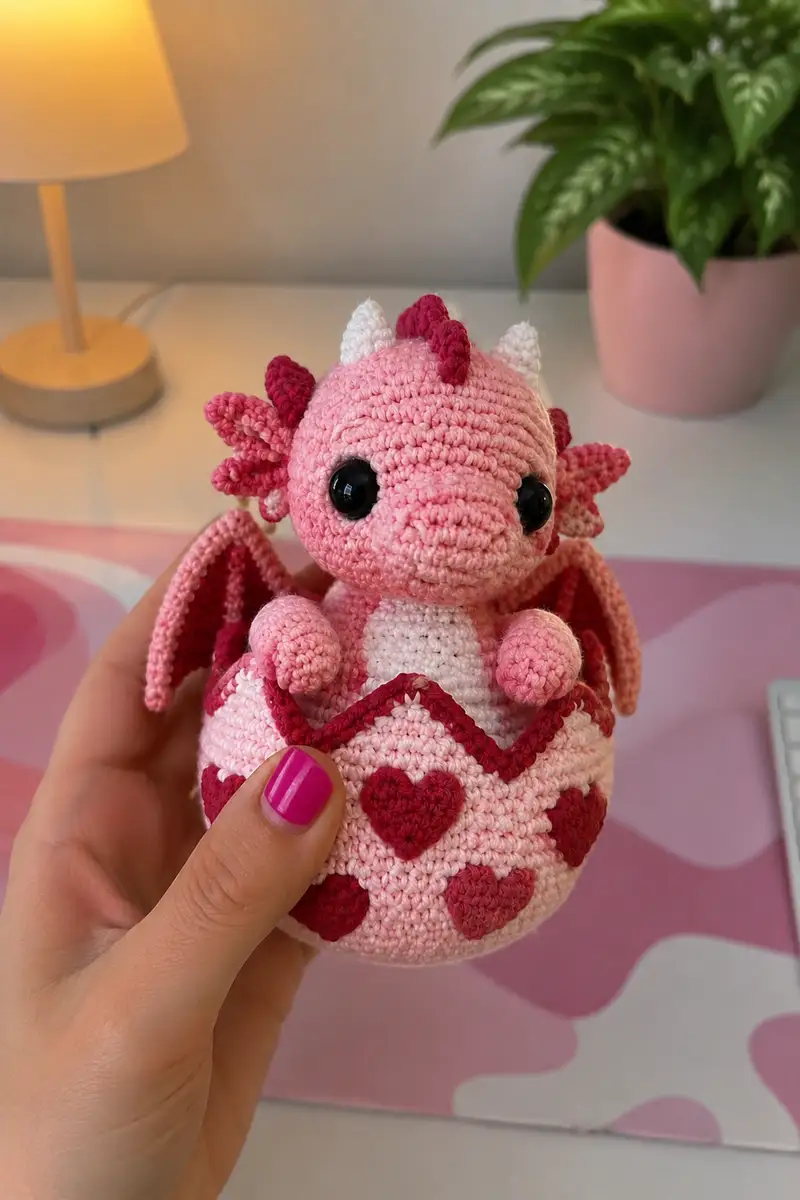
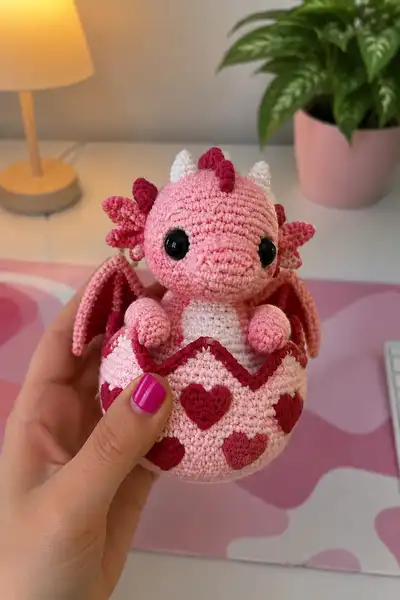
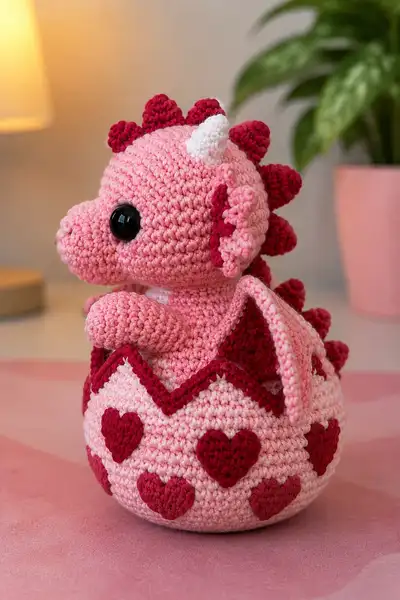
Cuddle up to this adorable pink baby dragon peeking out from a cracked heart-patterned egg. This detailed amigurumi pattern recreates the seated dragon with expressive black eyes, tiny horns, ruffled cheek frills, layered wings, and a scalloped egg top decorated with hearts. The finished piece is perfect as a Valentine gift, nursery accent, or collector's plush. Detailed round-by-round instructions and assembly tips are included for a polished finish.
Progress Tracker
0% Complete
— Head :
Round 1 :
6 sc in magic ring (6)
Round 3 :
(1 sc, inc) x 6 (18)
Round 4 :
(2 sc, inc) x 6 (24)
Round 5 :
(3 sc, inc) x 6 (30)
Round 6 :
(4 sc, inc) x 6 (36)
Round 7 :
(5 sc, inc) x 6 (42)
Round 8 :
(6 sc, inc) x 6 (48)
Info :
Use continuous spiral (do not join rounds) for a seamless head. Place a stitch marker in first stitch and move it each round. Use light pink yarn for all head rounds unless noted.
Round 9-12 :
1 sc in each st (48)
Info :
Position safety eyes between rounds 12 and 13, leaving 9-10 stitches between centers for a sweet wide-eyed look. If using 12 mm eyes, place them roughly at round 13 with 9 stitches spacing; adjust slightly for expression.
Round 13 :
1 sc in each st (48)
Round 14 :
1 sc in each st (48)
Round 15 :
1 sc in each st (48)
Info :
If you prefer embroidered eyes, stop before placing safety eyes and embroider using black yarn at this height, adding white french knot highlights later.
Round 16 :
(6 sc, dec) x 6 (42)
Round 17 :
(5 sc, dec) x 6 (36)
Round 18 :
1 sc in each st (36)
Round 19 :
(4 sc, dec) x 6 (30)
Info :
Begin stuffing head firmly at this stage, using small amounts of fill to create even shaping in the cheeks and forehead. Keep stuffing moderate to achieve a plush round head that will sit well in the egg.
Round 20 :
(3 sc, dec) x 6 (24)
Round 21 :
(2 sc, dec) x 6 (18)
Round 22 :
(1 sc, dec) x 6 (12)
Info :
Fasten off leaving a 20-25 cm tail to sew the head to the neck/body later. Finish stuffing firmly and close the small hole using yarn needle and ladder stitch. Set head aside while you make the snout and other facial elements to add before final assembly.
— Snout / Muzzle :
Round 1 :
6 sc in magic ring (6)
Round 3 :
(1 sc, inc) x 6 (18)
Round 4 :
(2 sc, inc) x 6 (24)
Round 5-6 :
1 sc in each st (24)
Info :
The snout will be slightly elongated-shaped; work in continuous rounds. Attach the snout to the head after round 6 by pinning it centered and slightly lower than the eye line.
Round 7 :
(3 sc, dec) x 6 (18)
Round 8 :
(2 sc, dec) x 6 (12)
Round 9 :
(1 sc, dec) x 6 (6)
Round 10 :
Fasten off leaving long tail for attaching and molding into place. Do not overstuff snout — just enough to give it shape without creating hard lumps.
— Neck / Upper Body Join :
Info :
We will join the head to the chest/body area after both pieces are made. Neck shaping is subtle: the head base will sit into the top opening of the torso. Leave long tails on both head and body for secure sewing.
— Torso / Belly :
Round 1 :
6 sc in magic ring (6)
Round 3 :
(1 sc, inc) x 6 (18)
Round 4 :
(2 sc, inc) x 6 (24)
Round 5 :
(3 sc, inc) x 6 (30)
Round 6 :
(4 sc, inc) x 6 (36)
Round 7-10 :
1 sc in each st (36)
Info :
Change to pale pink for belly rounds if you want a lighter belly contrast; attach new color with sl st and continue in continuous rounds. Work rounds 7-10 in pale pink to form the belly panel.
Round 11-14 :
1 sc in each st (36)
Info :
At this point the torso is wide enough to sit inside the egg. Stuff the torso moderately, especially around the lower belly, so it has a stable base. Keep stuffing lighter near top where head will attach.
Round 15 :
(5 sc, dec) x 6 (30)
Round 16 :
(4 sc, dec) x 6 (24)
Round 17 :
(3 sc, dec) x 6 (18)
Round 18 :
(2 sc, dec) x 6 (12)
Round 19 :
1 sc in each st (12)
Info :
If you plan to seat the torso inside a pre-made egg bottom, leave rounds 15-19 less stuffed so the body can nestle inside; otherwise stuff firmly and close. Fasten off leaving tail for sewing to head and to secure into egg.
— Arms (Make 2) :
Round 1 :
6 sc in magic ring (6)
Round 3 :
(1 sc, inc) x 6 (18)
Round 4-6 :
1 sc in each st (18)
Info :
Stuff the hand portion firmly to create a rounded paw. Keep a stitch marker and do not overstuff so the arm still looks cuddly and will sew smoothly to the torso/egg rim.
Round 7 :
(2 sc, dec) x 4, 2 sc (14)
Round 8-10 :
1 sc in each st (14)
Round 11 :
(2 sc, dec) x 3, 2 sc (11)
Round 12-14 :
1 sc in each st (11)
Round 15 :
(1 sc, dec) x 3, 2 sc (8)
Round 16 :
1 sc in each st (8)
Info :
Fasten off leaving long tail. Sew arms to the sides of the torso at approximately where the egg rim will meet rounds 8-10 of the arm and rounds 8-10 of the belly. Pin before sewing for symmetrical placement.
— Wings (Make 2 layered wings) :
Info :
Each wing is made in two layers: inner membrane (deep pink) and outer wing border (light pink). Sew membrane to outer border along seam and then attach to back of torso so they fold forward slightly.
Wing Membrane Round 1 :
6 sc in magic ring (6) using deep pink (membrane)
Round 3 :
(1 sc, inc) x 6 (18)
Round 4 :
(2 sc, inc) x 6 (24)
Round 5 :
1 sc in each st (24)
Wing Border Round 1 :
Join light pink to outer edge of membrane with sl st then 1 sc in each st around (24)
Round 2 :
1 sc in each st BLO (24) — creates a neat ridge
Round 3 :
Dec shaping on one side to create folded wing tip: (6 sc, dec) x 3 (21)
Round 4 :
1 sc in each st (21)
Info :
Sew wings symmetrically to back sides of torso at approximately the height of belly rounds 4-8. Use pins to position so that wings fold inward and rest on the egg rim when the dragon sits.
— Cheek Frills / Side Ears (Make 2) :
Round 1 :
6 sc in magic ring (6) using light pink
Round 3 :
(1 sc, inc) x 6 (18)
Round 4 :
1 sc in each st (18)
Round 5 :
Change to deep pink for ruffle edge: *ch 2, 3 dc in next st, sl st in next* across to make three scallops, adjust to shape (work approximately 3 scallops)
Info :
Sew cheek frills to side of head centered behind the eyes at approximately the line between head rounds 10-14. The ruffled edge should flare slightly outward to frame the face.
— Horns (Make 2: one white, one deep pink) :
Round 1 :
4 sc in magic ring (4)
Round 3 :
(1 sc, inc) x 4 (12)
Round 4 :
1 sc in each st (12)
Round 5 :
(2 sc, dec) x 3 (9)
Round 6 :
1 sc in each st (9)
Round 7 :
Make 2-3 dc across one side to create a tapered point; fasten off leaving tail to sew. Lightly stuff the horn so it keeps its cone shape but remains soft.
Info :
Sew the white horn centered slightly forward on the head top and the deep pink horn near the small ridge behind it so they read as a pair of tiny horns. Use placement approx at head round 6-8 measured from forehead center.
— Dorsal Spikes (Make 7 small spikes) :
Info :
Alternate colors across the spine: deep pink, light pink, deep pink, etc. Spikes are small cones; place them down the center back of the head and continuing onto the tail if desired.
Spike Round 1 :
5 sc in magic ring (5)
Round 3 :
(1 sc, inc) x 5 (15)
Round 4 :
(2 sc, dec) x 5 (10)
Round 5 :
Slip stitch across top to create point, fasten off leaving long tail for sewing. Make 7 spikes in alternating colors.
Info :
Sew the largest spikes toward center-back of head and taper slightly smaller toward the neck. Secure spikes firmly with multiple passes of yarn to prevent floppiness.
— Tail (optional small tail) :
Round 1 :
6 sc in magic ring (6)
Round 3-6 :
1 sc in each st (12)
Round 7 :
(2 sc, dec) x 3 (9)
Round 8-10 :
1 sc in each st (9)
Round 11 :
(1 sc, dec) x 3 (6)
Round 12 :
Fasten off leaving tail. Add a small spike at tail end if desired using spike pattern rounds 1-3 and sew in place.
— Egg Base (Bottom Half) :
Round 1 :
6 sc in magic ring using pale pink for egg base (6)
Round 3 :
(1 sc, inc) x 6 (18)
Round 4 :
(2 sc, inc) x 6 (24)
Round 5 :
(3 sc, inc) x 6 (30)
Round 6 :
(4 sc, inc) x 6 (36)
Round 7 :
(5 sc, inc) x 6 (42)
Round 8 :
(6 sc, inc) x 6 (48)
Round 9-12 :
1 sc in each st (48)
Info :
We will create a wide bowl shape for the egg base to host the dragon. Work even rounds until the bowl is tall enough to hold the dragon torso (typically 9-12 rounds for this yarn/hook). Stuff the egg base lightly after a few rounds to help it keep shape.
Round 13 :
(6 sc, dec) x 6 (42)
Round 14 :
1 sc in each st (42)
Round 15 :
(5 sc, dec) x 6 (36)
Round 16-18 :
1 sc in each st (36)
Round 19 :
(4 sc, dec) x 6 (30)
Round 20 :
1 sc in each st (30)
Round 21 :
(3 sc, dec) x 6 (24)
Round 22 :
1 sc in each st (24)
Info :
Stop increasing earlier if you want a narrower egg. The counts here produce an egg roughly 9-11 cm in diameter for DK yarn and a 3.0 mm hook. Stuff the bottom firmly so it supports the dragon sitting inside.
Round 23 :
(2 sc, dec) x 6 (18)
Round 24 :
1 sc in each st (18)
Round 25 :
(1 sc, dec) x 6 (12)
Info :
Fasten off leaving long tail if you plan to weave closed; but for a hollow bowl to seat the dragon, do not close—stop at round 22 or 24 and leave edge open for zigzag finish. If you close completely, you will not be able to insert the dragon.
— Egg Top Rim / Scalloped Crack :
Info :
The cracked top is created by crocheting a scalloped edge that matches the egg opening. Join deep pink to the open top edge and work a zigzag scallop that will be sewn to create the jagged edge.
Round 1 :
Join deep pink to top edge, ch 1, sc around entire top edge placing 1 sc in each stitch; do not increase (number will match opening, e.g., 48)
Round 2 :
*sc in next 5, 5 dc cluster in next (or 3 dc depending on size), sc in next 5, sl st in next* repeat around to create peaks and valleys for zigzag (adjust counts to create 6-8 prominent zigzags)
Round 3 :
Work a second deep pink row of sc around peaks to thicken rim and create the deep border. Fasten off and leave long tail for attaching to egg bottom if it was made as a separate piece.
Info :
When shaping the cracked rim, ensure peaks align evenly by counting stitches between peaks. The zigzag will peek outward when placed around the dragon for the ‘hatching’ effect.
— Heart Appliques (Make 6) :
Heart Round 1 :
ch 5, turn. Row 1: (starting in 2nd ch from hook) 1 sc, 1 hdc, 3 dc, 1 hdc, 1 sc across (total 7 stitches); sl st to form small cup
Heart Round 2 :
Ch 2, 3 dc in top ch (center), sl st to next cup edge, 3 dc in top ch, ch 2, sl st to close. Fasten off leaving tail for sewing. Each heart is made by a small cluster of dc rounds forming a heart; make 6 in deep pink and arrange evenly around egg bottom.
Info :
Sew hearts onto the egg bottom starting one or two rounds below the zigzag rim so they sit centered on ‘faces’ of the egg. Use pins to test placement: three hearts on front visible, three on back; spacing approx every 8-9 stitches around a 48-stitch circumference.
— Egg Decorative Zigzag Border (Contrast Row) :
Round 1 :
With deep pink, join to scallop peaks and work 1 sc around peaks to define edge (fasten off)
Info :
This deep-pink border visually outlines the cracked rim and creates a contrast line that frames the dragon. Use a smaller hook (2.5 mm) to make this ridge more defined if desired.
— Assembly and Placement of Dragon into Egg :
Info :
Before sewing parts to each other, block pieces by pinning to shape if needed. Position the dragon torso inside the egg bottom so that the head and arms protrude through the scalloped top. Use pins to mark where arms and head contacts the rim for sewing.
Step :
Sew the head to the top of the torso with the long tail left when closing the head. Use mattress or whip stitch and weave the tail through multiple stitches to secure. Make sure head is centered and that the snout sits slightly over the egg rim for cuteness.
Step :
Sew arms to the inner rim or to the torso sides so they look like they are clasping the egg. Place arms so that round 6-8 of arm aligns with the egg rim; use invisible stitches and leave no gaps.
Step :
Sew dorsal spikes along center back of head and down the small tail if present. Space spikes evenly; for 7 spikes on the head and neck use 6-7 stitches between centers depending on head circumference. Secure with multiple passes for stability.
Step :
Attach wings to the back sides of the torso using the long tails; sew root of wing to torso rounds 10-14 for balanced placement. Sew membranes to outer wing if not already done.
Step :
Sew the scalloped egg rim to the egg bottom if worked separately, then slip the dragon into the bottom so it appears to be hatching. Optionally sew the dragon base to the inside bottom half to secure it in place.
Info :
Weave in all loose ends, and if you used safety eyes, make sure their back washers are fully locked. Add a few hand-sewn stitches through egg rim to body base for extra stability if the dragon is intended as a toy for small children.
— Finishing Details :
Info :
Embroider a small mouth below the snout with deep pink yarn using a few neat backstitches or a simple straight stitch. Add two tiny french knots for nostrils. If you like blush, use a tiny dab of fabric-friendly blush powder on cheeks.
Info :
Place final safety eyes if you delayed installing them earlier; ensure stuffing under the eye area is even to avoid dimpling. Tidy all seams and finalize shaping by molding wings and frills with fingers and blocking pins if needed.
This charming baby dragon hatching from a heart-decorated egg is a delightful project that combines shaping, applique, and whimsical details. The finished amigurumi makes a perfect Valentine, nursery accent, or heartfelt gift. Each careful stitch brings personality to the dragon — from the tiny cheek frills to the zigzag egg rim. Have fun customizing colors and adding little flourishes that make the piece uniquely yours. 🧶💕