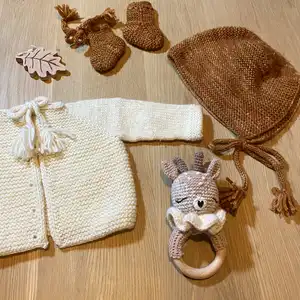
Create a sweet three-piece baby set featuring a garter stitch cardigan, a cozy bonnet and tiny boots. This pattern gives clear shaping, measurements for multiple sizes, and charming finishing details like I-cord ties and tassels. Perfect for making a thoughtful newborn gift or a treasured keepsake for a little one.
Progress Tracker
0% Complete
— Final dimensions :
Info :
The Biscuit (mini) set is a 3 piece set, featuring garter stitch. The bonnet, baby boots and cardigan make a perfect birth gift, for someone you love or for yourself. The garter stitch gives a squishy feel to the knitting, which is ideal to keep baby warm and cosy.
Infos :
Our baby patterns are a regular fit : choose the size you would pick in a shop for your child. If still in doubt, below are the finished measurements for Preemie, Newborn, 3 months, 6 months and 12 months.
— Yarn / Gauge / Needles / Notions :
Info :
Cardigan : 150, 200 (230, 300) 350 meters. Bonnet : 50, 60 (80, 95) 110 meters. Boots : 50, 60 (80, 95) 110 meters of DK weight yarn.
Info :
So 3, 3 (4, 5) 6 balls of our base N°2 - Mérino DK, Lolilafée. Yarn used for the sample: Lolilafée, base N°2 - Mérino DK 'Ecru' colourway.
Info :
Gauge: 22 sts per 40 rows = 10cm / 4" (washed and blocked) in garter st, worked flat, using 4 mm / US 6 needles.
Info :
Needles: 4 mm / US 6 needles (depending on the needles with which you get gauge).
Info :
Notions: 1 BORM, 8 st markers, tapestry needle, blocking tools, 60 cm cable minimum for the magic loop, 6 to 10 buttons (12mm).
— Glossary :
Info :
st(s) : stitch(es). k : knit. p : purl. sl* wyif/wyib : slip * stitch(es) purlwise with yarn in front / in back. R : row/round. M : marker. BORM : beginning of round marker. PM : place marker.
Info :
RM : remove marker. SM : slip marker from left to right needle. DR : decrease row. RS : right side. WS : wrong side. CO : cast on. BO : bind off. EOR : end of row. N1/N2 : needle 1 / needle 2.
Info :
Stockinette st: knit flat: R1 (RS): k until EOR. R2 (WS): p until EOR. in the round: k until BORM (all rows).
Info :
Garter stitch knit flat: R1 (RS): k until EOR. R2 (WS): k until EOR. in the round: R1 : k until EOR. R2 : p until EOR.
Info :
Increases: M1R : right leaning increase on the right side. M1L : left leaning increase on the right side. Decreases: k2tog : right leaning decrease - knit the next 2 sts together. SSK : left leaning decrease - slip, slip, knit. yo : yarn over. W&T : wrap and turn (short rows).
— Cardigan :
Cast on :
CO 42, 42 (50, 50) 54 sts using the long tail cast on method. Do not join in the round.
Placement row :
k 10, 10 (12, 12) 13, PM, p1, PM, p2, PM, p1, PM, k 14, 14 (18, 18) 20, PM, p1, PM, p2, PM, p1, PM, k 7, 7 (9, 9) 10, sl3 wyif.
Raglan - R1 (RS) :
k until M, *M1R, SM, k1, SM, M1L, k until M, repeat from * a total of 3 times, M1R, SM, k1, SM, M1L, k until 3 sts from EOR, sl3 wyib.
Raglan - R2 (WS) :
p3, *k until M, SM, p1, SM, p until M, SM, p1, SM, repeat from * twice, k until 3 sts from EOR, sl3 wyif.
Info :
Work R1 & R2 a total of 12, 14 (14, 16) 17 times.
Buttonhole row :
work R1 until 5 sts from EOR, yo, k2tog, sl3 wyib.
Body/sleeves separation - R3 (RS) :
k until M, RM, k1, RM, put the sleeve sts on hold, CO 2, 2 (2, 3) 4 sts, RM, k1, RM, k until M, RM, put the sleeve sts on hold, CO 2, 2 (2, 3) 4 sts, RM, k1, RM, k until 3 sts from EOR, sl3 wyib.
Info :
Work R1 & R2 a total of 12, 14 (14, 16) 17 times. Buttonhole row : work R1 until 5 sts from EOR, yo, k2tog, sl3 wyib.
Body :
Continue working in garter st, repeating R5 & R6 below until the body is 13, 15 (16, 17) 19 cm long from the body/sleeve separation (measurement taken from the underarm). Keep in mind to continue creating the buttonholes every 4cm.
R5 (RS) :
k until 3 sts from EOR, sl3 wyib.
R6 (WS) :
p3, k until 3 sts from EOR, sl3 wyif.
Buttonhole row :
work R5 until 5 sts from EOR, yo, k2tog, sl3 wyib.
Info :
Once you reach the recommended body length, BO the sts as they come and cut the yarn.
Sleeves :
Put back on the needles the 26, 30 (30, 34) 36 sts from the sleeve. Starting at the middle of the underarm, pick up 2, 2 (2, 3) 4 sts, k the sleeve sts, the pick up another 2, 2 (2, 3) 4 sts at the underarm and BORM.
Info :
Work 3 cm in stockinette st then, start working the decrease row.
DR :
k1, k2tog, k until 3 sts from BORM, SSK, k1.
Info :
Work RD every 2.5, 2.5 (3, 3) 2.5 cm a total of 2, 3 (3, 4) 5 times.
Continue :
Continue working in stockinette st until the sleeve is 10, 12 (14, 16) 18 cm long from the underarm.
Cuff :
Work 2 cm in garter st in the round (knit one row, purl one row), then bind off the sts as they come and cut the yarn.
Note :
Work the second sleeve the exact same way.
Neckline :
CO 3 sts, leaving a 15cm tail and work a 12, 15 (15, 17) 20 cm long I-cord. Do not cut the yarn.
Neckline - continue :
Using the 3 sts from the I-cord that are still on the needles, with the tail on the left, pick up a st on the right front. Move the sts to the left needle and BO into an I-cord.
Neckline - finish :
Repeat this sequence until all sts from the neckline have been bound off into an I-cord. Without cutting the yarn, work a 12, 15 (15, 17) 20 cm long I-cord.
Tassels :
Slip 1 st knitwise, k2tog, pass the slipped st over the second one. Using a new piece of yarn, create a 10 ply tassel and pass it through the remaining st to attach it to the I-cord. Weave int he ned to secure the tassel.
Tassels - finish :
On the second end of the I-cord, create a loop using the CO tail, attach a second 10 ply tassel and weave in the ends to secure it.
— Bonnet :
Bonnet - Cast on :
CO 60, 70 (80, 90) 100 sts using the long tail cast-on method. Do not join in the round.
R1 (RS) :
k until 1 st from EOR, sl1 wyif.
R2 (WS) :
k until 1 st from EOR, sl1 wyif.
Info :
Work R1 & R2 until the piece is 7, 8 (9, 10) 13 cm long from the CO row.
Decrease crown :
Place BORM and join to work in the round. On the next round, place M as follows : *k 6, 7 (8, 9) 10, PM, repeat from * until 6, 7 (8, 9) 10 sts from BORM, k until BORM.
R1 :
*k2tog, k until M, SM, repeat from * until BORM.
R2 :
k until BORM, slipping M as they come.
Info :
Work R1 & R2 until there are 2 sts in between the M.
R3 :
*k2tog, repeat from * until BORM, removing M as they come.
R4 :
*k2tog, repeat from * until BORM.
Ties :
Pick up 3 sts in the left corner of the bonnet and knit a 15, 15 (15, 20) 20 cm long I-cord. BO the sts, then create an 8 ply tassel and attach it to the end of the tie.
Note :
Work the second link the exact same way.
— Boots :
Setup - Cast on :
CO 18, 22 (26, 30) 34 sts using the long-tail cast on method.
Magic-loop setup :
The boot is worked in magic-loop : Distribute 9, 11 (13, 15) 17 sts per needle and join to work in the round. The beginning of the round is on N1, meaning when the CO tail is on your right. You can PBORM if you want to. Working an entire round means knitting the sts on both needles (N1 & N2).
Info :
Work R1 & R2 a total of 3 times.
R3 :
N1: k1, *k2tog, yo, repeat from * until 2 sts from end of N1, k2. N2: k1, *yo, k2tog, repeat from * until end of N2.
Info :
Work R1 & R2 for another 6, 7 (7, 8) 9 times total, the R1 once more.
Heel - Part 1 :
Turn your piece on the WS to work back and forth (you are now only working on N2). Continue working in garter st for 9, 11 (13, 13) 15 rows.
Heel - Part 2 R1 (RS) :
k 6, 7 (9, 9) 11, W&T
Heel - Part 2 R2 (WS) :
k 3, 3 (4, 3) 5, W&T
Heel - Part 2 R3 (RS) :
k until previous W&T, k2tog, W&T
Heel - Part 2 R4 (WS) :
k until previous W&T, k2tog, W&T
Info :
Work R3 & R4 a total of 2, 2 (2, 3) 3 times. You have 5, 7 (9, 9) 11 sts left on N2.
Gusset :
N2 : k 5, 7 (9, 9) 11, turn you work 90° clockwise and pick up 4, 6 (6, 8) 9 sts on the raw edge. N1 : p until end of N1. N2 : turn you work 90° clockwise and pick up 4, 6 (6, 8) 9 sts on the raw edge, p until end of N2.
Gusset decreases R1 :
N1 : k until end of N1. N2 : SSK, k until 2 sts from end of N2, k2tog.
Gusset decreases R2 :
N1 : p until end of N1. N2 : p until end of N2.
Info :
Work R1 & R2 a total of 3, 4 (4, 5) 6 times.
Foot :
Continue working the foot in garter st until it is 5, 6 (7, 7) 8 cm long from the start of the heel.
Toe R1 :
N1: SSK, k until 2 sts from end of N1, k2tog. N2: SSK, k until 2 sts from end of N2, k2tog.
Toe R2 :
p all sts (N1 & N2).
Info :
Work R1 & R2 a total of 1, 2 (3, 3) 4 times, then close the toe using the Kitchener st.
Link :
CO 3 sts and knit a 30, 30 (30, 35) 35 cm long I-cord. BO the sts.
Link - finish :
Pass the link through the eyelets at the top of the leg, then make two 8 ply tassels and attach them to the end of the I-cord.
Note :
Make a second boot the exact same way.
— Finishing :
Info :
Your set is now all done, all you have left to do is weave in the ends, sew the buttons on and admire it!
Info :
It is common practice to place buttonholes on the right front for boys and on the left front for girls. We ourself always create them on the right front, but you can easily place them on the left front by doing the yo at the beginning of the row if you wish to.
Thank you for choosing the Biscuit (mini) set — a cozy, thoughtful gift to knit with love. These sweet pieces combine simple stitches with charming details for a polished finish. Happy knitting and may your new baby set bring warmth and smiles! 🧶✨