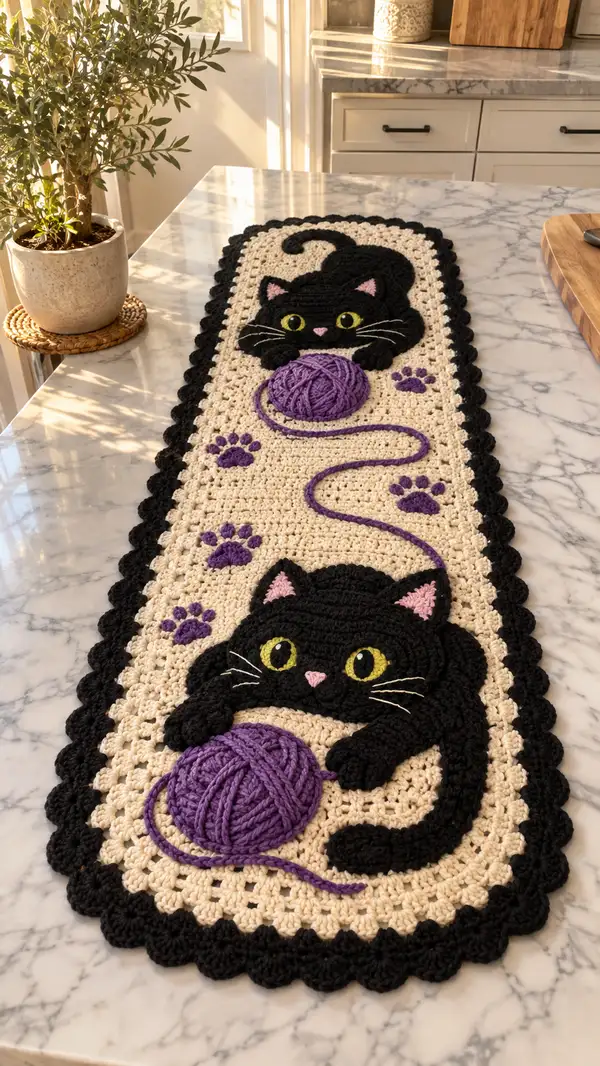
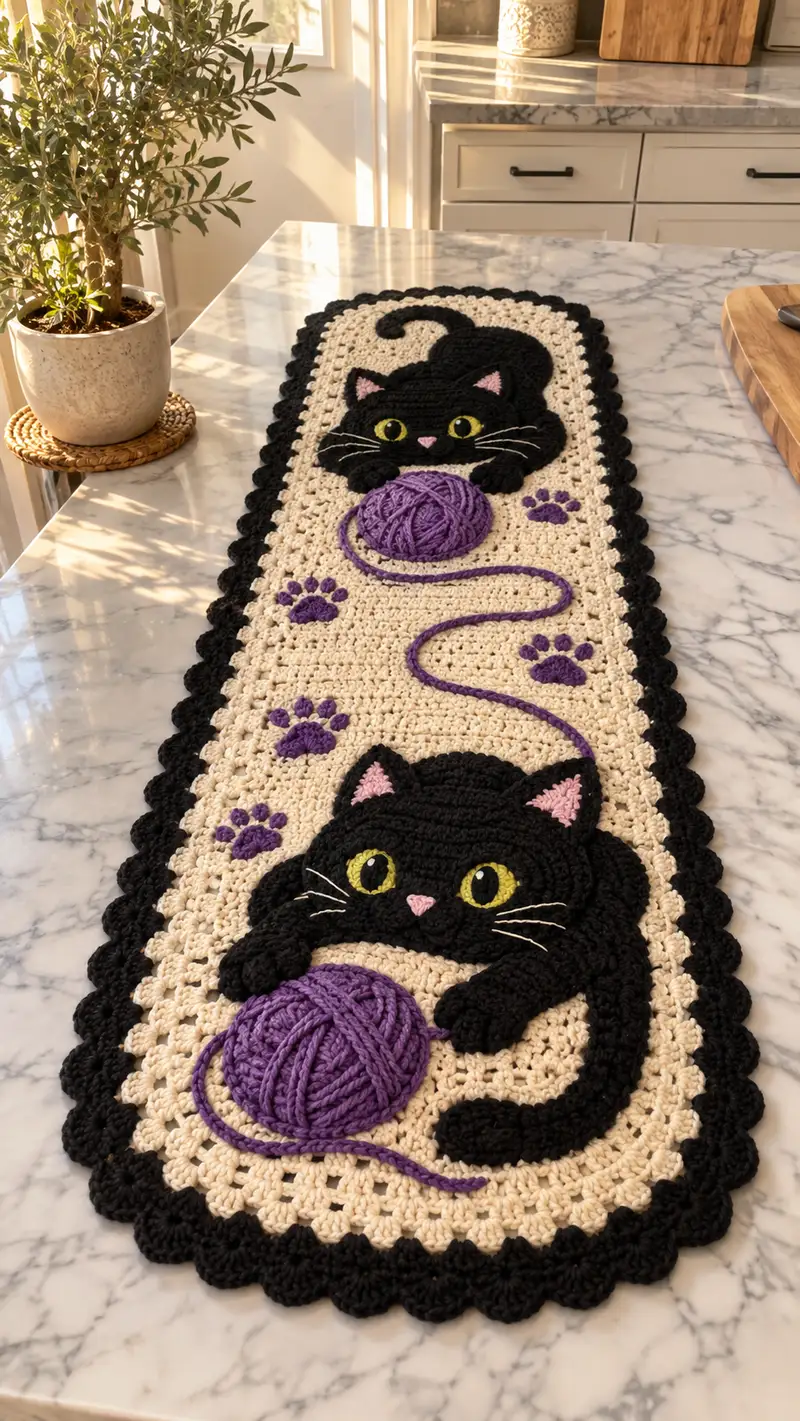
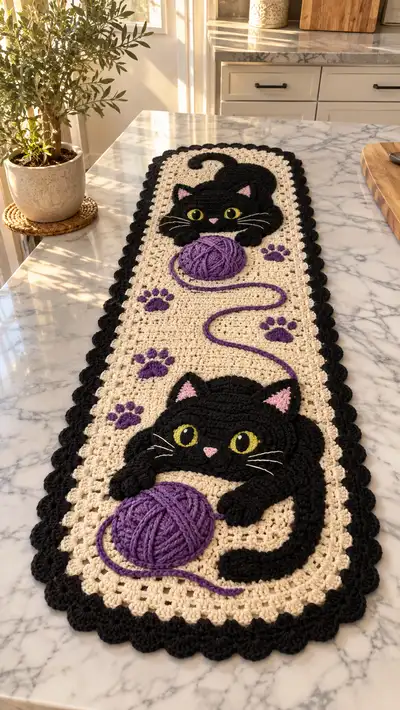
A charming rectangular table runner featuring two playful black cat appliques, purple yarn balls and paw prints on a warm cream granny-style background with a scalloped black border. This pattern includes step-by-step instructions to crochet the base runner and make the layered cat shapes, yarn balls, embroidered whiskers and paw pads. The finished runner brings a whimsical, cozy accent to a kitchen or table and combines simple granny stitches with appliqued details for a polished handmade look.
Progress Tracker
0% Complete
— Base Runner (Granny Rectangle) :
Info :
Work base runner flat in joined rounds as a granny-style rectangle. Use 5.0mm hook and cream yarn. The runner in the photo measures approximately 36" long x 9" wide; adjust number of rounds to reach your desired length. Start with a foundation chain that creates a rectangle roughly 9" wide—this pattern uses a foundation chain of 42 chains for the width shown. Gauge: approx 14 dc clusters across equals 9" with 5.0mm hook.
Foundation :
Ch 42 (this is the width; if you want wider, add multiples of 3+1)
Round 1 :
Dc in 4th ch from hook (counts as dc cluster), ch1, sk 2 ch, (3 dc in next ch, ch1, sk2) across until last ch, ending with a final dc in top of turning ch. Join with sl st to first dc to form a small rectangular loop. Work a tidy corner by placing pairs of clusters into corner chains so corners turn nicely. Count should produce 13 full clusters across plus corner clusters (approx 15 cluster units including corners).
Round 2 :
Ch3, turn work, (3 dc in ch-1 space, ch1) across, placing 3-dc clusters in each ch-1 space of previous round and 3-dc clusters into corner spaces to create a squared corner. Join with sl st to top of beginning ch3.
Rounds 3-6 :
Repeat Round 2 (granny cluster rows) maintaining rectangle; work evenly. After round 6 your rectangle will be a medium height; continue until you reach desired runner length. For the sample runner, work until you have 30 rounds of clusters total to reach approx 36" length. (See info below for exact counts.)
Info :
For the photographed dimensions, the maker worked 30 rounds of granny cluster rows, producing a length of around 36". You can measure and add or subtract rounds to match your table length. Keep the stitch counts consistent so appliques have expected positions.
Rounds 7-12 :
Continue 3-dc cluster in each ch-1 space across, placing 3-dc cluster groups into corner spaces to maintain neat corners. Fasten off at end of desired length if you plan to attach border separately, otherwise continue to border rounds below. Maintain even tension to keep rectangular shape flat.
Info :
If you prefer a firmer base for heavy appliques, add a backing fabric later or use a slightly smaller hook (4.5mm). Blocking the rectangle lightly before seaming will help remove any waves.
Round 13-30 :
Work additional rounds until runner is desired length. Sample: total 30 rounds. Keep counts consistent; do not add increases except corner cluster groups.
Info :
Keep the right side facing up. Mark the center line of your rectangle with removable pins to guide applique placement: mark central cluster row for middle and measure equal distances toward each end for the two cat placements.
Border Preparation :
Once base is complete and measured, leave a long tail for join to border and join black yarn for border rounds.
— Scalloped Border :
Info :
Border is worked in black yarn around the entire rectangle to create a scalloped edge that frames the runner. Work in joined rounds; place stitch markers for corners.
Round 1 (Border Join) :
Join black yarn with sl st to any ch-1 space on edge. Ch1, sc evenly around edges placing 1 sc in each ch-1 space and 2 sc in each corner cluster space. Work 3 sc in each corner if needed for a rounded corner. Join with sl st to first sc.
Round 2 :
Ch1, (sc 1 in next 2 sc, 5 dc in next sc) repeat around to create scallops: essentially work 'shells' of 5 dc alternating with 2 sc between shells. At corners work 7 dc shells to wrap corner. Join with sl st.
Round 3 :
Ch1, sc in each stitch around, working 3 sc across the top of 5-dc shells and placing 2 sc in spaces between shells to define scallop edges. Join and fasten off. Weave in ends. Border complete and runner ready for applique placement.
Info :
Block runner lightly if needed for flatness before attaching appliques. Place cat appliques with pins on runner before sewing to ensure symmetrical placement: one cat near top third, another near bottom third with a yarn-ball in the center.
— Cat Head & Face Applique (Make 2, Top and Bottom) :
Info :
Cat heads are worked in flat rounds to create a slightly domed applique. Use black yarn and 4.0mm hook for tighter fabric. Each head will be approx 6.5" wide by 5.5" tall as a layered applique. Work in continuous rounds for a smooth join; counts are given for right-side facing. Place safety eyes or embroider eyes as instructed later.
Round 1 :
With black, mr, 6 sc in ring (6)
Round 3 :
(1 sc, inc) x6 (18)
Round 4 :
(2 sc, inc) x6 (24)
Round 5 :
(3 sc, inc) x6 (30)
Round 6 :
(4 sc, inc) x6 (36)
Info :
Rounds 1-6 create a circular base. From here we'll begin shaping the head into an oval; mark the front center of the head where eyes will be placed—this will be between rounds 9-12 horizontally and slightly below center for a playful expression.
Round 7 :
(5 sc, inc) x6 (42)
Round 8 :
(6 sc, inc) x6 (48)
Round 9 :
1 sc in each st around (48)
Round 10 :
1 sc in each st around (48)
Round 11 :
1 sc in each st around (48)
Info :
Place eye markers between rounds 11 and 12 at approx 10-12 stitches apart depending on desired facial width. For the look pictured, place eyes about 12 sts apart center-to-center for each eye (count from marked center stitch).
Round 12 :
1 sc in each st around (48)
Round 13 :
(6 sc, dec) x6 (42)
Round 14 :
(5 sc, dec) x6 (36)
Info :
Begin forming chin and cheek shaping by slightly flattening lower rounds. Stuff very lightly if you want a slightly raised applique; otherwise leave flat. Use a small amount of fiberfill placed under center for subtle dome.
Round 15 :
(4 sc, dec) x6 (30)
Round 16 :
(3 sc, dec) x6 (24)
Round 17 :
(2 sc, dec) x6 (18)
Round 18 :
(1 sc, dec) x6 (12)
Round 19 :
6 dec (6) Fasten off leaving long tail for sewing
Info :
Sew head to runner with long tail and mattress or whip stitch around edges. Position head so lower edge meets body applique (to be attached first) and upper curve sits nicely below the border. Sew with small, even stitches to hide the seam.
— Face Details (Eyes, Nose, Whiskers) :
Info :
Eyes are layered: yellow iris with black pupil and a white highlight. Use yellow yarn to crochet small flat circles or embroider. For secure small pieces, embroider directly onto black head using yarn needle.
Eye Iris Round 1 :
With yellow, mr, 6 sc in ring (6)
Eye Iris Round 2 :
Inc x6 (12). Fasten off leaving tail to stitch in place. Place iris onto head at previously marked positions.
Pupil :
With black embroidery or tiny sewn circle, embroider a small slit-shaped pupil onto the yellow iris, leaving a small round highlight of cream or white at upper corner. Alternatively, use felt or safety eyes if making a child-safe item—use embroidered eyes for safety.
Nose :
With pink yarn, mr, 4 sc in ring (4), fasten off leaving tail to sew centered between eyes and above mouth area. Embroider a small triangle nose with long tail and anchor behind head.
Whiskers :
With white thread or yarn and embroidery needle, stitch three whisker lines on each side of the face. Secure ends on the backside and weave in tails. For a dimensional look, use a strand of yarn doubled and tack it in the center so whiskers slightly lift.
Info :
Use pins to place eyes and nose before securing. If using sewn-on eyes, stitch through both applique and runner and tie securely on the back of the base. Make sure all small parts are secure for durability.
— Cat Body Applique (Make 2 matching bodies) :
Info :
Body is worked flat in rounds to create a rounded, slightly raised oval shape. This part sits beneath head and includes front paws and tail starting point. Work with 4.0mm hook and black yarn. Body is slightly larger than head; counts below create a body approx 7.5" long by 5.5" wide.
Round 1 :
With black, mr, 6 sc in ring (6)
Round 3 :
(1 sc, inc) x6 (18)
Round 4 :
(2 sc, inc) x6 (24)
Round 5 :
(3 sc, inc) x6 (30)
Round 6 :
(4 sc, inc) x6 (36)
Round 7 :
(5 sc, inc) x6 (42)
Info :
To shape an oval rather than a perfect circle, we will work several even rounds then add increases only at the short ends to elongate the shape. Mark the two opposite sides that will become the 'nose' and 'tail' ends to place extra increase points later.
Rounds 8-11 :
1 sc in each st around (42)
Round 12 :
*Inc, 5 sc, Inc, 16 sc* repeat around to create two slight bulges (46) — mathematically: add 4 total stitches across the round by making two inc points separated by sections of 5 and 16 sc to elongate shape
Round 13 :
1 sc in each st around (46)
Round 14 :
(6 sc, inc) x6 plus 4 extra sc inserted at short ends to keep shape even (52)
Info :
At this stage, stop and place body under head to gauge position; body should sit below the head with front edge slightly overlapping head lower rounds. Adjust numbers by a couple stitches if needed to fit head widths exactly.
Rounds 15-18 :
1 sc in each st around (52)
Round 19 :
(6 sc, dec) x6 + 4 sc reductions at short ends = 46 (mathematically reduce 6 sts)
Round 20 :
(5 sc, dec) x6 + minor shaping as needed (40)
Round 21 :
(4 sc, dec) x6 (36)
Round 22 :
Work even 1 sc around for 1-2 rounds to tidy edge (36)
Info :
Do not fasten off. You will add paws and tail starting from body edges and then finish off. Optionally lightly stuff body center to create subtle lift so appliques look layered.
— Front Paws (Make 4 pads: 2 larger paws for front pair, 2 smaller back paws optional) :
Info :
Paws are slightly 3D and worked in rounds to create a little nub that is sewn onto body front. For the look in photo, front paws are more rounded and slightly raised; back paws are flat paw pad shapes. Use black yarn with 4.0mm hook.
Paw Round 1 (Large paw) :
mr, 6 sc in ring (6)
Paw Round 3 :
(1 sc, inc) x6 (18)
Paw Round 4 :
1 sc in each st around (18)
Paw Round 5 :
(2 sc, dec) x6 (12)
Paw Round 6 :
1 sc in each st around (12) Fasten off leaving long tail for sewing. Lightly stuff if you want slight puffiness, but not firm.
Info :
Sew two large paws to the front edge of each body applique so paws slightly overlap the yarn ball area. For the second cat, mirror placement. Use pins to align and stitch through body and runner to secure.
Small Paw Pad (for paw prints) :
With purple, mr, 6 sc in ring (6) Fasten off leaving tail to sew into runner. For three-toed pad, make a slightly teardrop shape by leaving one side a little elongated using a small short-row (work extra sc on one side then decrease).
Info :
Paw pads that appear stamped into the runner were crocheted flat and sewn flush to the runner surface. Place them symmetrically around the central yarn ball as in the photo: two near lower cat, two near upper cat, two grouped near center ball.
— Tail (Make 2 long tails) :
Info :
Tails are crocheted tubes in black worked in continuous rounds to create a slightly stuffed, curved tail. Work with 4.0mm hook. The curled tail in top cat is longer and tapered; bottom cat tail is shorter and rests along runner edge. Make tails slightly stiff by inserting a long thin cord or lightly stuffing.
Round 1 :
Ch6, join to form ring (or mr with 6 sc), 6 sc around (6)
Round 2-12 :
1 sc in each st around (6) Continue until tail reaches desired length (approx 12 rounds for short tail, 18-22 rounds for long curled tail)
Info :
To taper the tail toward the tip, begin decreasing after round 12: (1 sc, dec) x2 (4) then 2 dec to close and fasten off leaving tail to sew. For curled tail, insert a length of craft wire or pipe cleaner before final stuffing, bend into desired spiral and secure opening by sewing closed tightly around wire.
Round 13 :
(1 sc, dec) x2 (4)
Round 14 :
2 dec (2) Fasten off leaving long tail and stuff lightly; sew closed and secure inside tail base on body piece.
— Yarn Ball Applique (Make 2) :
Info :
Yarn balls are dimensional flat discs with surface spiral to mimic wound yarn. Work in purple with 4.0mm hook; make a round disc then create a raised spiral by sewing corded yarn across the surface. You can also crochet a thin i-cord for the trailing yarn.
Round 1 :
With purple, mr, 6 sc in ring (6)
Round 3 :
(1 sc, inc) x6 (18)
Round 4 :
(2 sc, inc) x6 (24)
Round 5 :
(3 sc, inc) x6 (30)
Round 6 :
1 sc in each st around (30) Fasten off leaving long tail for sewing
Info :
To create the wound yarn look, make a thin cord with purple yarn—either a short i-cord (crochet 3 sc across a folded strip) or a chain of approx 80 chains continuous for the central spiral and tail. Coil this cord across the ball surface in a spiral and tack down with small stitches across the top to create the 3D wound effect. For extra dimension, stitch over the woven spiral with additional loops to mimic strands.
Cord (Trailing Yarn) :
Ch 80 (or desired length), sl st back along chain to create a sturdy cord. Alternatively make i-cord by crocheting 3 sc across folded ch and slip stitching back. Attach one end to yarn ball by sewing under spiral and arrange winding path on runner as in photo.
Info :
Arrange cord in gentle curves that cross the runner from ball to ball. Bury ends securely under body or sew into body/backing to anchor path. Use pins to secure before final stitching.
— Paw Prints (Decorative Purple Pads) :
Info :
Paw prints are made of one larger pad and three small toe pads. Work flat with purple and 4.0mm hook. Make several to match photo placements around runner. Attach flat onto cream base using small whip stitches.
Large Pad Round 1 :
mr, 6 sc in ring (6)
Large Pad Round 2 :
Inc x6 (12)
Large Pad Round 3 :
1 sc in each st around (12) Fasten off leaving tail to sew flat onto base
Small Toe Round :
mr, 6 sc in ring (6) Fasten off leaving tail; make three toes per paw print and sew into position above large pad
Info :
Use reference photo to place paw prints: cluster near bottom cat and upper cat and some centered. Sew pads flat and weave tails through runner for secure hold.
— Ear Appliques (Make 4: 2 per head) :
Info :
Ears are triangular with a pink inner ear and black outer ear layered on top. Work black outer ear first then small pink triangle sewn to center. Small size; use 4.0mm hook.
Outer Ear Round 1 :
Ch 4, turn, sc in 2nd ch from hook, sc2, sc in last ch, continue working along other side of foundation ch (3 sc on return) to create a small semicircle; turn to shape triangle: (3 sc, dec, sc) to taper into point. Alternatively work: mr, 6 sc in ring, (dec, sc) shaping to triangle over 6-8 rounds until you reach a small ear point. Fasten off leaving tail for sewing.
Inner Ear :
With pink, mr, 4 sc in ring, 1 sc in each st next round to make tiny triangle. Fasten off and sew to black outer ear. Sew finished ear to upper edge of head around rounds 6-8 positions symmetrical from center.
Info :
Position ears slightly angled outward and forward for a natural cat look. Use pins and mirror placement on both heads before sewing.
— Assembly & Surface Embellishments :
Info :
Before assembly, block the runner to ensure a flat surface and lay out all appliques in their intended positions. Use the photo as a reference: bottom cat near lower end with head facing upward, upper cat near top end with curled tail. Central purple yarn ball in middle third with long cord connecting the two balls.
Step 1 :
Sew body appliques onto runner first, centering them on pre-marked cluster rows. Use long tail and ladder or whip stitch; make sure front of body faces runner RS. Stitch through body and base runner clusters for a strong attachment.
Step 2 :
Attach head appliques to bodies, aligning lower head edge to upper body edge so the seam is hidden under chin. Use small even stitches and check symmetry before tightening knots.
Step 3 :
Sew front paws onto body front edge so they slightly overlap yarn ball area; secure through both body and runner for stability. Sew tails at body back center and arrange curl; if wire is used, ensure ends are wrapped and sewn into body to avoid poking through fabric.
Step 4 :
Place purple yarn ball in center and sew into place from back. Arrange the cord trailing between balls and tack at 1-2 points along its path to hold shape on runner surface. If you prefer a looser cord, use removable pins; otherwise secure with small stitches under cord at several discreet points.
Step 5 :
Sew paw pads onto runner using purple yarn, matching photo placement. Add three small toe pads above each large pad and secure tails on the back. Weave ends through several stitches and trim close.
Step 6 :
Embroider whiskers with white yarn into face edges. Use long stitches anchored at center nose and secured on the back. Add small white highlights to eyes for life-like shine. Finish by weaving and trimming all tails and tucking loose tails under appliques.
Info :
Work slowly during assembly, check placement from multiple angles and step back frequently to ensure balanced composition. Attach pieces tightly so they ride flat on the runner and survive light washing.
— Finishing Touches & Care :
Info :
Weave all ends thoroughly into body/back of runner. Optionally apply a light spray of fabric stiffener under applique backs if you want them to remain particularly flat. Handwash gently in cool water and lay flat to dry. Avoid machine washing to protect attachments and embroidery.
Final :
Trim all stray fibers and re-block runner if needed. Enjoy your playful black cat table runner!
This whimsical table runner brings together cozy granny texture with playful appliques to create a charming centerpiece for your home. The black cats, purple yarn balls and paw prints give a touch of personality that brightens a kitchen or dining table. Every stitch brings joy — it's a rewarding project that combines simple stitches with creative assembly. 🧶🐾 Enjoy crafting this unique, handmade accent and share the warmth it adds to your space! ✨