🧢 Beautiful ✨ Detailed πŸ’ Adorable

Blue the Dumbo Octopus Amigurumi Pattern

Blue the Dumbo Octopus Amigurumi Pattern
4.4β˜… Rating
5-7 Hours Time Needed
1.5K Made This
βœ‚οΈ

Intermediate Level

Ideal for those with basic crochet experience, featuring slightly more advanced stitches and techniques to expand your skills.

⏱️

Weekend Treat

Takes 5-7 hours, making it an enjoyable project to finish over a couple of days.

🧸

Cute Companion

An adorable friend to cherish, handcrafted with love to bring comfort and joy for years to come.

About This Blue the Dumbo Octopus Amigurumi Pattern

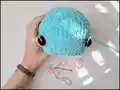
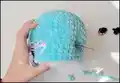
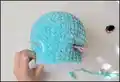
This pattern creates Blue the Dumbo Octopus β€” a plush amigurumi with floppy dumbo-style ears, large expressive eyes, and a frilly tentacle skirt. Worked from the top of the head down, the piece uses bulky weight yarn and a 6.0 mm hook for a soft, squishy finish. The pattern includes detailed rounds, eye placement tips, and full assembly instructions to help you achieve a professional result.

Blue the Dumbo Octopus Amigurumi Pattern crochet pattern - detailed view of completed project

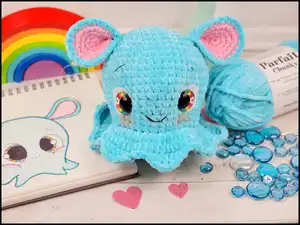
Perfect as a special handmade gift or nursery decor, this pattern emphasizes simple shaping and adorable facial details. Photos and a YouTube reference are included to guide tricky steps like eye sinking and embroidery.

Why You'll Love This Blue the Dumbo Octopus Amigurumi Pattern

I absolutely love this pattern because it turns simple stitches into a characterful little friend with big personality. The dumbo-style ears and frilly skirt give the octopus a whimsical, huggable look I adore. I enjoy how quickly the piece takes shape when working top-down, and how satisfying the eye-placement technique is for creating expressive faces. Making this octopus always brightens my day, and I hope it will bring you the same joy while you crochet it.

Blue the Dumbo Octopus Amigurumi Pattern step 1 - construction progress Blue the Dumbo Octopus Amigurumi Pattern step 2 - assembly progress Blue the Dumbo Octopus Amigurumi Pattern step 3 - details and accessories Blue the Dumbo Octopus Amigurumi Pattern step 4 - final assembly and finishing

Switch Things Up

I love customizing this pattern by changing yarn colors to create different personalities; try pastels for a soft nursery friend or bright neons for a playful toy.

To make a smaller keychain version I use sport or fingering yarn with a smaller hook; adjust eye sizes accordingly for proportion.

Want a chunkier, cuddlier octopus? Use an even bulkier yarn and a larger hook to create a plush, squishy result.

I often add embroidered freckles or blush to the cheeks for extra charm; a little powdered blush applied with a brush gives a gentle, handmade look.

Swap the safety eyes for embroidered eyes if the toy is for a baby to make it fully soft and safe for toddlers.

Try making a family of octopi in different sizes and colorways to create a lovely set for a nursery display or gift box.

I sometimes add tiny crocheted accessories like bows, hats, or scarves to personalize each octopus for special occasions.

For posable limbs, you can insert thin craft wire into the tentacles before closing, then shape them gently; test flexibility and safety first.

I like to experiment with textured stitches for the skirt to get a more ruffled effect; substituting puff or bobble stitches can create unique looks.

Consider sewing on small felt shapes or using buttons for decorative accents, but ensure all pieces are sewn on securely if the toy will be handled by children.

When gifting, stuff slightly less to make the octopus more squishable for cuddles and include care instructions for washing to keep it looking great.

Common Mistakes & How to Fix Them

βœ— Placing safety eyes too early can make reenforcing difficult; test placement with felt circles first and leave washers off until instructed for a sunk eye look. βœ— Skipping stitch markers causes lost rounds and uneven shaping in the spiral; use a stitch marker to mark the beginning of each round and move it every round. βœ— Overstuffing the head and body leads to distortion of the shape and poor eye placement; stuff gradually and shape as you go, removing stuffing if you need to place washers. βœ— Working with inconsistent tension produces uneven rows and an unbalanced skirt; maintain steady tension and check gauge with the recommended hook for a uniform finish.

Blue the Dumbo Octopus Amigurumi Pattern

Make a cuddly Blue the Dumbo Octopus with this detailed crochet pattern designed for intermediate makers. You will create a charming octopus with big dumbo-style ears, expressive eyes, and a frilly skirt using bulky weight yarn. The pattern includes step-by-step rounds, assembly photos, and helpful tips so you can finish a delightful handmade friend.

Intermediate 5-7 Hours

Materials Needed for Blue the Dumbo Octopus Amigurumi Pattern

β€” Main Fabric

  • 01
    Bulky weight yarn (#6), approximately 100g of main color (Color A: Blue)
  • 02
    Color B: Pink - approximately 25g for ear centers and small details
  • 03
    White felt circles for eye backing - cut circles approximately 4 cm in diameter
  • 04
    30 mm safety eyes (2 pieces) and washers

β€” Tools Required

  • 01
    Crochet hook size J / 6.00 mm
  • 02
    Scissors
  • 03
    Yarn needle for sewing and embroidery
  • 04
    Sewing needle
  • 05
    Black embroidery thread for eyebrows and mouth
  • 06
    Stitch markers
  • 07
    Polyester fiberfill stuffing
  • 08
    Pins for assembly
  • 09
    White felt (for eye backing)
  • 10
    Washers for safety eyes
  • 11
    Optional: blush or pink crayon for cheeks, glue to secure felt

Progress Tracker

0% Complete

β€” Head and Body :

Round 1 :

Make 6 sc into a magic ring = 6

Round 2 :

Increase in each st around = 12

Round 3 :

(sc, inc) x 6 = 18

Round 4 :

(2 sc, inc) x 6 = 24

Round 5 :

(3 sc, inc) x 6 = 30

Round 6 :

(4 sc, inc) x 6 = 36

Round 7 :

(5 sc, inc) x 6 = 42

Round 8 :

sc in each st around

Round 9 :

(6 sc, inc) x 6 = 48

Round 10-14 :

sc in each st around

Round 15 :

(6 sc, dec) x 6 = 42

Round 16 :

sc in each st around

Round 17 :

(5 sc, dec) x 6 = 36

Info :

If you want, cut a circle larger than the eye in white felt, approximately 4 cm in diameter. Cut a hole on the outer edge of the circle to put the eye inside.

Info :

Place eyes between rounds 15 and 16, leaving 11 holes between them. If you want the sunken eye look, do not place the backs of the eyes on until round 20.

Info :

TIP! You may have to adjust the eye placement depending on yarn and hook size you use.

Round 18-20 :

sc in each st around

Info :

Start stuffing the head and body

Info :

Now for the eyes. Cut a long piece of yarn and remove the eyes. Place the needle in the hole where the first eye was and insert the needle into a hole next to the eye hole. Go back and forth between each eye hole repeating the process from the first eye. Pull slightly on the yarn after going through each hole. Do this about 3 times on each side until you reach the look you want. Follow the pictures for help. There is also a youtube video I have for extra help on this process. https://www.youtube.com/watch?v=9XoBnTY6k70&t=55s

Info :

To place the backs of the eyes you will need to remove most of the stuffing to place the washers on the eyes then re stuff it.

Round 21 :

BLO (4 sc, dec) x 6 = 30

Round 22 :

(3 sc, dec) x 6 = 24

Round 23 :

(2 sc, dec) x 6 = 18

Round 24 :

(sc, dec) x 6 = 12

Round 25 :

Dec x 6 = 6

Info :

F/O and sew the hole closed

β€” Tentacles or Frill :

Info :

Turn the body upside down. Attach Color A yarn on round 21 with a sl st.

Round 0 :

Ch 2

Round 1 :

hdc-inc in each st around, join with a sl st to top of ch 2

Round 2 :

Ch 2, hdc in each st around, join with a sl st to top of ch 2

Round 3 :

Ch 2, (hdc, dc, tr, ch 1, tr, dc, hdc, 3 sl) x 8, sl st to top of ch 2 to fasten off

Info :

Weave in the tail ends.

β€” Ears (Make 2 Color A, 2 in Color B) :

Info :

Starting with Color B:

Round 1 :

Make 6 sc into a magic ring = 6

Round 2 :

Increase in each st around = 12

Round 3 :

(sc, inc) x 6 = 18

Round 4 :

(2 sc, inc) x 6 = 24

Info :

Do not F/O the Color A ears! Place the back sides of Color A and Color B ears together. sc around the ears with the Color A yarn. F/O and leave a long tail for sewing.

β€” Assembly :

Item Name (Head and Body) :

1. Thread your needle with a strand of black embroidery thread. Insert the needle into a hole on the head. Bring the needle above the eye. Embroider an eyebrow. Repeat for the 2nd eye. Weave in the tail ends.

Item Name (Head and Body) :

2. Thread your needle with a long strand of black embroidery thread. Insert the needle into a hole in the head. Bring the needle up to a spot between the eyes. Embroider a smile. Weave in the tail ends.

Item Name (Head and Body) :

3. If you want, you can glue down your white felt circle to make it flat against the body.

Item Name (Ears) :

1. Pinch the ears at the bottom. Sew about 3 stitches together at the bottom to give the ear a pinched look.

Item Name (Ears) :

2. Pin the ears onto the top of the head.

Item Name (Ears) :

3. Sew the ears onto the head.

Info :

Face: If you want you can add some blush to the cheeks with actual blush or pink crayon.

Assembly Instructions

  • Attach eyes between rounds 15 and 16 leaving 11 stitches between them; use a felt circle (approx 4 cm) with a hole cut to seat the eye, then use a long piece of yarn to create a sunk eye look by stitching through adjacent holes several times before securing the backs (remove stuffing if needed to add washers).
  • Sew the head closed after completing round 25 by fastening off and using the long tail to close the remaining hole securely with a whipstitch.
  • Pinch each ear at the bottom and sew about 3 stitches together to create a pinched look, then position and sew ears onto the top of the head using the long sewing tail for secure attachment.
  • Embroider facial details: with black embroidery thread stitch small eyebrows above each eye and a smile between the eyes, weaving in tail ends after finishing.
  • Attach the tentacle frill: turn body inside out, join Color A at round 21 with a sl st, work the frill rounds (hdc-inc round, hdc round, frill picot/cluster round), fasten off and weave in ends.

Important Notes

  • πŸ’‘Do not join rounds unless stated; work in a continuous spiral for smooth shaping.
  • πŸ’‘Use a stitch marker to mark the beginning of each round and move it up as you work to avoid losing track of rounds.
  • πŸ’‘All stitches are worked in both loops unless stated otherwise in the pattern.
  • πŸ’‘Start stuffing gradually and adjust stuffing when placing eye washers to avoid distorting the head shape.

Thank you for choosing this Blue the Dumbo Octopus pattern β€” I hope you enjoyed every stitch and smile it brings. This little octopus is perfect for gifting, nursery decor, or keeping as a cozy handmade friend. Share your finished octopus and tag me to show off your unique creation! 🧢🧑

You ask,

we answer.

FAQs

What size will the finished piece be?

The finished octopus measures approximately 12 inches from bottom to top of head when using bulky weight #6 yarn and a 6.00 mm hook.

Can I use different yarn weights for this pattern?

Yes, you can use different yarn weights but the final size will change; choose an appropriate hook for your yarn and adjust eye and nose placement as needed.

Do I need prior crochet experience for this pattern?

This pattern is rated intermediate, so basic knowledge of single crochet, increases, decreases, and working in continuous rounds is recommended.

How long does this project typically take to complete?

Most crocheters complete this project in 5-7 hours, though time may vary based on experience level and how much time you spend on assembly and detailing.