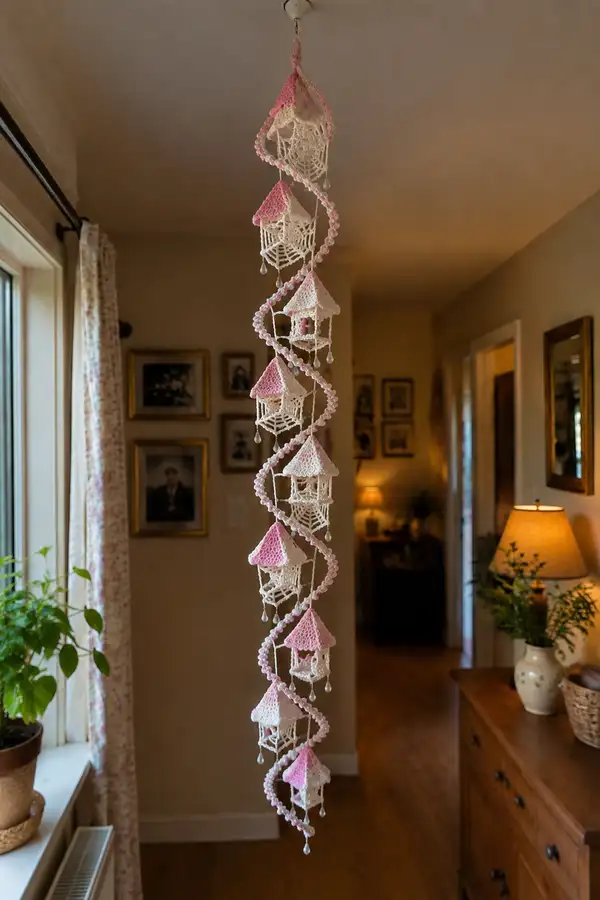
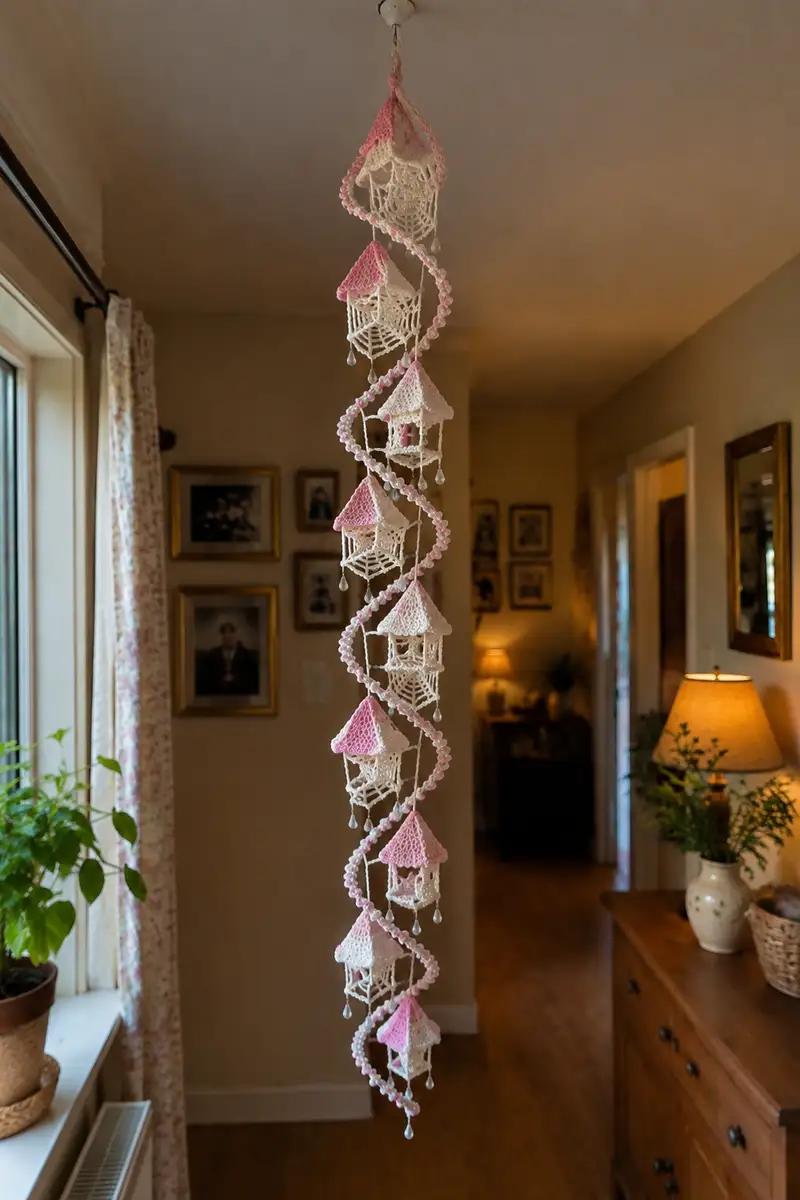
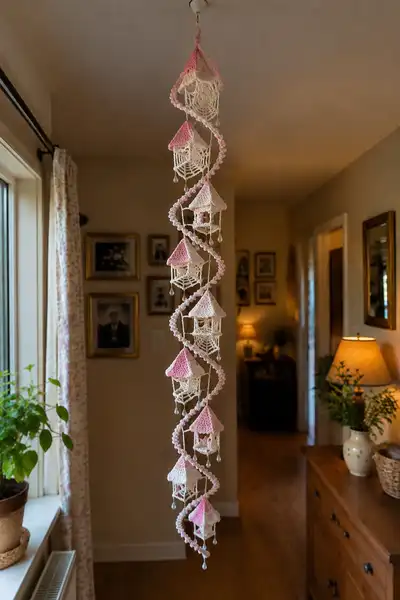
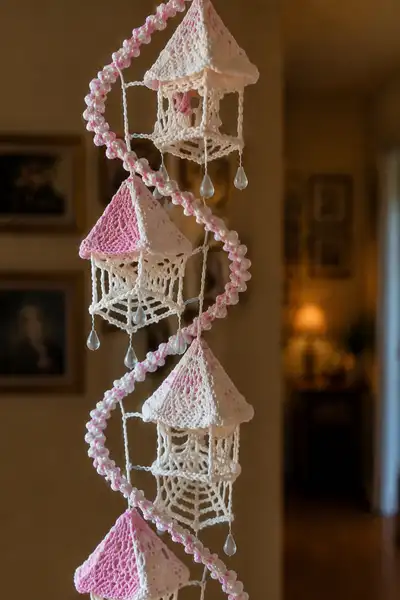
A delicate hanging garland of tiny lace houses with blush-pink roofs suspended on a spiraling beaded rope. Each openwork spiderweb cage hangs beneath a soft conical roof and finishes with iridescent teardrop beads. This lightweight cotton-thread project brings vintage charm and gentle movement to a window, doorway, or nursery. Detailed stitchwork and join-as-you-go assembly make this a beautiful decorative statement piece.
Progress Tracker
0% Complete
— Roof (Make 8 identical roofs) :
Round 1 :
6 sc in magic ring (6)
Round 3 :
(1 sc, inc) x 6 (18)
Round 4 :
(2 sc, inc) x 6 (24)
Round 5 :
(3 sc, inc) x 6 (30)
Round 6 :
(4 sc, inc) x 6 (36)
Round 7 :
(5 sc, inc) x 6 (42)
Round 8 :
(6 sc, inc) x 6 (48)
Info :
Change to blush-pink thread now if you want the very apex to be pink. Working with thread, keep tension even. Use a stitch marker at the beginning of each round.
Round 9 :
(7 sc, inc) x 6 (54)
Round 10 :
(8 sc, inc) x 6 (60)
Round 11 :
(9 sc, inc) x 6 (66)
Round 12 :
(10 sc, inc) x 6 (72)
Round 13-18 :
1 sc in each st (72)
Info :
These even rounds grow the roof surface. If you prefer a taller roof, add additional even rounds in multiples of two to maintain balance. Keep counts consistent — 72 sts per round.
Round 19 :
*(BLO) 1 sc in next 2 sts, picot (ch3, sl st to base of ch) in next st* rep around (72) — creates a textured ridge visible when folded into a cone
Round 20 :
1 sc in each st (72)
Round 21 :
*(1 sc, 1 picot on top of next sc) x 24 to space decorative tiny scallops* (72)
Round 22 :
1 sc in each st (72)
Info :
At this stage the roof is a flat, large circle. To form a cone, you will fold and create vertical seams; mark 6 equally spaced seams (every 12 stitches) that will form triangular panels. Pin across blocking board to set the shape before sewing.
Round 23 :
Mark stitches at 1, 13, 25, 37, 49, 61 (these are seam markers) — do not change stitch count
Round 24 :
Fold the circle by bringing marker 1 to marker 13, 13 to 25 etc., forming 6 triangular panels. Sew the panels together using a yarn needle and matching thread by whip stitch along fold lines; press lightly and reblock (72)
Info :
Sew slowly ensuring each seam brings the edges together without puckering. The apex (center) will be slightly closed after sewing; make sure the top looks neat as this will be visible from below.
Round 25 :
After sewing panels, work 1 sc evenly around the lower eave edge to tidy it (72)
Round 26 :
(3 sc, picot) x 18 around for decorative eave (72)
Round 27 :
Sl st evenly every 3rd stitch to create a slightly scalloped edge; fasten off leaving long tail for attaching to web module
Info :
Optional: Use a speckle technique by adding tiny French knots with embroidery floss on the upper roof panels after blocking for a dotted appearance like the photo. Use a very small needle and short silk thread.
— Spiderweb Cage Module (Make 8 identical cages) :
Round 1 :
With cream thread, ch 6 and sl st to form a small loop (or magic ring with 6 ch loops). ch 1, 12 sc into loop around (12)
Round 2 :
(1 sc, inc) x 6 then (1 sc, inc) x 6 to double and form hex base — rearranged as: (1 sc, inc) x 12 (18)
Round 3 :
(2 sc, inc) x 6 = (3 sc, inc) x 4 adjusted to create 24 sts total (24)
Round 4 :
Transition round: 1 sc in each st (24). Place 6 evenly spaced marker stitches — these will be the vertical corner posts (every 4th stitch)
Info :
The web cage has 6 vertical corner posts; mark them clearly now. We will build the base net and then work up vertical openwork pillars to create a little hexagonal house cage.
Round 5 :
Base net: *ch 6, skip 3 sts, sl st into next st* repeat around to create 6 long chain loops anchored by sl sts (6 loops). Join with sl st to first sl st.
Round 6 :
In each chain loop work: sl st into loop, ch 3, (dc, ch 3, dc) to form a small fan; sl st back to anchor. This creates a decorative arch over each base side (6 fans)
Round 7 :
Form first web tier: in center of each fan ch8, sl st to opposite fan anchor to create 6 spokes across the base. This is worked as ch8, sl st to the sl st that anchors the opposite fan (6 spokes)
Round 8 :
With these 6 spokes in place, around the base work a round of 1 sc in each stitch and 1 sc in the top of chain spaces to secure spokes; maintain count ~36 (36)
Info :
Accuracy in the base is important for symmetry. Pin the base flat to blocking board and check spokes are evenly spaced. The counts above approximate the stitches used to anchor spokes and fans.
Round 9 :
Begin pillars: Over each of the 6 corner markers, ch 20 (this creates a vertical post), sl st to next marker on the base. Work these six posts spaced evenly so each forms a vertical side. After finishing posts, join to first sl st at base.
Round 10 :
Stabilize posts: 1 sc in each ch of posts but work from bottom to top: *attach at base, sc up 20 ch spaces, sl st at top to create a small ring at the top of each pillar* (six pillars)
Round 11 :
Create top ring: Join the top of pillars by ch 6 between each pillar and sl st into next pillar top — you will have 6 chain-spaces creating a hex top ring
Round 12 :
Work three rounds of 1 sc in each top ring stitch to firm the top ring (approx 36 sts each round)
Info :
The cage sides remain open. The top ring must be sturdy since you will attach the roof to it with whip stitching. If you want a more defined top, add one round of BLO sc to create a ridge.
Round 13 :
Web tiers: Working from the top ring down, make 4 concentric web tiers: *ch 8 from one pillar top to next top, sl st to create bridge; on each bridge work a mesh row (ch5, sk 2, sl st)* — continue around to make a spiderweb effect. After completing a full round, you will have a web lattice around the open sides.
Round 14 :
Reinforce bottom: From the inside, sl st into each bottom fan and work 1 sc around base anchoring the pillars and the spokes together (approx 36)
Round 15 :
Lower decorative scallop: *(ch3, sl st) around lower edge between pillars, 6 times* to give the airy fringe that echoes the photos (6 scallops)
Info :
Check that the cage is roughly cylindrical and flat at base. The openwork spiderweb pattern should have four horizontal tiers of mesh; if desired, add a second mesh round for extra web detail. Keep counts even so the roof will match when stitched on.
Round 16 :
Make hanging loops: At the top ring, evenly space 6 short chains of ch 6 and sl st to create 6 little loops; these will be used to whip-stitch the roof down at its eaves points (6 loops)
Round 17 :
Prepare bead-drop anchors: At each lower corner of the hex (just under each pillar), create a ch 10 loop and sl st to anchor — these will carry the teardrop bead drops (6 loops)
Round 18 :
Fasten off leaving a long tail for joining to the roof. Block the cage flat and plump slightly if you used any stiffener. Make 8 cages total.
Info :
Starch lightly if you want the web to hold shape. Leave long tails for sewing — you will use these to attach each roof and to join the module to the spiral chain.
— Teardrop Bead Drops (Make 8 drops, one per cage) :
Round 1 :
Thread a teardrop bead onto a short length of nylon thread (approx 15 cm); tie a stop knot at the end so bead sits on thread
Round 2 :
Work a small decorative cap using thread: ch 4, sl st to join into a ring, (ch 3, 2 dc, ch 3) x 3 to create an open cap; fold under bead and stitch cap around top of bead using sewing needle
Round 3 :
Secure top: After stitching cap, create a ch 6 loop above the cap and tie off leaving a 3 cm tail to whip-stitch through the cage bottom anchor (the ch10 loop from Round 17 of the cage). Repeat for all beads.
Info :
Use small, light-weight beads so the lace does not pull. I recommend pre-threading beads and testing how they hang from one module before finishing all eight.
— Spiral Beaded Cord (Make 1 main spiral cord) :
Round 1 :
Make a foundation chain of 220 ch (or desired finished garland length; photo shows a long spiral ~1.6 m total — adjust chain length accordingly). Do not twist; leave a long tail at the beg for joining to ceiling loop.
Round 2 :
Optional core: If using wire, thread 28-26 ga craft wire through the chain length to provide structure. Bend the wire at one end to form a hanging loop, tape or twist to secure.
Round 3 :
Round tube start: Join foundation chain to form a slight spiral by joining the last ch to the first with a sl st then working 1 sc evenly around both sides of the chain to create a flat tubular cord — this will lay as a thin rope (approx 440 sts total; count will vary with chain length)
Round 4 :
Continue rounds: 1 sc in each stitch around for 6 rounds to form an even tube. If you used wire, enclose wire within the tube as you work. Tube remains unstuffed or very lightly stuffed if desired.
Info :
The spiral form is created by later wrapping clusters of beads and tiny bobbles around this tube and gently twisting. Keep the tube flexible. If you plan to hang outdoors, leave the wire out or use a weather-safe wire.
Round 5 :
Bobble cluster foundation: Mark every 11th stitch along one side of the tube (approx marks = foundation chain length / 11). These marks will be the positions for pearl-like clusters that give the spiral a helical ridged look.
Round 6 :
Beaded clusters: At each mark, work *(ch1, 5 dc cluster in same st, ch1, sl st in next st)* to create tiny bobbles projecting outwards. Move marker to next 11th st and repeat along tube. This will add a small bump of texture at regular intervals (marker count determines number of clusters).
Round 7 :
Alternate side clusters: On the next round, offset clusters by 5 stitches so clusters spiral around the tube. In practice, work clusters at stitch positions halfway between the previous clusters to create a helical appearance.
Round 8 :
Work a single sc round to tidy and lock clusters in place (sc in each st around). Maintain tube flexibility. If using beads for the pearl effect, slip a small 4-6 mm bead onto the thread before completing each 5-dc cluster and secure; the bead will sit atop the cluster.
Info :
It helps to pre-string small beads on separate short lengths of thread and whip-stitch them into each cluster if your beading needle cannot pass through cluster stitches directly. Keep clusters small so they read as pearl dots from a distance.
Round 9-16 :
Repeat the offset cluster rounds two to three more times, spacing clusters on successive rounds so a clear spiral line of clusters emerges. After 3 full cluster cycles you will see a continuous helical ridge when the tube is gently twisted.
Round 17 :
Finish tube: Work two final rounds of reverse sl st and sl st to create a neat raised ridge; fasten off leaving long tails at both ends for securing to ceiling and bottom weight (if desired).
Info :
If you used wire, test the spiral by twisting the tube gently into a helix; the clusters will ride the outside of the helix and create the motif seen in the photos. If not using wire, twist gently and block to hold shape.
— Connector Chains & Module Attachment (Make 8 connectors) :
Round 1 :
For each module you will make two short connecting chains: one chain of ch 14 to attach the top ring of the cage to the spiral tube at the desired spiral point, and one chain of ch 10 to attach the bottom of the cage or bead drop.
Round 2 :
Chain reinforcement: Work 1 sc along each chain (front post) to make the connectors sturdier: 1 sc in each ch back along the chain (14 sc) and 1 sc in each ch of the shorter chain (10 sc). Fasten off leaving long tails for sewing.
Info :
Spacing along the spiral cord is critical: the photo shows evenly spaced modules with around 18-24 cm between modules along the spiral. Plan positions before sewing; lay the tube flat and mark placement with pins.
Round 3 :
Attach top connector: Position the top connector chain so it loops over the spiraled clusters at a stable point. Sew through the tube into the connector tail and anchor around a cluster, sewing securely with multiple passes. Repeat for each module top (8 connections).
Round 4 :
Attach bottom connector: Sew the shorter chain from the cage lower anchor (Round 17 of cage) to the spiral tube a bit lower than the top connector, ensuring the cage hangs vertically under its roof. Check balance and adjust before finishing knots.
Info :
Use small, tight stitches to anchor connectors. If your spiral tube has a wire core, sew through the tube fabric but avoid piercing the wire; if you cross the wire, you can create a bump or compromise the wire's integrity.
— Final Finishing and Join-as-you-go Details :
Round 1 :
Attach roof to cage: Place roof over the top ring of a cage so the eaves align with the six top loops. Using the long tail left on the roof (Round 27 tail), whip-stitch roof eave to the top ring by sewing through the roof eave sl st ridge into the top ring loops at the six attachment points. Use small even stitches and tie off securely inside the roof.
Round 2 :
Sew bead drops: Using the nylon thread tails from your teardrop beads, slip the tails through the lower anchors at each cage corner. Secure with two reinforced knots and hide the knot inside the web where possible. Repeat all drops (6 per cage) or use 3 evenly spaced as in the sample for lighter weight.
Round 3 :
Balance test: Hang the partially completed garland vertically and check that each module hangs freely without twisting the web. Re-position connector chains if any module tilts. Small adjustments will make the final piece crisp and even.
Info :
It is helpful to pin modules on a vertical board while you sew them to the spiral so gravity helps you see the true hanging position. Use a small level or visually align with a long ruler if you want perfect vertical placement.
Round 4 :
Secure top loop: Create a strong hanging loop at the very top by folding a 20 cm tail from the spiral tube into a loop and sewing it in place with many passes. You can also insert a small screw eye into the ceiling anchor and tie the loop to it.
Round 5 :
Fasten all tails: Weave in and hide all tails from roof, cages, connectors and spiral using a yarn needle, and trim close. Add a small dab of clear fabric glue on hidden knots for extra security if desired.
Round 6 :
Final blocking: Lightly steam or starch the entire assembled garland if using cotton thread. Re-shape the roof cones and web cages; allow to dry fully while hanging so the spiral settles in its final curvature.
Info :
For longevity, avoid heavy beads and heavy handling; this piece is a delicate decorative accent. If you need a more robust structure, stitch a second internal ring into the top of each cage with firmer thread before attaching the roof.
— Optional Embellishments & Variations :
Round 1 :
Add tiny embroidered flowers: On the roofs, using a thin stranded floss, work small lazy-daisy stitches or French knots clustered near the eaves for a cottage look.
Round 2 :
Create ombre roofs: Begin roof rounds in pink then switch to cream on Round 13 to fade color toward the eave (use Info technique below for carry method).
Info :
When changing color mid-round, finish the last yarn-over with the new color to avoid knots. Carry unused thread on the wrong side of the roof and secure every 6-8 sts with a tiny catch stitch to prevent long floats.
Round 3 :
Replace beads with tiny bells for a chiming garland — add bells only if the structure can handle the weight and be mindful of noise if placed in a bedroom.
Round 4 :
Make smaller or larger versions by adjusting foundation chain length for the spiral tube and changing the roof circle increase rounds proportionally (add or subtract increases in the early rounds to preserve panel count).
This blush-roof spiral garland is a lovely labor of love — each tiny house is a little celebration of lacework and patient stitching. Watching the spiral come together and the teardrop beads swing in the light is endlessly rewarding. 🧶 Hang it in a sunny window or a cozy corner to add a vintage handmade accent that delights every day. Happy stitching and may your garland bring soft charm to your home! ✨