🧢 Beautiful ✨ Detailed πŸ’ Adorable

Boar Hand Puppet Amigurumi Pattern

Boar Hand Puppet Amigurumi Pattern
4.0β˜… Rating
5-7 Hours Time Needed
3.4K Made This
βœ‚οΈ

Intermediate Level

Ideal for those with basic crochet experience, featuring slightly more advanced stitches and techniques to expand your skills.

⏱️

Weekend Treat

Takes 5-7 hours, making it an enjoyable project to finish over a couple of days.

🧸

Cute Companion

An adorable friend to cherish, handcrafted with love to bring comfort and joy for years to come.

About This Boar Hand Puppet Amigurumi Pattern

This pattern creates a soft, plush boar hand puppet worked in plush yarn with cotton details for tusks and facial features. You will crochet the head, ears, arms, body and small accessories, then assemble them to create a poseable puppet. It uses simple amigurumi shaping techniques with clear round-by-round instructions and helpful photos.

Boar Hand Puppet Amigurumi Pattern crochet pattern - detailed view of completed project

Designed for an intermediate crocheter, the puppet finishes approximately 28 cm (11") tall. The pattern includes tips for indenting eyes, embroidering nostrils and attaching arms securely.

Why You'll Love This Boar Hand Puppet Amigurumi Pattern

I absolutely love this pattern because it transforms plush yarn into a cuddly, character-filled hand puppet that is both tactile and expressive. I enjoy the way simple rounds combine to form a friendly face with tiny tusks and embroidered details that bring the boar to life. The step-by-step photos and clear round instructions make assembly satisfying and straightforward. Sewing the parts together is the most rewarding part β€” you can see the puppet take shape and personality as you stitch.

Boar Hand Puppet Amigurumi Pattern step 1 - construction progress Boar Hand Puppet Amigurumi Pattern step 2 - assembly progress Boar Hand Puppet Amigurumi Pattern step 3 - details and accessories Boar Hand Puppet Amigurumi Pattern step 4 - final assembly and finishing

Switch Things Up

I love how flexible this pattern is for personalization β€” I often change yarn colors to make different characters, like grays or browns for forest friends.

I sometimes swap the plush yarn for a slightly thinner velvety yarn and use a smaller hook to make a smaller, more detailed puppet version.

I also add little crocheted accessories like scarves, hats or tiny bows to give each puppet a unique personality.

I like to experiment with eye placement and eyebrow embroidery to change the expression from curious to sleepy or surprised.

If I want a sturdier puppet for frequent use, I reinforce seams with an extra pass of stitching when sewing the body to the head.

I sometimes add a small piece of felt inside the mouth for contrast or use contrasting yarn for the tusks to make them pop.

I suggest trying safety eyes of different diameters to vary the scale β€” smaller eyes make a cuter baby look, larger eyes give a cartoonish feel.

I occasionally add a short wire in the arm seams for light posability if the puppet will be used for display rather than child play.

I also recommend experimenting with different stuffing densities β€” slightly firmer for a structured puppet, softer for a cuddly one.

I enjoy creating sets of puppets with matching colors and tiny accessories for storytelling; it makes a great gift set and play collection.

Common Mistakes & How to Fix Them

βœ— Placing safety eyes too high or low can make the face look unbalanced; measure and fix them between rounds 11 and 12 with 9 sc between eyes for correct placement. βœ— Forgetting to stuff as you go results in lumps or a misshapen head; stuff gradually and evenly before finishing the closing rounds to maintain a smooth shape. βœ— Skipping stitch markers during increases and decreases causes missed stitches and uneven shaping; place a marker at the start of each round and recount stitches regularly. βœ— Using too tight tension with plush yarn will make the fabric stiff and hard to sew; maintain a consistent, slightly loose tension to keep the puppet soft and flexible.

Boar Hand Puppet Amigurumi Pattern

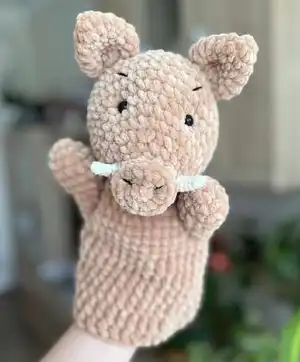
Create a charming boar hand puppet with this detailed amigurumi pattern. You will be guided through every round, from head shaping to sewn-on details, using plush yarn for a soft finish. Perfect for gift-making or adding a cozy hand puppet to playtime. Follow the step-by-step instructions and photos to achieve professional results.

Intermediate 5-7 Hours

Materials Needed for Boar Hand Puppet Amigurumi Pattern

β€” Main Fabric

  • 01
    Plush yarn - Himalaya Dolphin Baby (120 m / 100 g) or (131 yd - 3.52 oz) - Beige color (1 skein, No 80365)
  • 02
    Cotton yarn - Yarn Art Jeans (160 m - 50 g) or (175 yd - 1.76 oz) - Black cotton yarn for nose and eyebrows (No 53)
  • 03
    Cotton yarn - Yarn Art Jeans (160 m - 50 g) or (175 yd - 1.76 oz) - Milky cotton yarn for fangs (No 3)
  • 04
    Plastic safety eyes - 2 pieces, diameter 7 mm
  • 05
    Fiber filler - polyester stuffing, amount as needed for head and body

β€” Tools Required

  • 01
    Crochet hook size 4.5 mm (for plush yarn)
  • 02
    Crochet hook size 2.0 mm (for cotton yarn details)
  • 03
    Large needle (for embroidery and sewing parts)
  • 04
    Stitch markers (knitting markers)
  • 05
    Scissors
  • 06
    Yarn needle for sewing
  • 07
    Polyester stuffing (fiber filler)

Progress Tracker

0% Complete

β€” Head :

Info :

Use the beige plush yarn, hook 4.5 mm.

Round 1 :

6 sc in MR (6)

Round 2 :

inc * 6 (12)

Round 3 :

(1 sc, inc) * 6 (18)

Info :

Crochet next round by BLO

Round 4 :

(1 BLO sc, dec by BLO) * 6 (12)

Round 5 :

12 sc

Round 6 :

(2 sc, inc) * 3, 3 sc (15)

Round 7 :

(3 sc, inc) * 3, 3 sc (18)

Round 8 :

(1 sc, inc) * 8, 2 sc (26)

Round 9 :

26 sc

Round 10 :

(2 sc, inc) * 8, 2 sc (34)

Round 11 :

34 sc

Round 12 :

(3 sc, inc) * 8, 2 sc (42)

Round 13-17 :

42 sc (5 rounds)

Round 18 :

(5 sc, dec) * 6 (36)

Round 19 :

(4 sc, dec) * 6 (30)

Round 20 :

(3 sc, dec) * 6 (24)

Info :

Insert safe plastic eyes. Fix eyes between 11 and 12 rounds from MR on the nose. The distance between the eyes is 9 sc.

Info :

Stuff the head with fiber filler.

Round 21 :

(2 sc, dec) * 6 (18)

Round 22 :

(1 sc, dec) * 6 (12)

Round 23 :

dec * 6 (6)

Info :

Draw the yarn through 6 front loops and tighten. Cut and secure the yarn.

Info :

HOW TO CLOSE A HOLE IN AMIGURUMI https://youtu.be/DdqCijfLtXA

Info :

HOW TO INDENT AMIGURUMI EYES https://youtu.be/ta3Hl1hU8SY

Info :

Use the black cotton yarn. Take the thread. Pull it through the back of the head and pull it out above the right eye. Leave the tail on back head's part. Pass the needle from below under the left eye and pull out under the right eye. Make sure that the yarn falls from the inside of the left eye. Next, pass the needle from above the right eye, making sure that the thread lies on the inside of the eye. And pull out the needle in the same place behind the head. Tighten both threads so that the eyes are sunken. Tie a knot, hide the tail inside the head.

β€” Ears :

Info :

EARS (2 pieces) Use the beige plush yarn, hook 4.5 mm.

Round 1 :

4 sc in MR (4)

Round 2 :

4 inc (8)

Round 3 :

(1 sc, inc) * 4 (12)

Round 4 :

(2 sc, inc) * 4 (16)

Round 5 :

(3 sc, inc) * 4 (20)

Round 6 :

20 sc

Round 7 :

(2 sc, dec) * 5 (15)

Info :

Leave 20 cm for sewing. Cut the thread. Sew ears between 16-17 rounds from the MR on the nose. Distance 7 st.

β€” Boar Fangs :

Info :

Use the milky cotton yarn, crochet hook 2 mm

Round 1 :

4 sc in MR (4)

Round 2 :

4 sc

Round 3 :

(1 sc, inc) * 2 (6)

Round 4 :

6 sc

Round 5 :

(2 sc, inc) * 2 (8)

Round 6-7 :

8 sc - 2 rounds

Info :

Crochet 2 pieces. Sew fangs on both sides.

Info :

HOW TO INDENT NOSTRILS Use the black cotton yarn. Take the thread. Pull it through under of the head. Leave the tail and sew in the right nostril. Pass the needle from right to the left nostril. And pull out the needle in the same place under the head. Tighten both threads so that the nostrils are sunken. Tie a knot, hide the tail inside the head.

Info :

EMBROIDERY NOSTRILS Use the black cotton yarn and a large needle. Embroider nostrils.

Info :

EMBROIDERY EYEBROWS Use the black cotton yarn and a large needle. Embroider eyebrows.

β€” Arms :

Info :

Use the beige plush yarn. Crochet hook 4.5 mm.

Round 1 :

6 sc in MR (6)

Round 2 :

inc * 6 (12)

Round 3 :

(2 sc, inc) * 4 (16)

Round 4-5 :

16 sc (2 rounds)

Round 6 :

(2 sc, dec) * 4 (12)

Round 7-9 :

12 sc (3 rounds)

Info :

Make sl st, cut the yarn. Don't stuff. Make 2 pieces.

β€” Body :

Info :

Use the beige plush yarn. Crochet hook 4.5 mm. Leave the tail for sewing, begin crochet without sl st. Make 24 ch, sl st in the first loop. Make a circle.

Round 1 :

24 sc

Round 2 :

(3 sc, inc) * 6 (30)

Round 3 :

(4 sc, inc) * 6 (36)

Round 4 :

(5 sc, inc) * 6 (42)

Info :

HOW TO ATTACH ARM TO BODY https://youtu.be/Bq3PAUiOh2M

Round 5 :

crochet together with arm - 7 sc, 13 sc only on the body, 7 sc together with another arm, 15 sc only on the body (42)

Info :

Crochet sc2tog on both sleeves sides to avoid holes.

Info :

HOW TO CROCHET SC2TOG https://youtu.be/tZqOHv2NJhM

Round 6 :

sc2tog, crochet only on the arm - 4 sc, sc2tog, 12 sc only on the body, sc2tog, 4 sc only on the another arm, sc2tog, 14 sc only on the body (38)

Round 7 :

dec, 2 sc, dec, 12 sc, dec, 2 sc, dec, 14 sc (34)

Round 8 :

34 sc, ch

Round 9-14 :

34 dc (6 rounds)

Info :

Make 1 sc, 1 sl st, cut and secure the yarn.

Info :

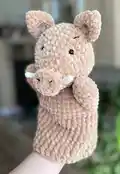
Sew the body to the head as shown in the photos

Info :

CONGRATULATIONS! Your hand puppet is readyβœ“

Assembly Instructions

  • Insert and secure the 7 mm plastic safety eyes between rounds 11 and 12 of the head, leaving a distance of 9 single crochets between the eyes before closing the head.
  • Sew ears between rounds 16-17 from the MR on the nose, spacing the ears 7 stitches apart and leaving a 20 cm tail for sewing to fasten them securely.
  • Attach both arms to the body during Round 5 by crocheting together with the arm: 7 sc with arm, 13 sc only on body, 7 sc together with other arm, 15 sc only on body (42), then continue body shaping.
  • Sew fangs on both sides of the nose after crocheting two milky cotton tusks, and use black cotton yarn to indent nostrils and embroider nostril details, hiding tails inside the head.
  • Sew the finished body to the head evenly around the neck opening as shown in the photos, matching stitches and easing the seam for a neat finish.

Important Notes

  • πŸ’‘Use stitch markers to mark the beginning of each round for accurate stitch counting and even shaping throughout the pattern.
  • πŸ’‘Stuff the head gradually and evenly before finishing the closing rounds to maintain a smooth and proportional shape without lumps.
  • πŸ’‘Leave long sewing tails where indicated (ears, body join) to make assembly and secure stitching easier and stronger.
  • πŸ’‘Work consistently with the recommended hook sizes for the specified yarns to achieve the finished size and fabric density shown.

This sweet Boar Hand Puppet pattern brings a soft, plush companion to life with cozy textures and tiny details. 🧢 Follow the clear rounds and photos to create a cuddly puppet perfect for storytelling or gifts. πŸ— Enjoy finishing touches like embroidered nostrils and tiny tusks to give your puppet personality and charm. ✨

You ask,

we answer.

FAQs

What size will the finished piece be?

The finished boar hand puppet measures approximately 28 cm (11") tall when using the recommended plush yarn and 4.5 mm hook.

Can I use different yarn weights for this pattern?

Yes, but changing yarn weight and hook size will change the final size and fabric feel; adjust hook size and expect variations in finished measurements.

Do I need prior crochet experience for this pattern?

This pattern is rated intermediate, so familiarity with single crochet, increases, decreases, working in the round and basic sewing is recommended.

How long does this project typically take to complete?

Most crocheters complete this project in 5-7 hours, though time may vary based on experience level and the amount of time spent on embroidery and assembly.