๐Ÿงถ Beautiful โœจ Detailed ๐Ÿ’ Adorable

Bobby the Bighorn Sheep Amigurumi Pattern

Bobby the Bighorn Sheep Amigurumi Pattern
4.8โ˜… Rating
5-7 Hours Time Needed
3.9K Made This
โœ‚๏ธ

Intermediate Level

Ideal for those with basic crochet experience, featuring slightly more advanced stitches and techniques to expand your skills.

โฑ๏ธ

Weekend Treat

Takes 5-7 hours, making it an enjoyable project to finish over a couple of days.

๐Ÿงธ

Cute Companion

An adorable friend to cherish, handcrafted with love to bring comfort and joy for years to come.

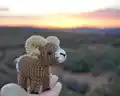
About This Bobby the Bighorn Sheep Amigurumi Pattern

This pattern creates Bobby, a tiny bighorn sheep amigurumi with curled beige horns and a brown body with white nose detail. The design uses simple amigurumi construction with color changes and small accessories like safety eyes. You will crochet separate pieces (head, body, legs, tail, horns) and sew them together for a finished sculpted look.

Bobby the Bighorn Sheep Amigurumi Pattern crochet pattern - detailed view of completed project

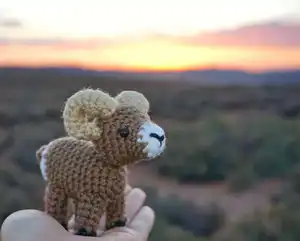
Worked in worsted weight yarn with 3.5mm and 3mm hooks, it is suitable for makers who want a small project with character. Clear round-by-round instructions and assembly directions are provided to help you finish a neat, standing sheep.

Why You'll Love This Bobby the Bighorn Sheep Amigurumi Pattern

I absolutely love this pattern because it captures so much personality in a very small size. I enjoyed designing the curled horns which give the sheep character and make it stand out from simpler amigurumi. The pattern balances straightforward rounds with a few shaping details so you learn while making something adorable. I also love how sturdy the finished toy is when you add the small weight in the body. Making several in different colors is one of my favorite ways to gift handmade charm to friends and family.

Bobby the Bighorn Sheep Amigurumi Pattern step 1 - construction progress Bobby the Bighorn Sheep Amigurumi Pattern step 2 - assembly progress Bobby the Bighorn Sheep Amigurumi Pattern step 3 - details and accessories Bobby the Bighorn Sheep Amigurumi Pattern step 4 - final assembly and finishing

Switch Things Up

I love customizing this pattern by changing yarn colors to make different breeds of sheep; try a grey body with cream horns for variety.

I often make the horns a little larger by adding an extra increase round for a more dramatic curl.

To make a mini keychain version, use sport weight yarn and a 2.5mm hook and shorten the body rounds.

For a fluffier look, substitute the body yarn for a brushed mohair held together with the base yarn and use the same hook size.

I sometimes embroider small eyelashes or add tiny felt ears for different facial expressions.

Want a sturdier toy? Add a small washer or a couple of coins inside the bottom of the body for weight and balance.

You can create a family set by altering sizes: use thicker yarn for a large mom sheep and thinner yarn for babies.

Try adding removable accessories like a tiny crocheted scarf or bell using contrasting yarn for seasonal flair.

If you prefer posable legs, add thin wire inside the legs before stuffing to allow slight repositioning.

I recommend practicing the horn shaping on scrap yarn first, then sew them on securely once you are happy with the curl and size.

Common Mistakes & How to Fix Them

โœ— Skipping stitch markers when working rounds can cause you to lose the start of the round; place a marker at the first stitch of each round to maintain accurate counts. โœ— Changing color without doing it on the last stitch of the previous round will create a visible join; follow the instruction to change color on the last stitch so the transition is neat. โœ— Forgetting to stuff gradually often results in lumps or under-stuffed areas; stuff a little at a time and shape as you go to maintain a smooth surface. โœ— Not counting stitches after increases or decreases leads to uneven shaping and mismatched seams; count your stitches at the end of each round to confirm accuracy. โœ— Pulling your tension too tight will make pieces stiff and difficult to sew together; maintain consistent, moderate tension for flexible, even fabric.

Bobby the Bighorn Sheep Amigurumi Pattern

Make a tiny, charming bighorn sheep amigurumi you can hold in your hand. This pattern guides you through shaping the head, body, curled horns, legs and tail with clear rounds and assembly photos. Perfect for gifting or keeping as a cute desk companion, the finished sheep features realistic curled horns and a contrasting nose detail.

Intermediate 5-7 Hours

Materials Needed for Bobby the Bighorn Sheep Amigurumi Pattern

โ€” Main Fabric

  • 01
    Worsted weight yarn (colors: beige, brown, white, black) - used for body, horns, nose and mouth stitching
  • 02
    Fiber fill for stuffing (polyester stuffing) - enough to firmly stuff head, body and legs

โ€” Tools Required

  • 01
    Crochet hook size 3 mm (for horns only)
  • 02
    Crochet hook size 3.5 mm
  • 03
    6 mm black safety eyes (2 pieces)
  • 04
    Scissors
  • 05
    Stitch markers or stitch counter (if needed)
  • 06
    Sewing needle / yarn needle
  • 07
    Penny (optional, to add weight inside body)
  • 08
    Pins for positioning pieces (optional)

Progress Tracker

0% Complete

โ€” Supplies :

Infos :

3 mm crochet hook (for horns only). 3.5 mm crochet hook. 6 mm black safety eyes. Worsted weight yarn in beige, brown, white and black(for stitching on mouth). Fiber fill. Scissors. Stitch markers or stitch counter (if needed). Sewing needle.

โ€” Notes :

Infos :

This pattern is made using US terms. The bighorn sheep can be made smaller by reducing the ply yarn you are using and the hook size. Crochet using a tight stitch and stuff generously so it keeps it shape.

โ€” Crochet Abbreviations used in this pattern :

Infos :

DEC- decrease. FO- Finish off. INC-increase. MC- Magic Circle. SC- single crochet. SL- Slip stitch.

โ€” Head :

Info :

*Start using white yarn

Round 1 :

6 SC in MC (6)

Round 2 :

INC X 6 (12)

Info :

*on the last stitch change color to brown, the remainder of the head will be made using brown yarn.

Round 3 - 4 :

SC around (12)

Round 5 :

6 SC, 6 INC (18)

Round 6 :

SC around (18)

Round 7 :

(2SC, INC) X 6 (24)

Round 8 :

(3SC, INC) X 6 (30)

Info :

*Stop and put eyes in and using your needle stitch in the nose.

Round 9 :

SC around (30)

Round 10 :

(3SC, DEC) x 6 (24)

Round 11 :

(2SC, DEC) x 6 (18)

Info :

*stop and lightly stuff head

Round 12 :

(SC, DEC) x 6 (12)

Info :

*continue stuffing so head will stay nice and firm

Round 13 :

SC around (6)

Info :

*SL, close up hole and leave long tail of yarn for sewing onto body

Infos :

**Eyes should be placed in between rows 5 & 6 and be 8 stiches apart. The top of the nose should start between rows 2 and 3 and the bottom should be in the middle of the original magic circle.

โ€” Body :

Info :

*Use brown yarn

Round 1 :

6 SC in MC (6)

Round 2 :

INC X 6 (12)

Round 3 :

(SC, INC) X 6 (18)

Round 4 :

(2SC, INC) x 6 (24)

Round 5 - 14 :

24 around (24)

Info :

*On last stitch change to white yarn. At this point you lightly stuff and add a penny inside to weigh it down.

Round 15 :

(2SC, DEC) x 6 (18)

Round 16 :

(SC, DEC) x 6 (12)

Info :

*stop and stuff generously so it will stay nice and firm

Round 17 :

DEC x 6 (6), SL and close up hole.

โ€” Legs (Make 4) :

Info :

*Start off using black yarn

Round 1 :

5SC in MC (5)

Round 2 :

SC around in BLO (change to brown yarn in 5th stitch)

Round 3 :

INC, 4SC (6)

Round 4 :

SC around (6)

Round 5 :

(2 SC, INC) X 2 (8)

Round 6-7 :

SC around (8)

Info :

*SL, stuff with fiber fill and leave long tail for sewing onto body

โ€” Tail :

Info :

*Use brown yarn

Item Name (P1) :

Chain 4

Item Name (P1) :

SC in 2nd chain from hook and next two stitches, SL in last stitch. Leave tail for sewing onto body.

โ€” Horns (Make 2) :

Info :

*Use Beige Yarn & 3mm hook

Round 1 :

4SC in MC (4)

Round 2 :

3SC, INC (5)

Round 3 :

4SC, INC (6)

Round 4 :

6 around (6)

Round 5 :

(2 SC, INC) X 2 (8)

Round 6-7 :

SC around (8)

Round 8 :

(3SC, INC) X 2 (10)

Round 9 :

SC around (10)

Round 10 :

4SC, INC X 2 (12)

Round 11 :

12 around (12)

Round 12 :

(2 SC, DEC) X 3 (9)

Round 13 :

SC around (9)

Info :

*Finish off and leave a long tail for sewing onto head. Lightly stuff your horns.

โ€” Assembly :

Item Name (P1) :

Attach head to body between rows 4 and 5. Tail should be sewed on the back 2 rows up.

Item Name (P1) :

Attach horns between rows 8 & 9 of the head. Looks pretty silly at this point. You will take the horns roll them backward and attach to head.

Item Name (P1) :

Sew front legs between rows 4- 6. Back legs will go between rows 11- 13.

Info :

Place safety eyes between rows 5 & 6, 8 stitches apart, and use your needle to stitch the nose as shown in photos. Leave tails for sewing and weave in ends after assembly.

Assembly Instructions

  • Attach head to body between rows 4 and 5. Tail should be sewed on the back 2 rows up.
  • Attach horns between rows 8 & 9 of the head, then roll the horns backward into position and sew securely to the head so the curl sits naturally.
  • Sew front legs between rows 4-6 and the back legs between rows 11-13, spacing them evenly so the sheep stands balanced.
  • Place safety eyes between rows 5 & 6 about 8 stitches apart, then stitch the nose with black yarn using a yarn needle before closing the head.

Important Notes

  • ๐Ÿ’กThis pattern uses US crochet terms; review abbreviations before starting to avoid confusion.
  • ๐Ÿ’กUse a tight stitch and stuff generously so the sheep keeps its shape; add a small weight like a penny inside the body if desired.
  • ๐Ÿ’กChange color on the last stitch as instructed to keep color joins neat and tidy.
  • ๐Ÿ’กPin parts in place before sewing to ensure correct positioning and symmetry.

Thank you for choosing this little Bobby the Bighorn Sheep pattern โ€” I hope it brings a smile to your crafting time! ๐Ÿงถ This tiny amigurumi has so much charm packed into a small design and makes a lovely handmade gift. ๐Ÿงต Have fun shaping the horns and giving your sheep a unique personality with small color variations! โœจ

You ask,

we answer.

FAQs

What size will the finished piece be?

The finished amigurumi measures approximately 8-10 cm tall when using worsted weight yarn and the recommended 3.5mm hook for body and 3mm for horns.

Can I use different yarn weights for this pattern?

Yes, you can use different yarn weights but the final size will change; use a larger hook for bulkier yarn and a smaller hook for thinner yarn to maintain stitch density.

Do I need prior crochet experience for this pattern?

This pattern is rated intermediate, so basic experience with single crochet, increases, decreases and crocheting in rounds is recommended for best results.

How long does this project typically take to complete?

Most crocheters complete this project in 5-7 hours, though time may vary based on experience level and how quickly you assemble and finish details.