๐Ÿงถ Beautiful โœจ Detailed ๐Ÿ’ Adorable

Bobby the Pencil Amigurumi Pattern

Bobby the Pencil Amigurumi Pattern
4.4โ˜… Rating
5-7 Hours Time Needed
2.3K Made This
โœ‚๏ธ

Intermediate Level

Ideal for those with basic crochet experience, featuring slightly more advanced stitches and techniques to expand your skills.

โฑ๏ธ

Weekend Treat

Takes 5-7 hours, making it an enjoyable project to finish over a couple of days.

๐Ÿงธ

Cute Companion

An adorable friend to cherish, handcrafted with love to bring comfort and joy for years to come.

About This Bobby the Pencil Amigurumi Pattern

This pattern creates Bobby the Pencil, an expressive amigurumi pencil with a playful mouth and poseable wire-backed arms. The design features color changes for the pencil tip, a stitched mouth with a removable inner section, and a soft eraser top. You'll work with small hooks and fine yarn to achieve neat, dense stitches and crisp details.

Bobby the Pencil Amigurumi Pattern crochet pattern - detailed view of completed project

Includes full round-by-round instructions for every piece, plus assembly tips and embroidery details. Ideal for making a sweet handmade gift or a quirky desk friend.

Why You'll Love This Bobby the Pencil Amigurumi Pattern

I absolutely love this pattern because it combines simple amigurumi shaping with playful character details that really bring Bobby to life. I enjoy the color-change technique around the pencil tip and the little eraser top โ€” they make the toy instantly recognizable and fun to crochet. The sewing and assembly steps let me add personality through eye placement and mouth shaping, which is always my favorite part. I also like that the wire-armed construction lets you pose Bobby for photography or gifting, giving the finished toy both charm and function.

Bobby the Pencil Amigurumi Pattern step 1 - construction progress Bobby the Pencil Amigurumi Pattern step 2 - assembly progress Bobby the Pencil Amigurumi Pattern step 3 - details and accessories Bobby the Pencil Amigurumi Pattern step 4 - final assembly and finishing

Switch Things Up

I love changing the color palette to make different personalities โ€” try soft pastels for a sleepy pencil or neon brights for a fun classroom set.

If you want a larger Bobby, I change to a thicker yarn and a larger hook; it makes a chunky, huggable version quickly.

I sometimes swap safety eyes for embroidered eyes for a fully washable toy and a different expression.

For extra poseability I add a slightly thicker wire inside the body or use two wires for more rigid limb movement.

I often embroider different mouths and eyebrow shapes to create angry, surprised, or sleepy faces โ€” placement of the eyes and mouth changes personality dramatically.

Make a set by varying eraser colors and adding tiny accessories like a crocheted notebook or felt glasses for extra charm.

To create a keychain version, use thinner yarn and a smaller hook, then attach a metal keyring to the top before finishing the eraser section.

Swap the BPSC rounds for a decorative stitch if you want a different edge texture around the eraser band.

I like to experiment with half double crochet (HDC) or slip stitch rounds for different densities in the tip detail โ€” just keep stitch counts consistent.

For gift-ready presentation, add a tiny scarf or a sewn-on felt patch with initials to personalize each Bobby you make.

Common Mistakes & How to Fix Them

โœ— Skipping the instruction to change color in specific stitches; follow the color-change notes exactly so the pencil tip and bands form clean edges. โœ— Ignoring the "stuff in process" note for the body; stuff gradually while crocheting to keep an even cylindrical shape and avoid lumps. โœ— Not marking your rounds or counting stitches during increases and decreases; use a stitch marker and recount frequently to maintain correct stitch counts. โœ— Leaving wire ends exposed or sharp; trim, bend, and wrap wire tips with a band-aid or tape before inserting to prevent holes or pokes through the fabric. โœ— Switching yarn weight without adjusting hook size; always test a gauge swatch because changing yarn or hook will alter the final size and stitch density.

Bobby the Pencil Amigurumi Pattern

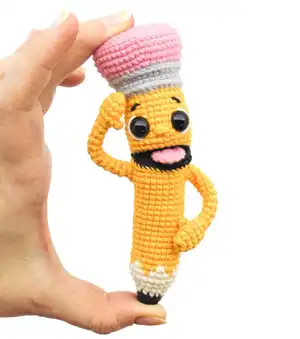
Bring Bobby the Pencil to life with this playful amigurumi pattern that guides you step-by-step. You will create a cheerful pencil character with a removable mouth detail, movable arms, and a cute pink eraser top. The pattern includes clear rounds, color-change tips, and assembly instructions so you can finish a charming handmade gift. Perfect for crafters who enjoy character details and a little wire arm engineering.

Intermediate 5-7 Hours

Materials Needed for Bobby the Pencil Amigurumi Pattern

โ€” Main Fabric

  • 01
    Cotton/semi-cotton yarn YarnArt Jeans or Alize Cotton Gold (~160 m / 50 g, 174 yds / 1.75 Oz) - less than a ball of each color as needed
  • 02
    Yellow - main body color, less than one 50 g ball
  • 03
    Black - small amount for tip and mouth inner part, less than one 50 g ball
  • 04
    Ivory - small amount for pencil tip detail, less than one 50 g ball
  • 05
    Gray - small amount for metal band under eraser, less than one 50 g ball
  • 06
    Pink - small amount for eraser top and tongue, less than one 50 g ball
  • 07
    White - small amount for eye highlights and tip detail, less than one 50 g ball

โ€” Tools Required

  • 01
    Crochet hook size 1.75 mm (recommended; pattern lists 1.75-2 mm)
  • 02
    Optional crochet hook 2.0 mm if your tension is tight
  • 03
    A pair of plastic safety eyes ~10 mm (2 pieces)
  • 04
    Aluminum or copper wire 1-1.5 mm for the arms
  • 05
    Band-aid or tape (to wrap wire ends)
  • 06
    Yarn sewing needles
  • 07
    Stitch markers
  • 08
    Pins with large head
  • 09
    Scissors
  • 10
    Polyester fiber filling (toy stuffing)
  • 11
    Small pliers or wire cutters for trimming the wire

Progress Tracker

0% Complete

โ€” Inner Part of the Mouth :

Round 1 :

6 SC in MR;

Round 2 :

6 INC (12);

Round 3 :

(SC, INC)*6 (18);

Round 4 :

(2 SC, INC)*6 (24);

Round 5 :

(3 SC, INC)*6 (30);

Info :

fix the thread and leave a long ending for sewing.

โ€” Tongue :

Round 1 :

6 SC in MR;

Round 2 :

6 INC (12);

Round 3 :

3 SC, CH, turn the detail (3);

Round 4 :

3 SC in the other direction;

Info :

fix the thread and leave a long ending for sewing, withdraw the initial thread from the MR to the last row.
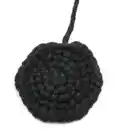
โ€” Body :

Info :

*start with black yarn, 1,75 mm hook. *stuff in process

Round 1 :

3 SC IN MR;

Round 2 :

3 INC (6);

Round 3 :

(SC, INC)*3 (9);

Round 4 :

(2 SC, INC)*3 (12);

Info :

*change the color to ivory

Round 5 :

(3 SC, INC)*3 (15);

Round 6 :

(4 SC, INC)*3 (18);

Round 7 :

(5 SC, INC)*3 (21);

Round 8 :

(6 SC, INC)*3 (24);

Info :

*in Round 9 begin to change the thread color in turn

Round 9 :

(3 SC, change the color to yellow, SC, change the color to ivory)*6 (24);

Round 10 :

2 SC, (change the color to yellow, 3 SC, change the color to ivory, SC)*5, change the color to yellow, 2 SC (24);

Info :

* further, there are repeated rounds; if you want a longer pencil, just work extra repeated rounds

Round 11-24 :

14 rounds 24 SC;

Round 25 :

5 SC, INC, 12 SC, INC, 5 SC (26);

Round 26 :

6 SC, INC, 12 SC, INC, 6 SC (28);

Round 27 :

7 SC, INC, 12 SC, INC, 7 SC (30);

Round 28 :

7 SC, 16 SS back loops only, 7 SC (30);

Round 29 :

6 SC, chain 18, skip18 St, 6 SC (12);

Round 30 :

6 SC, 18 SC on the chain, 6 SC (30);

Info :

*further, there are repeated rounds (Rounds 31-38); after you would crochet 3 rounds, fix the mouth inner part - sew it, as shown in the photo: on the top - hooking up black front loops and yellow loops of the chain, from below hooking up black and yellow front loops; fix with a stitch the middle part of the mouth and the body from the other side, so that the fiber filling does not push the black part out;

Round 31-38 :

7 rounds 30 SC;

Round 39 :

(4 SC, INC)*6 (36);

Info :

*insert plastic eyes 4 rounds higher than mouth upper line at the distance of 6 SC;

Info :

*change the color to gray

Round 40 :

36 SC front loops only;

Round 41 :

36 BPSC;

Round 42-43 :

2 rounds 36 SC;

Round 44 :

36 BPSC;

Info :

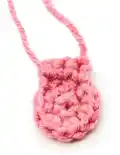
*change the color to pink

Round 45 :

(5 SC, INC)*6 (42);

Round 46 :

(6 SC, INC)*6 (48);

Round 47-49 :

3 rounds 48 SC;

Round 50 :

(6 SC, DEC)*6 back loops only (42);

Round 51 :

(5 SC, DEC)*6 (36);

Round 52 :

(4 SC, DEC)*6 (30);

Round 53 :

(3 SC, DEC)*6 (24);

Round 54 :

12 DEC (12);

Round 55 :

6 DEC (6);

Info :

- tighten the hole, fix the thread and hide the ending inside;

Info :

- embroider the white of the eye on the sides, eyebrows and nose;

Info :

- sew the tongue.

โ€” Arms :

Info :

*yellow yarn, 1,75 mm hook. *don't stuff

Round 1 :

3 SC IN MR;

Round 2 :

3 INC (6);

Round 3 :

(SC, INC)*3 (9);

Round 4 :

9 SC;

Round 5 :

chain 3, (start in the 2nd chain from the hook) 2 SC on the chain, 9 SC (9+2 on thumb);

Round 6 :

9 SC;

Round 7 :

(SC, DEC)*3 (6);

Round 8-17 :

10 rounds 6 SC;

Info :

- fix the thread and leave a long ending for sewing;

โ€” Assembly :

Info :

Fix with the thread the middle of the mouth from the other side by hooking up black front loops and yellow loops of the chain on the top and from below hooking up black and yellow front loops; stitch the middle part of the mouth and the body from the other side so the fiber filling does not push the black part out.

Info :

Insert plastic eyes four rounds higher than the mouth upper line at the distance of 6 SC; embroider the white of the eye on the sides, eyebrows and nose; sew the tongue in position.

Info :

Insert wire into the body, trim the ends, bend and isolate the tips with a band-aid so that the length of the wire on each side is equal to the length of the arms.

Info :

Put the arms on the wire and sew them securely to the body, hiding and reinforcing ends with yarn; arrange and pose arms as desired.

Info :

After finishing head and body shaping, tighten the hole, fix threads and hide endings inside the toy for a neat finish.

Assembly Instructions

  • Sew the black inner mouth piece into the opening by hooking black front loops to yellow front loops on the chain from the top and hooking black and yellow front loops from below, then fix the middle of the mouth to the body so the stuffing does not push the black part out.
  • Insert plastic eyes four rounds above the mouth upper line and space them six single crochet stitches apart before securing the eye backs; embroider white eye highlights and stitch on eyebrows and nose with black thread.
  • Insert aluminum/copper wire into the body, trim the ends, bend and wrap the tips with a band-aid so the wire ends are not sharp, and ensure the length of exposed wire on each side matches the arm length.
  • Slide each arm onto the prepared wire, position as desired, and sew the arm bases to the body securely using matching yarn and hidden stitches, reinforcing the joins so they are stable for posing.
  • Tidy all loose ends: tighten holes, hide thread endings inside the body, sew the tongue into place, and finish any embroidery for facial details to complete the look.

Important Notes

  • ๐Ÿ’กWork with consistent tension and a small hook (1.75 mm recommended) to keep stitches tight so stuffing does not show through.
  • ๐Ÿ’กStuff the body in process as you crochet to maintain an even cylindrical shape and avoid lumps or under-stuffed sections.
  • ๐Ÿ’กWhen inserting wire, wrap the ends securely (band-aid or tape) to prevent the wire from poking through the fabric and to keep seams neat.
  • ๐Ÿ’กUse stitch markers to mark the beginning of rounds and to help place eyes and mouth details at the correct round distances.
  • ๐Ÿ’กChange colors cleanly by switching yarn at the last yarn-over of the stitch where instructed to avoid loose floats on the inside.

This playful Bobby the Pencil amigurumi is a tiny handmade treasure full of personality and cuddly charm. With colorworked details, a stitched mouth, and poseable arms, it makes a perfect gift or quirky desk companion. Grab your fine hook and bright yarns โ€” happy crocheting! โœ๏ธ๐Ÿงถ

You ask,

we answer.

FAQs

What size will the finished piece be?

The finished amigurumi measures approximately 15 cm (5.9 inches) tall when using the recommended yarn (YarnArt Jeans / Alize Cotton Gold) and a 1.75 mm hook.

Can I use different yarn weights for this pattern?

Yes, you can change yarn weight, but it will affect final size and stitch counts; use an appropriate hook for your yarn and make a gauge test before starting.

Do I need experience with special stitches for this pattern?

This pattern uses basic amigurumi techniques plus back post single crochet (BPSC) and color changes; basic crochet experience and familiarity with increases/decreases is recommended.

How long does this project typically take to complete?

Most crafters complete this project in about 5-7 hours, depending on experience, customizations, and assembly time.