🧢 Beautiful ✨ Detailed πŸ’ Adorable

Bonnie Amigurumi Pattern

Bonnie Amigurumi Pattern
4.9β˜… Rating
5-7 Hours Time Needed
3.1K Made This
βœ‚οΈ

Intermediate Level

Ideal for those with basic crochet experience, featuring slightly more advanced stitches and techniques to expand your skills.

⏱️

Weekend Treat

Takes 5-7 hours, making it an enjoyable project to finish over a couple of days.

🧸

Cute Companion

An adorable friend to cherish, handcrafted with love to bring comfort and joy for years to come.

About This Bonnie Amigurumi Pattern

This pattern creates a purple Bonnie amigurumi with sculpted muzzle, long ears, arms, and a crocheted bow tie. It features step-by-step round instructions for every piece and clear tips for assembly. The pattern includes a guide to make anime-style felt eyes and how to position them for expression.

Bonnie Amigurumi Pattern crochet pattern - detailed view of completed project

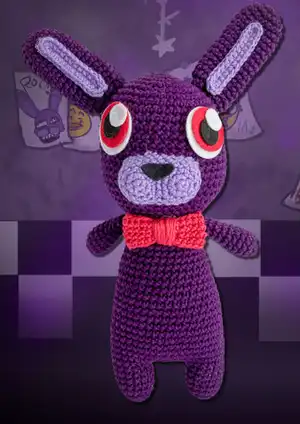
Designed for intermediate crocheters comfortable with increases and decreases, this pattern offers a satisfying build from head to feet. Photos and assembly notes help you finish a polished, poseable toy.

Why You'll Love This Bonnie Amigurumi Pattern

I absolutely love this pattern because it brings a playful character to life with simple crochet techniques and a dramatic look. I enjoy the way the sculpted muzzle and felt anime eyes create a lot of personality with small details. The bow tie is a fun finishing touch that transforms the piece from cute to characterful. I also love that the pattern is modularβ€”each part is made separately so you can customize colors and details as you go. Seeing the head and body joined and the face completed always feels incredibly rewarding.

Bonnie Amigurumi Pattern step 1 - construction progress Bonnie Amigurumi Pattern step 2 - assembly progress Bonnie Amigurumi Pattern step 3 - details and accessories Bonnie Amigurumi Pattern step 4 - final assembly and finishing

Switch Things Up

I love to change up the colors to create unique versions; try pastel purples or greys for a softer look.

I sometimes make a mini version by using thinner yarn and a smaller hook to create keychain-sized Bonnies.

I often replace the felt eyes with safety eyes or embroidered eyes for different textures and safety for kids.

I like to embroider small details like eyebrows or freckles to give different expressions to each character.

You can swap the cotton yarn for acrylic or worsted blends for a plusher, sturdier finished toy.

I sometimes add wire to the arms for a posable figure, wrapping the wire before stuffing for safety and shape.

I make alternative bows: a crocheted neck scarf, a felt bow, or a sewn fabric bow to match outfits.

For a spooky twist, change the eye colors and add tiny stitched teeth to create a themed character.

If you want a sturdier base, add a small disc of felt or cardboard inside the bottom before closing to help it stand upright.

I recommend trying different stuffing amounts to find the perfect firmnessβ€”you might prefer firmer heads and softer bodies.

Common Mistakes & How to Fix Them

βœ— Placing the eyes too early or unevenly will make the face look lopsided; measure the spacing accurately and place a marker between rounds 13-14 two inches apart before attaching. βœ— Not stuffing gradually causes lumps and uneven shaping in the head and limbs; add small amounts of stuffing frequently and shape as you go to maintain smooth curves. βœ— Working with loose tension can make stitches gap and stuffing show through; keep your stitches tight and consistent to hide the filling and keep details crisp. βœ— Skipping stitch markers when joining the legs to the body will make the join uneven; place a marker in the last stitch of the left leg to track your start and alignment for the join.

Bonnie Amigurumi Pattern

Make your own cuddly purple Bonnie amigurumi with this detailed crochet pattern. You will enjoy shaping the expressive anime-style eyes, sculpted muzzle, and cute bow tie for a charming finished toy. Clear photos and step-by-step rounds guide you through each piece so you can follow along with confidence. Perfect for gifting or adding to your FNAF-inspired collection.

Intermediate 5-7 Hours

Materials Needed for Bonnie Amigurumi Pattern

β€” Main Fabric

  • 01
    Hobby Lobby 'I Love This Cotton' color 252 Purple (main body color)
  • 02
    Hobby Lobby 'I Love This Cotton' color 250 Amethyst (muzzle/inner ear accent)
  • 03
    Hobby Lobby 'I Love This Cotton' color 60 Red (bow tie and eye layer)
  • 04
    Felt sheet - White (eye highlights and outer eye layer)
  • 05
    Felt sheet - Black (pupil and nose)
  • 06
    Felt sheet - Pink (optional accents)
  • 07
    Polyester fiberfill for stuffing (amount as needed)

β€” Tools Required

  • 01
    Crochet hook size D/3.25mm
  • 02
    Darning/tapestry needle for sewing and weaving ends
  • 03
    Scissors
  • 04
    Stitch markers
  • 05
    Polyester stuffing (fiberfill)
  • 06
    Felt sheets and fabric glue or hot glue for eyes/nose
  • 07
    Pins for positioning pieces during assembly

Progress Tracker

0% Complete

β€” Head :

Round 1 :

MR and place 6SC (6)

Round 2 :

[INC] x6 (12)

Round 3 :

[SC, INC] x6 (18)

Round 4 :

[SC1, INC, SC1] x6 (24)

Round 5 :

[SC3, INC] x6 (30)

Round 6 :

[SC2, INC, SC2] x6 (36)

Round 7 :

[SC5, INC] x6 (42)

Round 8 :

[SC3, INC, SC3] x6 (48)

Round 9-20 :

[SC] across (48)

Info :

TIP: I place eyes between rounds 13-14 two inches apart.

Round 21 :

[SC3, DEC, SC3] x6 (42)

Round 22 :

[SC5, DEC] x6 (36)

Round 23 :

[SC2, DEC, SC2] x6 (30)

Round 24 :

[SC3, DEC] x6 (24)

Round 25 :

[SC1, DEC, SC1] x6 (18)

Round 26 :

[SC1, DEC] x6 (12)

Round 27 :

[DEC] x6 (6)

Info :

Slip stitch off, and make sure you leave enough yarn to sew into last 6 stitches. Weave in tails

β€” Bow Tie :

Item Name (P1) :

Chain 25, attach first stitch to last with a slip stitch.

Round 1-4 :

[SC] around for four rounds.

Info :

Slip stitch off, make a long tail (16') and wrap around the center as shown in video tutorial.

β€” Legs :

Round 1 :

MR, [SC] x5 inside ring and tighten the loop (5)

Round 2 :

[INC] x5 (10)

Round 3 :

[SC1, INC] x5 (15)

Round 4-5 :

[SC] across (15)

Round 6 :

[SC] across (15)

Infos :

Break the yarn and fasten off your work. The right leg is done. Repeat R1-6 with left leg as well, but this time do not fasten off. Place a stitch marker into the last stitch you made on the left leg. This is your new start for your rounds. Continue next to the body.

β€” Body :

Round 7 :

8SC in the stitches of the left leg, CH9 and join to the right leg with a SC (this counts as the 1st SC of the following SC), SC in the next stitches of the right leg, 9SC in the 9CH, 7SC in the stitches of the left leg. (48)

Round 8 :

[SC] across (48)

Round 9 :

[SC22, DEC] x2 (46)

Round 10 :

[SC] across (46)

Round 11 :

[SC21, DEC] x2 (44)

Round 12 :

[SC] across (44)

Round 13 :

[SC20, DEC] x2 (42)

Round 14 :

[SC] across (42)

Round 15 :

[SC19, DEC] x2 (40)

Round 16 :

[SC] across (40)

Round 17 :

[SC18, DEC] x2 (38)

Round 18 :

[SC] across (38)

Round 19 :

[SC17, DEC] x2 (36)

Round 20 :

[SC] across (36)

Round 21 :

[SC16, DEC] x2 (34)

Round 22 :

[SC] across (34)

Round 23 :

[SC15, DEC] x2 (32)

Round 24 :

[SC] across (32)

Round 25 :

[SC14, DEC] x2 (30)

Round 26 :

[SC] across (30)

Round 27 :

[SC3, DEC] x6 (24)

Info :

Break yarn and fasten off.

β€” Arms :

Round 1 :

MR with 6SC (6)

Round 2 :

[INC] x6 (12)

Round 3-11 :

[SC] across (12)

Info :

TIP: I stuff the tips of the hands up to round 5, but leave the rest of the arms empty.

β€” Eyes :

Round 1 :

With pink yarn, MR with 6SC (6)

Round 2 :

[INC] x6 (12)

Round 3 :

Change to white, [SC1, INC] x6 (18)

Info :

Slip stitch off. I have a tutorial on how to make "anime" eyes which will be linked at the end of this PDF.

β€” Nose :

Round 1 :

MR and place 5SC (5)

Round 2 :

[INC] x5 (10)

Round 3 :

[SC1, INC] x5 (15)

Info :

Repeat 1-3 but this time don't slip stitch off. Sew first piece down the side for 3 stitches on both pieces. Check out our tutorial for further instructions.

Round 3-5 :

[SC] around both pieces. (24)

β€” Outer Ear :

Round 1 :

MR with 6SC (6)

Round 2 :

[INC] x6 (12)

Round 3 :

[SC1, INC] x6 (18)

Round 4-17 :

[SC] around (18)

Round 18 :

[SC1, DEC] x6 (12)

Info :

Slip stitch off and attach to top of the head.

β€” Inner Ear :

Info :

Chain 13, skip first chain and [SC] inside 11 chains, INC2 in final chain, turn and [SC11, INC2] in the backs of the foundational chains.

Info :

Slip stitch off and attach to the fronts of the ears.

Assembly Instructions

  • Place the eyes between rounds 13-14 about two inches apart and secure the felt pieces or sewn eye pieces in place before stitching through the head.
  • Sew the two nose pieces together along their sides for three stitches on each side, then attach the completed nose to the center of the muzzle and stitch securely.
  • Attach the outer ears to the top of the head, then center and sew the inner ear pieces to the fronts of the ears for the layered ear look.
  • Position the arms on either side of the body and sew securely with a yarn needle, stuffing only the tips as noted to create natural hanging arms.
  • Wrap the long tail of the bow tie around the center to form the bow and sew the bow tie onto the front of the neck, hiding the knot and weaving in ends.

Important Notes

  • πŸ’‘Hook size is less important than stitch tension; keep stitches tight enough to prevent stuffing from showing through.
  • πŸ’‘Stuff legs as you go to keep an even shape and avoid lumps in the lower body and feet.
  • πŸ’‘Place stitch markers when joining legs and starting new rounds to maintain correct alignment and stitch counts.
  • πŸ’‘Leave long tails when finishing the head so you can sew the final stitches closed neatly and securely.

This Bonnie amigurumi pattern captures the playful personality of a purple bunny with a sculpted muzzle and expressive anime-style eyes. The project includes clear round-by-round instructions and helpful photo tips so you can finish a polished toy. Make one for yourself or as a special handmade giftβ€”happy crocheting! 🧢🧡

You ask,

we answer.

FAQs

What size will the finished piece be?

The finished amigurumi measures approximately 9-12 inches tall depending on yarn tension and hook size used.

Can I use different yarn weights for this pattern?

Yes, you can use different yarn weights but this will change the final size; adjust hook size and eye/felt sizes accordingly.

Do I need prior crochet experience for this pattern?

This pattern is rated intermediate, so familiarity with single crochet, increases, decreases, and working in the round is recommended.

How long does this project typically take to complete?

Most crocheters complete this project in 5-7 hours, though total time depends on experience level and customization choices.