🧶 Beautiful ✨ Detailed 💝 Adorable

Bonnie Beanie Pattern

Bonnie Beanie Pattern
4.6★ Rating
2-4 Hours Time Needed
3.9K Made This
✂️

Beginner Friendly Level

Perfect for those just starting their crochet journey, with clear instructions and simple techniques

⏱️

Bite-Sized Project

Finishes in 2-4 hours—perfect for an afternoon of creative relaxation.

🧣

Snug Essential

Everyday comfort with practical charm, designed for both functionality and style through changing seasons.

About This Bonnie Beanie Pattern

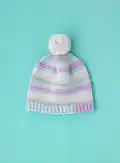
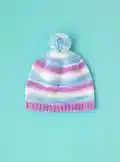
This pattern creates the Bonnie Beanie — a soft, striped baby hat worked in continuous rounds using Paintbox Baby DK Prints. It includes clear, beginner-friendly instructions for sizes 0–24 months and a simple ribbed brim made with a smaller hook. The hat finishes with a small pom pom sewn into the crown for a cute, playful finish.

Bonnie Beanie Pattern crochet pattern - detailed view of completed project

Worked in single (double) crochet rounds, the pattern gives size-specific changes so you can easily make the correct circumference. Perfect for gifting, stash-busting, or quick handmade projects.

Why You'll Love This Bonnie Beanie Pattern

I absolutely love this pattern because it is fast, forgiving, and produces such a cozy little hat every time. I enjoy how the Paintbox Baby DK Prints yarn creates lovely stripe sequences without needing to change colors. The simple increase rounds and continuous rounds make it relaxing to work on while still producing a professional-looking finish. Sewing on a pom pom at the end always feels like the most satisfying part, adding a charming handmade touch.

Bonnie Beanie Pattern step 1 - construction progress Bonnie Beanie Pattern step 2 - assembly progress Bonnie Beanie Pattern step 3 - details and accessories Bonnie Beanie Pattern step 4 - final assembly and finishing

Switch Things Up

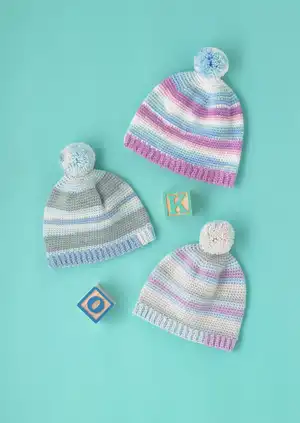
I love how easily you can switch yarn colors to create different looks; try bold brights or neutral tones to suit your style.

I often use a solid DK yarn instead of self-striping prints to create a cleaner color block beanie for a more classic finish.

You can make the beanie larger or smaller by choosing a different yarn weight and adjusting hook size; thicker yarns with a larger hook yield a chunkier hat.

I sometimes add a small embroidered heart or initial near the brim to personalize a hat for a baby shower gift.

If youd like a more secure pom pom, use two pom pom discs or wrap yarn tightly and sew it on with several passes for durability.

I like to add earflaps and ties for extra warmth on windy days; simply work extra stitches down from the brim and shape the flap with short rows.

For a more fitted brim, work more rounds of ribbing with the smaller hook or try folded brim techniques for extra snugness.

Want a fuzzy finish? Use a brushed mohair held with the DK for a soft halo effect, but make sure fiber choice is suitable for babies.

I sometimes line the hat with a cotton jersey band for extra comfort on newborn heads; sew the band inside the brim before attaching the pom pom.

To make a matching set, crochet a tiny pair of booties using the same yarn and a similar ribbed cuff treatment for a coordinated gift.

Common Mistakes & How to Fix Them

✗ Skipping the place marker during the crown increases can make it hard to track rounds; place a marker in the last stitch and move it up each round to stay aligned. ✗ Not checking gauge before starting results in incorrect finished size; make the recommended swatch of 24 sts and 27 rows over 4in/10cm to match the pattern tension. ✗ Using the same hook for brim and body may flatten the ribbing; switch to the smaller US D/3 (3mm) hook for the brim to keep it neat and elastic. ✗ Pulling loops too tightly when working increases can distort the crown shape; maintain consistent, moderate tension and count stitches after each increase round to confirm totals. ✗ Failing to join the brim correctly can leave uneven edges; follow the joining instructions carefully, working ss in FLO of each previous row and BLO of each corresponding ch to secure the brim neatly.

Bonnie Beanie Pattern

Make a sweet, beginner-friendly Bonnie Beanie for babies aged 0–24 months. This easy crochet hat uses Paintbox Baby DK Prints for soft, pastel striping and a cozy ribbed brim. Youll love how quickly the hat comes together in continuous rounds, and the pom pom finishing adds a playful touch. Perfect for gifting or keeping little heads warm with handmade charm.

Beginner Friendly 2-4 Hours

Materials Needed for Bonnie Beanie Pattern

— Main Fabric

  • 01
    Paintbox Yarns Baby DK Prints (50g / 1 3/4 oz) - 1(1:1:2:2) balls depending on size (sizes 0-3, 3-6, 6-12, 12-18, 18-24 months respectively)
  • 02
    Color options: Mermaid, Misty Forest, Pastel Party (use balls in either Mermaid, Misty Forest or Pastel Party as specified)

— Tools Required

  • 01
    US E/4 (3.5mm) crochet hook
  • 02
    US D/3 (3mm) crochet hook for brim
  • 03
    1 place marker

Progress Tracker

0% Complete

— Hat :

Info :

Make a MR using US E/4 (3.5mm) crochet hook.

1st round :

(right side) 1 ch (does not count as st), 6 sc (dc) in MR, do not join or turn. | 6 sts.

2nd round :

2 sc (dc) in each st around. | 12 sts.

Info :

PM in last st of round and move up as you work each round.

3rd round :

[2 sc (dc) in next st, 1 sc (dc) in next st] 6 times. | 18 sts.

4th round :

[2 sc (dc) in next st, 1 sc (dc) in next 2 sts] 6 times. | 24 sts.

5th round :

[2 sc (dc) in next st, 1 sc (dc) in next 3 sts] 6 times. | 30 sts.

6th round :

[2 sc (dc) in next st, 1 sc (dc) in next 4 sts] 6 times. | 36 sts.

7th round :

[2 sc (dc) in next st, 1 sc (dc) in next 5 sts] 6 times. | 42 sts.

8th round :

[2 sc (dc) in next st, 1 sc (dc) in next 6 sts] 6 times. | 48 sts.

9th round :

[2 sc (dc) in next st, 1 sc (dc) in next 7 sts] 6 times. | 54 sts.

10th round :

[2 sc (dc) in next st, 1 sc (dc) in next 8 sts] 6 times. | 60 sts.

11th round :

[2 sc (dc) in next st, 1 sc (dc) in next 9 sts] 6 times. | 66 sts.

12th round :

[2 sc (dc) in next st, 1 sc (dc) in next 10 sts] 6 times. | 72 sts.

For size 0–3 months only :

13th - 32nd rounds 1 sc (dc) in each st around. | 72 sts. Continue to brim.

For size 3–6 months only :

13th round [2 sc (dc) in first st, 1 sc (dc) in next 11 sts] 6 times. | 78 sts. 14th - 35th rounds 1 sc (dc) in each st around. Continue to brim.

For size 6–12 mths only :

13th round [2 sc (dc) in first st, 1 sc (dc) in next 11 sts] 6 times. | 78 sts. 14th round [2 sc (dc) in first st, 1 sc (dc) in next 12 sts] 6 times. | 84 sts. 15th - 38th rounds 1 sc (dc) in each st around. Continue to brim.

For size 12–18 months only :

13th round [2 sc (dc) in first st, 1 sc (dc) in next 11 sts] 6 times. | 78 sts. 14th round [2 sc (dc) in first st, 1 sc (dc) in next 12 sts] 6 times. | 84 sts. 15th round [2 sc (dc) in first st, 1 sc (dc) in next 13 sts] 6 times. | 90 sts. 16th - 40th rounds 1 sc (dc) in each st around. Continue to brim.

For size 18–24 months only :

13th round [2 sc (dc) in first st, 1 sc (dc) in next 11 sts] 6 times. | 78 sts. 14th round [2 sc (dc) in first st, 1 sc (dc) in next 12 sts] 6 times. | 84 sts. 15th round [2 sc (dc) in first st, 1 sc (dc) in next 13 sts] 6 times. | 90 sts. 16th round [2 sc (dc) in first st, 1 sc (dc) in next 14 sts] 6 times. | 96 sts. 17th - 42nd rounds 1 sc (dc) in each st around. Continue to brim.

— Brim :

Info :

For all sizes Without fastening off, ss in next st at end of final round of hat body, turn to work at right angles to the hat body and continue as follows: Using US D/3 (3mm) hook, make 6 ch.

1st row :

(right side) 1 sc (dc) in second ch from hook and in each of next 4 ch, ss in next st on final round of hat body, turn. 5 sc (dc) and 1 ss.

2nd row :

Miss 1 ss, 1 sc (dc) in BLO of next 5 sts, turn. 5 sc (dc) BLO.

3rd row :

1 ch (does not count as st throughout), 1 sc (dc) in BLO of next 5 sts, ss in next 2 sts on final round of body, turn. 5 sc (dc) BLO and 2 ss.

4th row :

Miss 2 ss, 1 sc (dc) in BLO of next 5 sts, turn. 5 sc (dc) BLO.

Info :

Repeat 3rd and 4th rows around the bottom of the hat finishing on a 4th row.

To join the brim :

Working on the wrong side from the outside edge back towards the body of the hat, ss in FLO of each st of previous row and BLO of each corresponding ch from 1st row. Fasten off and weave in ends.

— To Finish :

Info :

Make a small pom pom and sew securely into the centre of the magic ring at the crown. Sew in any remaining ends.

Assembly Instructions

  • To join the brim: working on the wrong side from the outside edge back towards the body of the hat, slip stitch in the front loop only (FLO) of each stitch of the previous row and back loop only (BLO) of each corresponding chain from the first row, then fasten off and weave in ends.
  • Turn the hat when instructed and work the brim at right angles to the hat body using US D/3 (3mm) hook, making 6 chains to start the brim edge.
  • Make a small pom pom and sew it securely into the centre of the magic ring at the crown to finish the hat.
  • Weave in any remaining ends neatly on the inside of the hat to hide tails and secure them so they do not come loose with wear.

Important Notes

  • 💡Use the recommended Paintbox Baby DK Prints yarn to achieve the same drape and sizing as the pattern notes specify.
  • 💡Work in continuous rounds for the hat body and move your place marker up as you complete each round to maintain accurate stitch counts.
  • 💡Switch to the smaller US D/3 (3mm) hook for the brim to create a neat, elastic ribbed edge and follow the joining instructions to secure it.

This Bonnie Beanie pattern is perfect for stitching up quick, cozy hats in beautiful Paintbox Baby DK Prints. Whether youre making one for a newborn or a toddler, the easy shaping and striped yarn do the work for you. Add a pom pom for a playful finish and enjoy a handmade gift full of love. 🧶🎀

You ask,

we answer.

FAQs

What size will the finished piece be?

The finished beanie measurements vary by size: circumferences are approximately 12, 13, 14, 15 and 16 inches (30, 32.5, 35, 37.5 and 40 cm) and lengths 5½, 6, 6¼, 6½ and 6¾ inches (14, 15, 16, 16.5 and 17 cm) for sizes 0-3 through 18-24 months respectively.

Can I use different yarn weights for this pattern?

You can, but it will change the finished size and gauge; if using a different weight, make a gauge swatch and adjust hook size as needed to match 24 sts and 27 rows over 4in/10cm.

Do I need prior crochet experience for this pattern?

This pattern is rated Beginner Friendly and uses simple techniques such as working in a magic ring, single (double) crochet increases, and basic ribbing, so basic crochet knowledge is helpful.

How long does this project typically take to complete?

Most crocheters complete this beanie in about 2-4 hours, though time may vary based on experience level and how quickly you work.