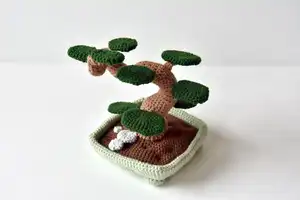
Make a charming crocheted bonsai tree to brighten your home or give as a thoughtful handmade gift. This pattern walks you through each piece step-by-step, from pot and soil to trunk, branches, leaves and finishing touches. You will enjoy sculpting the curvy trunk and arranging leaves to build a balanced, natural composition. Perfect for crocheters who like a creative assembly challenge and a lovely decorative result.
Progress Tracker
0% Complete
— Flower pot (in light green) :
Info :
Please note, these abbreviations look very alike but are slightly different: inc1sc = increase 1 = crochet 2 in next stitch. inc2sc = increase 2 = crochet 3 in next stitch.
Round 2 :
inc2sc in every st. =12
Round 3 :
Repeat 4x(1sc, inc2sc in next st, 1sc). =20
Round 4 :
Repeat 4x(2sc, inc2sc in next st, 2sc). =28
Round 5 :
Repeat 4x(3sc, inc2sc in next st, 3sc). =36
Round 6 :
Repeat 4x(4sc, inc1sc in next st, 4sc). =40
Round 7 :
Repeat 4x(5sc, inc1sc in next st, 4sc). =44
Round 8 :
Repeat 4x(5sc, inc2sc in next st, 5sc). =52
Round 9 :
Repeat 4x(6sc, inc1sc in next st, 6sc). =56
Round 10 :
Repeat 4x(7sc, inc1sc in next st, 6sc). =60
Round 11 :
Repeat 4x(7sc, inc2sc in next st, 7sc). =68
Round 12 :
Repeat 4x(8sc, inc1sc in next st, 8sc). =72
Round 13 :
Repeat 4x(9sc, inc1sc in next st, 8sc). =76
Round 14 :
Repeat 4x(9sc, inc2sc in next st, 9sc). =84
Round 15 :
Repeat 4x(10sc, inc1sc in next st, 10sc). =88
Round 16 :
Repeat 4x(11sc, inc1sc in next st, 10sc). =92
Round 17 :
Repeat 4x(11sc, inc2sc in next st, 11sc). =100
Round 18 :
Repeat 4x(12sc, inc2sc in next st, 12sc). =108
Round 19 :
Crochet 5 rounds of sc. =108
Round 20 :
Crochet 1sc and move your stitch marker/starting point of the round to this point. Continue to work on the next step, do not finish the round.
Round 21 :
Repeat 4x(12sc, sc3tog, 12sc). =100
Round 22 :
Crochet 4 rounds of sc. =100
Round 23 :
Crochet 1sc and move your stitch marker/starting point of the round to this point. Continue to work on the next step, do not finish the round.
Round 24 :
Repeat 4x(11sc, sc3tog, 11sc). =92
Round 25 :
Repeat 4x(11sc, sc2tog, 10sc). =88
Round 26 :
Repeat 4x(10sc, sc2tog, 10sc). =84
Round 27 :
Repeat 4x(9sc, sc3tog, 9sc). =76
Round 28 :
Repeat 4x(9sc, sc2tog, 8sc). =72
Round 29 :
Repeat 4x(8sc, sc2tog, 8sc). =68
Round 30 :
Repeat 4x(7sc, sc3tog, 7sc). =60
Round 31 :
Repeat 4x(7sc, sc2tog, 6sc). =56
Round 32 :
Repeat 4x(6sc, sc2tog, 6sc). =52
Round 33 :
Repeat 4x(5sc, sc3tog, 5sc). =44
Round 34 :
Repeat 4x(5sc, sc2tog, 4sc). =40
Round 35 :
Repeat 4x(4sc, sc2tog, 4sc). =36
Round 36 :
Repeat 4x(3sc, sc3tog, 3sc). =28
Round 37 :
Repeat 4x(2sc, sc3tog, 2sc). =20
Round 38 :
Repeat 4x(1sc, sc3tog, 1sc). =12
Round 39 :
Repeat 4x(sc3tog). =4
Round 40 :
Crochet 1slst and fasten off.
Info :
Do not stuff the flowerpot.
Round 42 :
Place the last slst you crocheted on top of the MR of step 1 and fold the flowerpot in shape.
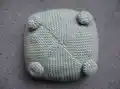
— Supports for the flowerpot :
Round 44 :
inc1sc in every st. =12
Round 45 :
1sc, inc1sc in next st. Repeat all round. =18
Round 46 :
1sc, sc2tog. Repeat all round. =12
Round 47 :
Stuff the support a little bit, do not use too much stuffing.
Round 48 :
sc2tog, repeat all round. =6
Round 49 :
sc3tog, skip 1st, crochet 1slst and fasten off.
Round 50 :
Make 4 in total.
Round 51 :
Sew the supports onto the bottom of the flowerpot underneath every corner, as pictured below. Keep a distance of 8 rounds of sc in between the top of the pot and the outside of the support.
— The soil (in dark brown) :
Round 2 :
inc2sc in every st. =12
Round 3 :
Repeat 4x(1sc, inc2sc in next st, 1sc). =20
Round 4 :
Repeat 4x(2sc, inc2sc in next st, 2sc). =28
Round 5 :
Repeat 4x(3sc, inc2sc in next st, 3sc). =36
Round 6 :
Repeat 4x(4sc, inc1sc in next st, 4sc). =40
Round 7 :
Repeat 4x(5sc, inc1sc in next st, 4sc). =44
Round 8 :
Repeat 4x(5sc, inc2sc in next st, 5sc). =52
Round 9 :
Repeat 4x(6sc, inc1sc in next st, 6sc). =56
Round 10 :
Repeat 4x(7sc, inc1sc in next st, 6sc). =60
Round 11 :
Repeat 4x(7sc, inc2sc in next st, 7sc). =68
Round 12 :
Repeat 4x(8sc, inc1sc in next st, 8sc). =72
Round 13 :
Repeat 4x(9sc, inc1sc in next st, 8sc). =76
Round 14 :
Repeat 4x(9sc, inc2sc in next st, 9sc). =84
Round 15 :
Repeat 4x(10sc, inc1sc in next st, 10sc). =88
Round 16 :
Repeat 4x(11sc, inc1sc in next st, 10sc). =92
Round 17 :
Repeat 4x(11sc, sc2tog, 10sc). =88
Round 18 :
Repeat 4x(10sc, sc2tog, 10sc). =84
Round 19 :
Repeat 4x(9sc, sc3tog, 9sc). =76
Round 20 :
Repeat 4x(9sc, sc2tog, 8sc). =72
Round 21 :
Repeat 4x(8sc, sc2tog, 8sc). =68
Round 22 :
Repeat 4x(7sc, sc3tog, 7sc). =60
Round 23 :
Repeat 4x(7sc, sc2tog, 6sc). =56
Round 24 :
Repeat 4x(6sc, sc2tog, 6sc). =52
Round 25 :
Repeat 4x(5sc, sc3tog, 5sc). =44
Round 26 :
Repeat 4x(5sc, sc2tog, 4sc). =40
Round 27 :
Repeat 4x(4sc, sc2tog, 4sc). =36
Round 28 :
Stuff the soil with fiberfill.
Round 29 :
Repeat 4x(3sc, sc3tog, 3sc). =28
Round 30 :
Repeat 4x(2sc, sc3tog, 2sc). =20
Round 31 :
Stuff the soil with fiberfill.
Round 32 :
Repeat 4x(1sc, sc3tog, 1sc). =12
Round 33 :
Stuff the soil with fiberfill.
Round 34 :
Repeat 4x(sc3tog). =4
Round 35 :
Crochet 1slst and fasten off.
Round 36 :
Get a long strand of dark brown yarn and pull the yarn with your sewing needle or crochet hook through the soil, from top to bottom and back. Tighten the yarn, this way little dents will occur. Make two flat knots on top of each other to secure the yarn. Repeat this 16 times, or as much as you like. This will give the soil some strenght and a more natural look.
Round 37 :
Place the soil in the flowerpot and sew it in place.
— The tree (in light brown) :
Round 1 :
ch30, close the chain with a slst. =30
Round 3 :
8sc, sc2tog. Repeat all round. =27
Round 4 :
7sc, sc2tog. Repeat all round. =24
Round 5 :
6sc, sc2tog. Repeat all round. =21
Round 6 :
4sc, 3hdc, 7dc, 3hdc, 4sc. =21
Round 7 :
4sc, 3hdc, 7dc, 3hdc, 4sc. =21
Round 8 :
4sc, 3hdc, 7dc, 3hdc, 4sc. =21
Round 9 :
4sc, 3hdc, 7dc, 3hdc, 4sc. =21
Round 10 :
4sc, 3hdc, 7dc, 3hdc, 4sc. =21
Round 11 :
10sc, sc2tog, 9sc. =20
Round 12 :
9sc, sc2tog, 9sc. =19
Round 13 :
8sc, sc2tog, 9sc. =18
Round 14 :
Crochet 10sc and move your stitch marker/starting point of the round to this point. Continue to work on the next step, do not finish the round.
Round 15 :
3sc, 3hdc, 6dc, 3hdc, 3sc. =18
Round 16 :
3sc, 3hdc, 6dc, 3hdc, 3sc. =18
Round 17 :
3sc, 3hdc, 6dc, 3hdc, 3sc. =18
Round 18 :
3sc, 3hdc, 6dc, 3hdc, 3sc. =18
Round 19 :
3sc, 3hdc, 6dc, 3hdc, 3sc. =18
Round 20 :
3sc, 3hdc, 6dc, 3hdc, 3sc. =18
Round 21 :
3sc, 3hdc, 6dc, 3hdc, 3sc. =18
Round 22 :
3sc, 3hdc, 6dc, 3hdc, 3sc. =18
Round 23 :
3sc, 3hdc, 6dc, 3hdc, 3sc. =18
Round 24 :
3sc, 3hdc, 6dc, 3hdc, 3sc. =18
Round 25 :
3sc, 3hdc, 6dc, 3hdc, 3sc. =18
Round 26 :
8sc, sc2tog, 8sc. =17
Round 27 :
7sc, sc2tog, 7sc. =16
Round 28 :
7sc, sc2tog, 7sc. =15
Round 29 :
Stuff the tree with fiberfill.
Round 30 :
7sc, sc2tog, 6sc. =14
Round 31 :
Crochet 7sc and move your stitch marker/starting point of the round to this point. Continue to work on the next step, do not finish the round.
Round 32 :
2sc, 2hdc, 6dc, 2hdc, 2sc. =14
Round 33 :
2sc, 2hdc, 6dc, 2hdc, 2sc. =14
Round 34 :
2sc, 2hdc, 6dc, 2hdc, 2sc. =14
Round 35 :
2sc, 2hdc, 6dc, 2hdc, 2sc. =14
Round 36 :
2sc, 2hdc, 6dc, 2hdc, 2sc. =14
Round 37 :
2sc, 2hdc, 2dc, dc2tog, 2dc, 2hdc, 2sc. =13
Round 38 :
2sc, 2hdc, 5dc, 2hdc, 2sc. =13
Round 39 :
Stuff the tree with fiberfill.
Round 40 :
2sc, 2hdc, 1dc, dc2tog, 2dc, 2hdc, 2sc. =12
Round 41 :
2sc, 2hdc, 4dc, 2hdc, 2sc. =12
Round 42 :
Stuff the tree with fiberfill.
Round 43 :
2sc, 2hdc, 4dc, 2hdc, 2sc. =12
Round 44 :
2sc, 2hdc, 1dc, dc2tog, 1dc, 2hdc, 2sc. =11
Round 45 :
5sc, sc2tog, 4sc. =10
Round 46 :
4sc, sc2tog, 4sc. =9
Round 47 :
4sc, sc2tog, 3sc. =8
Round 48 :
Stuff the tree with fiberfill.
Round 49 :
4sc, sc2tog, 3sc. =8
Round 50 :
4sc, sc2tog, 3sc. =8
Round 51 :
Crochet 4sc and move your stitch marker/starting point of the round to this point. Continue to work on the next step, do not finish the round.
Round 52 :
1sc, 1hdc, 4dc, 1hdc, 1sc. =8
Round 53 :
2sc, 1hdc, 2dc, 1hdc, 2sc. =8
Round 54 :
2sc, 1hdc, 2dc, 1hdc, 2sc. =8
Round 55 :
2sc, 1hdc, 2dc, 1hdc, 2sc. =8
Round 56 :
Stuff the tree with fiberfill.
Round 57 :
2sc, 1hdc, 2dc, 1hdc, 2sc. =8
Round 58 :
2sc, 1hdc, 2dc, 1hdc, 2sc. =8
Round 59 :
Stuff the tree with fiberfill.
Round 60 :
6sc, sc2tog. =7
Round 61 :
5sc, sc2tog. =6
Round 62 :
Stuff the tree with fiberfill.
Round 63 :
4sc, sc2tog. =5
Round 64 :
3sc, sc2tog. =4
Round 65 :
2sc, sc2tog. =3
Round 66 :
1slst and fasten off.
Round 67 :
Stuff the bottom of the tree some more with fiberfill if needed and sew the tree on top of the soil, right in the middle.
— The stones (in light grey) :
Stone A (Round 1) :
MR6 =6
Stone A (Round 2) :
inc1sc in every st. =12
Stone A (Round 3) :
1sc, inc1sc in next st. Repeat all round. =18
Stone A (Round 4) :
1sc, sc2tog. Repeat all round. =12
Stone A (Round 5) :
sc2tog, repeat all round. =6
Stone A (Round 6) :
sc3tog, skip 1st, crochet 1slst and fasten off.
Stone A (Round 7) :
Do not stuff the stone with fiberfill.
Stone B (Round 8) :
MR6 =6
Stone B (Round 9) :
inc1sc in every st. =12
Stone B (Round 10) :
sc2tog, repeat all round. =6
Stone B (Round 11) :
sc3tog, skip 1st, crochet 1slst and fasten off.
Stone C (Round 12) :
MR6 =6
Stone C (Round 13) :
sc3tog, sc2tog, 1slst and fasten off.
Stone C (Round 14) :
Do not stuff the stone with fiberfill.
Round 15 :
Place the stones onto the soil, next to the tree. Place stone A a little bit on top of stone B, place stone C next to A and B with 1-2sc in between.
— The leaves (in dark green) :
Info :
There are three sizes of leaves: A, B and C. The leaves are worked flat.
Type A (P1) :
Make 2 in total. 1. ch5, turn. 2. Start working in the 2nd ch st as counted from the crochet hook: 3sc, inc2sc in next st. =6. 3. Continue to work on the bottom of the foundation chain: 3sc, inc2sc in next st. You have now created a new round counting 12 stitches. Continue to work in spirals. =12. 4. 3sc, repeat 3x(inc1sc in next st), 3sc, repeat 3x(inc1sc in next st). =18. 5. 3sc, repeat 3x(1sc, inc1sc in next st), 3sc, repeat 3x(1sc, inc1sc in next st). =24. 6. 3sc, repeat 3x(2sc, inc1sc in next st), 3sc, repeat 3x(2sc, inc1sc in next st). =30. 7. 3sc, repeat 3x(3sc, inc1sc in next st), 3sc, repeat 3x(3sc, inc1sc in next st). =36. 8. 3sc, repeat 3x(3sc, sc2tog), 3sc, repeat 3x(3sc, sc2tog). =30. 9. 3sc, repeat 3x(2sc, sc2tog), 3sc, repeat 3x(2sc, sc2tog). =24. 10. 3sc, repeat 3x(1sc, sc2tog), 3sc, repeat 3x(1sc, sc2tog). =18. 11. 3sc, repeat 3x(sc2tog), 3sc, repeat 3x(sc2tog). =12. 12. 3sc, sc3tog, 3sc. =6. 13. Crochet 1slst and fasten off. 14. Do not stuff the leaf with fiberfill but flatten it and sew the remaining hole shut.
Type B (P1) :
Make 4 in total. 1. ch5, turn. 2. Start working in the 2nd ch st as counted from the crochet hook: 3sc, inc2sc in next st. =6. 3. Continue to work on the bottom of the foundation chain: 3sc, inc2sc in next st. You have now created a new round counting 12 stitches. Continue to work in spirals. =12. 4. 3sc, repeat 3x(inc1sc in next st), 3sc, repeat 3x(inc1sc in next st). =18. 5. 3sc, repeat 3x(1sc, inc1sc in next st), 3sc, repeat 3x(1sc, inc1sc in next st). =24. 6. 3sc, repeat 3x(2sc, inc1sc in next st), 3sc, repeat 3x(2sc, inc1sc in next st). =30. 7. 3sc, repeat 3x(3sc, inc1sc in next st), 3sc, repeat 3x(3sc, inc1sc in next st). =36. 8. 3sc, repeat 3x(3sc, sc2tog), 3sc, repeat 3x(3sc, sc2tog). =30. 9. 3sc, sc3tog, 3sc, sc3tog. =24. 10. 3sc, sc3tog, 3sc, sc3tog. =? (follow pattern photos and counts). 11. Crochet 1slst and fasten off. 12. Do not stuff the leaf with fiberfill but flatten it and sew the remaining hole shut.
Type C (P1) :
Make 3 in total. 1. ch5, turn. 2. Start working in the 2nd ch st as counted from the crochet hook: 3sc, inc2sc in next st. =6. 3. Continue to work on the bottom of the foundation chain: 3sc, inc2sc in next st. You have now created a new round counting 12 stitches. Continue to work in spirals. =12. 4. 3sc, repeat 3x(inc1sc in next st), 3sc, repeat 3x(inc1sc in next st). =18. 5. 3sc, repeat 3x(1sc, inc1sc in next st), 3sc, repeat 3x(1sc, inc1sc in next st). =24. 6. 3sc, repeat 3x(3sc, sc2tog), 3sc, repeat 3x(3sc, sc2tog). =18. 7. 3sc, sc3tog, 3sc. =12. 8. Crochet 1slst and fasten off. 9. Do not stuff the leaf with fiberfill but flatten it and sew the remaining hole shut.
— The branches (in light brown) :
Info :
There are three types of branches, each belongs to the same type of leaf: A, B and C.
Type A (P1) :
Make 2 in total. 1. MR6 =6. 2. 4sc, sc2tog. =5. 3. 3sc, sc2tog. =4. 4. Crochet 5 rounds of sc. =4. 5. 2sc, sc2tog. =3. 6. Crochet 1slst and fasten off. 7. Do not stuff the branch with fiberfill.
Type B (P1) :
Make 4 in total. 1. MR6 =6. 2. 4sc, sc2tog. =5. 3. 3sc, sc2tog. =4. 4. Crochet 4 rounds of sc. =4. 5. 2sc, sc2tog. =3. 6. Crochet 1slst and fasten off. 7. Do not stuff the branch with fiberfill.
Type C (P1) :
Make 3 in total. 1. MR6 =5. 2. 3sc, sc2tog. =4. 3. Crochet 4 rounds of sc. =4. 4. 2sc, sc2tog. =3. 5. Crochet 1slst and fasten off. 6. Do not stuff the branch with fiberfill.
Info :
How to put all leaves and branches of the tree together: Some things to keep in mind: Divide the tree in three parts. - Place the heaviest leaves (A) and their branches mostly on the bottom third of the tree, but maybe also one in the middle (depending on how many leaves you want to add yourself). - Place the lightest leaves (C) and their branches on the top third of the tree. - Place the medium weight leaves (B) and their branches on the middle part and bottom third of the tree.
Info :
...this way the tree will keep its balance and will be able to stand on its own in the end. If you place leaves on the end of the tree that are too heavy, it will tip over. If you want, use some small pins or small skewer sticks to try out some different positions with leaves on the tree trunk. You can adjust them until you are happy with the final composition.
Info :
Also: When finally sewing all branches and leaves onto the tree, make sure all leaves are pointing in the same direction.
— Assembly :
Step 1 :
First, sew all branches onto the tree, one by one, positioning them according to the guidance above and the photos.
Step 2 :
And then, sew the matching leaves (type A leaves for type A branches, etc) onto the branches. Keep the edge of the leaf close to the tree itself.
Step 3 :
Repeat until all branches and leaves are sewn onto the tree.
Step 4 :
Sew the completed tree onto the soil in the center, and place the soil inside the flowerpot, sewing the soil to the pot so it is secure.
Step 5 :
Attach the supports under each corner of the flowerpot and position the stones on the soil next to the trunk as pictured.
Info :
Congratulations! Your tree is finished!
This charming Bonsai Tree Amigurumi Pattern helps you create a lovely miniature tree to brighten shelves or workspaces. It combines shaping, small pieces and thoughtful assembly for a truly handcrafted decorative piece. Make one for yourself or as a thoughtful, handmade gift that brings a touch of nature indoors. 🪴🧶