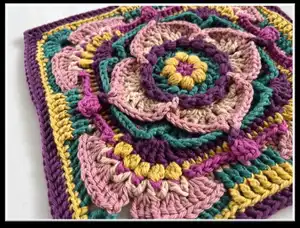
Create a richly textured floral square with Brood of Angels Square Pattern by Pam Knighton-Haener. This advanced square features puff stitches, clusters, modified X-stitches, and layered petals to give a dramatic, dimensional bloom that looks stunning in blankets or as a stand-alone cushion panel. You will follow clear step-by-step rounds with photo guidance and links to right- and left-handed videos to support each shaping technique. Enjoy exploring colorways and texture as you stitch each detailed round.
Progress Tracker
0% Complete
— Main Square :
Round 1 :
In double magic circle, ch 3 (counts as first hdc and ch 1 of rnd); [hdc, ch 1] 7 times; cut yarn, invisible join; Counts: 8 hdc, 8 ch-1 sp (16 total)
Round 2 :
If you have difficulty working Option 1, please use Option 2. Option 1: Turn to back AND starting in any ch-1 sp, *puff in ch-1 sp; ch 2, sk NEXT hdc; repeat from * around; cut yarn, invisible join. Counts: 8 puff, 8 ch-2 sp (24 total) Option 2: Starting in any ch-1 sp, *puff in ch-1 sp; ch 2, sk NEXT hdc; repeat from * around; cut yarn, invisible join. Counts: 8 puff, 8 ch-2 sp (24 total) ~ Rnd 2 Right-Handed and Left-Handed Videos
Round 3 :
I recommend watching the video for this rnd before starting. Option 1: Turn to front AND starting in any ch-2 sp, Option 2: Starting in any ch-2 sp, Both options, continue: Note: the 1st dc of the dc2tog is always worked behind the previous dc2tog and st between dc2tog is skipped. • dc2tog, working in ch-2 sp before and after puff, ch 1; • [dc2tog, working in previously skipped puff and NEXT puff, ch 1; dc2tog, working in previously worked ch-2 sp and NEXT ch-2 sp, ch 1] 7 times; • dc2tog, working in previously skipped puff and from the front in NEXT puff, ch 1; cut yarn, invisible join. Counts: 16 dc2tog, 16 ch-1 sp (32 total) ~ Rnd 3 Right-Handed and Left-Handed Videos
Round 4 :
I recommend watching the video before starting this rnd. Starting in any ch-1 sp, *HPS in ch-1 sp, ch 1; sk NEXT dc2tog; repeat from * around; cut yarn, invisible join. Counts: 16 HPS, 16 ch-1 sp (32 total) ~ Rnd 4 Right-Handed and Left-Handed Videos
Round 5 :
Working behind rnd 4 and in rnd 3 dc2tog only, start in any dc2tog, *working in BL and 3LP as one, hdc in dc2tog, ch 2; repeat from * around; cut yarn, invisible join. Counts: 16 BLhdc, 16 ch-2 sp (48 total) ~ Rnd 5 Right-Handed and Left-Handed Videos
Round 6 :
Starting in any BLhdc, *sc in BLhdc; ch 2, sk NEXT ch-2 sp; repeat from * around; cut yarn, invisible join. Counts: 16 sc, 16 ch-2 sp (48 total) ~ Rnd 6 Right-Handed and Left-Handed Videos
Round 7 :
Starting in any ch-2 sp, *[(tr, ch 1] 5 times) in ch-2 sp-place st marker in 4th ch-1 sp; sk NEXT sc, ([tr, ch 1] 5 times) in NEXT ch-2 sp; sk NEXT sc, place st marker in ch-2 sp of rnd 5 directly below, sk NEXT ch-2 sp; sc in NEXT sc; ch 1, sk NEXT ch-2 sp and sc; repeat from * around; cut yarn, invisible join. Counts: 4 sc, 40 tr, 44 ch-1 sp (88 total) ~ Rnd 7 Right-Handed and Left-Handed Videos
Round 8 :
Starting in ch-1 marked sp of rnd 7-remove marker, * (2 hdc) in ch-1 sp; sk NEXT tr, (dc, ch 2, dc) in NEXT ch-1 sp-place st marker in ch-2 sp; sk NEXT tr [(2 hdc) in NEXT ch-1 sp, sk NEXT tr] 2 times; [(2 dc) in NEXT ch-1 sp, sk NEXT tr] 2 times; ch 1, sk NEXT ch-1 sp; sc in NEXT ch-1 sp directly below AND between 2 HPS of rnd 4- there will be 4 HPS between scs, ch 1; working behind rnd 7, sc in NEXT ch-2 marked sp of rnd 5-do not remove marker; ch 1, sk NEXT (sc, ch-1 sp); [sk NEXT tr, (2 dc) in NEXT ch-1 sp] 2 times; sk NEXT tr, (2 hdc) in NEXT ch-1 sp, sk NEXT tr; repeat from * around; cut yarn, invisible join. Counts: 8 sc, 32 hdc, 40 dc, 12 ch-1 sp, 4 ch-2 sp (100 total/25 per side) ~ Rnd 8 Right-Handed and Left-Handed Videos
Round 9 :
I recommend watching the video before starting this rnd. Working from the back of rnd 7 only, start in tr immediately before any (dc, ch 2, dc) marked st of rnd 8-do not remove marker, *[working in rnd 7 tr, hdc in BL and 3LP of tr as one, hdc in tr, ch 1; sk all sts to NEXT tr] 5 times-place st marker in 5th ch-1 sp; sk all sts to marked st of rnd 5; working in marked st of rnd 5, dc to the left of sc (right, if left-handed) in rnd 8-remove marker; ch 1, sk NEXT (sc, ch 1, tr); [BLhdc in 3LP of NEXT tr, ch 1, sk all sts to NEXT tr] 3 times; repeat from * around; cut yarn, invisible join. Counts: 32 BLhdc, 4 dc, 36 ch-1 sp (72 total) ~ Rnd 9 Right-Handed and Left-Handed Videos
Round 10 :
Starting in ch-1 marked sp of rnd 9, *dtr in ch-1 marked sp of rnd 9-remove marker, ch 1; X-st using the NEXT Unworked ch-1 sp and previously worked ch-1 sp - for the exact placement of the X-st I recommend looking at rnd 10 picture or watching the video; ch 1, dtr in previously worked ch-1 sp; sk NEXT hdc, (2 tr) in ch-1 sp; [sk NEXT hdc, (2 dc) in ch-1 sp] 2 times; ch 1, sk NEXT (hdc, ch-1 sp, hdc); [(2 dc) in ch-1 sp, sk NEXT hdc] 2 times; (2 tr) in NEXT ch-1 sp; repeat from * around; cut yarn, invisible join. Counts: 32 dc, 16 tr, 8 dtr, 12 ch-1 sp, 4 X-st (72 total) ~ Rnd 10 Right-Handed and Left-Handed Videos
Round 11 :
Use Option 4 if you find working Option 3 is too difficult or you prefer the look of Option 4. Option 3: Starting in ch-2 sp of any X-st, *[(4 tr) in ch-2 sp of X-st; ch 1, sk NEXT (dtr, ch-1 sp); BPdc around NEXT dtr and tr; BPhdc around NEXT tr and 4 dc; mod X-st in ch-2 marked sp of rnd 8-remove marker; sk NEXT ch-1 sp, BPhdc around NEXT 4 dc and tr; BPdc around NEXT tr and dtr; ch 1, sk NEXT ch-1 sp and dtr; tr in NEXT ch-2 sp of X-st; repeat from * around; cut yarn, invisible join. Counts: 40 BPhdc, 16 BPdc, 20 tr, 8 ch-1 sp, 4 mod X-st (88 total) Option 4: Starting in ch-2 sp of any X-st, *[(4 tr) in ch-2 sp of X-st; ch 1, sk NEXT (dtr, ch-1 sp); BPdc around 2 sts; BPhdc around 5 sts; (dc, ch 2, dc) in ch-2 sp marked st of rnd 8-remove marker; sk ch-1 sp, BPhdc around NEXT 5 sts; BPdc around NEXT 2 sts; ch 1, sk NEXT (ch-1 sp, dtr); tr in NEXT ch-2 sp of X-st; repeat from * around; cut yarn, invisible join. Counts: 40 BPhdc, 8 dc, 16 BPdc, 20 tr, 8 ch-1 sp, 4 ch-2 sps (100 total) ~ Rnd 11 Right-Handed and Left-Handed Videos
Round 12 :
Starting in 2nd BPdc after any group of 5 tr, *dc in 6 sts; ch 1, sk NEXT mod X-st OR NEXT (dc, ch 2, dc); dc in NEXT 7 sts; ch 1, sk NEXT ch-1 sp; [3dc-cluster in NEXT tr, ch 1] 5 times; sk NEXT ch-1 sp, dc in NEXT BPdc; repeat from * around; cut yarn, invisible join. Counts: 56 dc, 20 3dc-cluster, 28 ch-1 sp (104 total) ~ Rnd 12 Right-Handed and Left-Handed Videos
Round 13 :
In this rnd use the same option used in rnd 11. Option 3: Starting around 2nd dc of any side, *FPhdc around 6 sts, ch 1; (5 dc) in NEXT ch-2 sp of rnd 11 mod X-st; ch 1, sk NEXT ch-1 sp; FPhdc around NEXT 7 sts; ch 1, sk NEXT ch-1 sp; Option 4: Starting around 2nd dc of any side, *FPhdc around 6 sts, ch 1; (5 dc) in NEXT ch-2 sp of rnd 11; ch 1, sk NEXT ch-1 sp; FPhdc around NEXT 7 sts; ch 1, sk NEXT ch-1 sp; Both options, continue: • [FPdc around NEXT 3dc-cluster, ch 2, sk NEXT ch-1 sp] 4 times; FPdc around NEXT 3dc-cluster; ch 1, sk NEXT ch-1 sp; FPdc around NEXT st; repeat from * around; cut yarn, invisible. Counts: 56 FPhdc, 20 dc, 20 FPdc, 16 ch-1 sp, 16 ch-2 sp (144 total) ~ Rnd 13 Right-Handed and Left-Handed Videos
Round 14 :
Work in rnd 12 only and start in ch-1 sp between 1st and 2nd 3dc-cluster of any side, In the 1st, 2nd, 3rd and 5th bullet points below, fold ch-2 sp of rnd 13 to the back, working dc2tog in rnd 12 ch-1 sps and in front of rnd 13 FPdc; • *work dc2tog in ch-1 sp AND NEXT ch-1 sp, ch 2; • [work dc2tog in previously worked ch-1 sp and NEXT Unworked ch-1 sp, ch 2] 2 times; • work dc2tog in previously worked ch-1 sp and NEXT Unworked ch-1 sp; ch 1, sk NEXT 2 dc; • working behind rnd 13, hdc in NEXT 2 sts; dc in NEXT 3 sts-place st marker in 2nd dc; ch 1, sk NEXT ch-1 sp; dc in NEXT 3 sts; hdc in NEXT 2 dc; ch 1, sk NEXT 2 dc; • work dc2tog in NEXT rnd 12 ch-1 sp and NEXT ch-1 sp; ch 2; repeat from * around; cut yarn, invisible join. Counts: 16 hdc, 24 dc, 20 dc2tog, 12 ch-1 sp, 16 ch-2 sp (104 total) ~ Rnd 14 Right-Handed and Left-Handed Videos
Round 15 :
Starting in 2nd marked dc of rnd 14, • *sc in 2 dc-move marker to place it around 1st worked dc of rnd 14, sk NEXT ch-1 sp; working under both ch-1 sps before and after (5 dc) of rnd 13, FPdc around NEXT group of 5 dc, sk NEXT ch-1 sp; sc in NEXT 3 dc; ch 1, sk NEXT 2 hdc of rnd 14; In the NEXT 4 bullet points, fold ch-2 of rnd 14 to the back, insert hook from front-to-back and pull ch-2 of rnd 13 to the front: • (4 tr) in NEXT Unworked ch-1 sp of rnd 13; sk ALL sts across to NEXT ch-2 sp of rnd 13; • [(4 tr) in NEXT Unworked ch-2 sp of rnd 13; sk ALL sts across to NEXT ch-2 sp of rnd 13] 2 times, ch 2 as a corner; • (4 tr) in NEXT Unworked ch-2 sp of rnd 13; sk ALL sts across to NEXT ch-2 sp of rnd 13; • (4 tr) in NEXT Unworked ch-1 sp of rnd 13; ch 1, sk NEXT 2 hdc of rnd 14; sc in NEXT dc; repeat from * around; cut yarn, invisible join. Counts: 24 sc, 4 FPdc, 96 tr, 8 ch-1 sp, 4 ch-2 corner sp (132 total/33 per side) ~ Rnd 15 Right-Handed and Left-Handed Videos
Round 16 :
Starting in any ch-2 corner sp, * (3 tr, ch 2, 4 tr) in ch-2 corner sp; ch 1, sk NEXT 4 tr; working in 3LP, dc in NEXT 8 tr; ch 1, sk NEXT 4 tr; start around marked dc of rnd 14, and work FPtr around 1st, 2nd and 3rd dc-remove marker; FPdc around NEXT FPdc of rnd 15, FPtr around 4th, 5th and 6th dc of rnd 14; ch 1, sk ALL sts to NEXT tr of rnd 15; working in 3LP, dc in NEXT 8 tr; ch 1, sk NEXT 4 tr; tr in NEXT ch-2 corner sp; repeat from * around; cut yarn, invisible join. Counts: 64 dc, 4 FPdc, 32 tr, 24 FPtr, 16 ch-1 sp, 4 ch-2 corner sp (140 total/35 per side) ~ Rnd 16 Right-Handed and Left-Handed Videos
Round 17 :
Starting in any ch-2 corner sp, * (sc, ch 2, sc) in ch-2 corner sp; sc in NEXT 3 tr; hdc in NEXT tr and ch-1 sp; sc in NEXT 7 dc; hdc in NEXT dc; sk NEXT ch-1 sp; FPtr around NEXT 7 sts; sk NEXT ch-1 sp, hdc in NEXT dc; sc in NEXT 7 dc; hdc in NEXT ch-1 sp and tr; sc in NEXT 3 tr; repeat from * around; cut yarn, invisible join. Counts: 88 sc, 24 hdc, 28 FPtr, 4 ch-2 corner sp (140 total/35 per side)
Round 18 :
Starting in any ch-2 corner sp, * (2 dc, ch 2, 2 dc) in ch-2 corner sp; working in BL, dc in NEXT 14 sts; working in BL and 3LP as one, dc in NEXT 7 FPtr; working in BL, dc in NEXT 14 sts; repeat from * around; cut yarn, invisible join and weave in ALL yarn ends. Counts: 156 dc, 4 ch-2 corner sp (156 total/39 per side)
This gorgeous Brood of Angels Square combines layering, texture, and color for a truly unique floral panel. It makes a spectacular center square for blankets or a striking cushion front for your home decor projects. Enjoy stitching the dimensional petals and special stitches that give this piece personality and charm. 🧶🌸✨