🧢 Beautiful ✨ Detailed πŸ’ Adorable

Bulbasaur Amigurumi Pattern

Bulbasaur Amigurumi Pattern
4.5β˜… Rating
2-3 Hours Time Needed
1.7K Made This
βœ‚οΈ

Intermediate Level

Ideal for those with basic crochet experience, featuring slightly more advanced stitches and techniques to expand your skills.

⏱️

Bite-Sized Project

Finishes in 2-4 hoursβ€”perfect for an afternoon of creative relaxation.

🧸

Cute Companion

An adorable friend to cherish, handcrafted with love to bring comfort and joy for years to come.

About This Bulbasaur Amigurumi Pattern

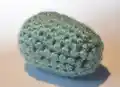
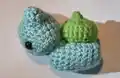
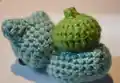
This pattern creates a small Bulbasaur amigurumi using worsted weight yarn and a 3.5mm hook. You will crochet separate pieces β€” head, body, ears, pod and legs β€” then assemble them for a compact, cuddly figure. It uses simple increases and decreases to shape the pieces and includes placement notes for eyes and felt markings.

Bulbasaur Amigurumi Pattern crochet pattern - detailed view of completed project

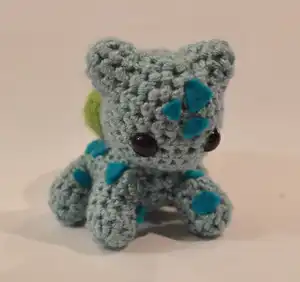
Perfect for intermediate crocheters comfortable with single crochet, increases and decreases. The pattern is concise and friendly, with helpful photos and finishing tips to guide your assembly.

Why You'll Love This Bulbasaur Amigurumi Pattern

I absolutely love this pattern because it captures Bulbasaur's charm in a tiny, manageable project that still feels satisfying to complete. I enjoyed designing the little pod and simple felt markings that give the character personality. I love how quick it is to make β€” you can finish one in an afternoon and it still looks detailed. I also love that it uses basic stitches, so you can focus on shaping and finishing rather than learning new techniques.

Bulbasaur Amigurumi Pattern step 1 - construction progress Bulbasaur Amigurumi Pattern step 2 - assembly progress Bulbasaur Amigurumi Pattern step 3 - details and accessories Bulbasaur Amigurumi Pattern step 4 - final assembly and finishing

Switch Things Up

I love customizing this Bulbasaur by changing the yarn color for a unique take; use pastel shades for a softer look or bright colors for a playful version.

I sometimes make a larger Bulbasaur by switching to bulky yarn and a larger hook to create a plush, more huggable figure.

I often swap safety eyes for embroidered eyes when making toys for small children to make the piece fully child-safe and durable.

Try adding wire inside the legs for a posable toy; I insert thin craft wire into the limb stuffing to adjust poses for display.

Experiment with different felt shapes for the markings β€” rounded spots or star shapes change the personality of your Bulbasaur instantly.

I like to stitch on tiny accessories like a miniature scarf or flower to give each amigurumi a unique story and charm.

If you want a more realistic pod, crochet it in two colors or add a tiny appliqued spiral detail to the top for extra interest.

To make a keychain version, use thinner yarn and a small hook, then attach a keyring to the top before final stuffing and closing.

I sometimes embroider a small smile or blush with pink floss to change the facial expression and make each toy feel handmade and special.

Don't be afraid to mix yarn textures β€” pairing a boucle or slightly fuzzy yarn for the pod gives a lovely tactile contrast to the smooth body yarn.

Common Mistakes & How to Fix Them

βœ— Not placing the eyes evenly will make the face look lopsided; place the safety eyes five stitches apart and check placement before securing to ensure symmetry. βœ— Skipping stuffing until the end can make shaping difficult and uneven; stuff the head and body as you go, adding small amounts gradually to maintain shape. βœ— Pulling stitches too tightly during increases and decreases causes distortion in the round; maintain consistent, moderate tension and count stitches after each round. βœ— Forgetting to fasten off and weave ends neatly results in messy joins and visible tails; FO with a slip stitch when directed and weave in ends securely before final assembly.

Bulbasaur Amigurumi Pattern

Make a tiny, adorable Bulbasaur with this complete crochet pattern. You will follow step-by-step rounds to create the head, body, ears, legs, and the iconic plant pod. The pattern includes materials, abbreviations, and clear assembly notes so you can finish a charming Pokemon-inspired amigurumi. Ideal for gifting or keeping as a cute collectible.

Intermediate 2-3 Hours

Materials Needed for Bulbasaur Amigurumi Pattern

β€” Main Fabric

  • 01
    Worsted weight yarn (approximate amounts as needed) - Light Teal / Aqua (main color for body/head)
  • 02
    Worsted weight yarn (approximate amounts as needed) - Green (for pod)
  • 03
    Dark teal felt for markings
  • 04
    Polyfil (or another soft stuffing)
  • 05
    1 pair 10mm safety eyes

β€” Tools Required

  • 01
    Crochet hook size 3.5mm
  • 02
    Scissors
  • 03
    Tapestry needle
  • 04
    Glue gun or fabric glue
  • 05
    Stitch markers (recommended)
  • 06
    Pins for assembly (optional)

Progress Tracker

0% Complete

β€” Materials :

Info :

3.5mm crochet hook. Scissors. Tapestry Needle. Glue gun/fabric glue. Dark teal Felt. 1 pair 10mm safety eyes. Polyfil (or another soft stuffing). Worsted weight yarn in: Green, Light Teal/aqua.

β€” Abbreviations :

Info :

SC = single crochet. DEC = single crochet decrease one. INC = single crochet increase one. SlSt = slip stitch. CH = chain. FO = fasten off.

β€” Head :

Row 1 :

CH 2, SC 8 in first stitch. (8 stitches)

Info :

Alternatively, SC 8 into a magic circle

Row 2 :

INC x 8 (16 stitches)

Row 3 :

*SC, INC* x 8 (24 stitches)

Row 4-6 :

SC x 24 (24 stitches)

Row 7 :

*SC x 9*, INC, *SC x 4*, INC, *SC x 9* (26 stitches)

Info :

Place eyes 5 stitches apart (in between each of the increases)

Row 8 :

SC x 26 (26 stitches)

Row 9 :

*SC x 2*, DEC x 11*, *SC x 2* (15 stitches)

Info :

Stuff as much of the head as you can

Row 10 :

*SC x 4*, *DEC x 3*, *SC x 5*

Info :

Finish stuffing head, FO with SlSt.

β€” Body :

Row 1 :

CH 2, SC 6 in first stitch. (6 stitches)

Info :

Alternatively, SC 6 into a magic circle

Row 2 :

INC x 6 (12 stitches)

Row 3 :

*SC, INC* x 6 (18 stitches)

Row 4-6 :

SC x 18 (18 stitches)

Row 7 :

*SC x 5*, INC, *SC x 6*, INC, *SC x 5* (20 stitches)

Row 8-10 :

SC x 20 (20 stitches)

Row 11 :

DEC to close, stuffing the body as you go. FO with a SlSt.

Info :

Sew head onto body (row 1 is the front of the body, and the increases done face the upwards.)

Info :

Ignore the pod/ears (that's coming later), but this is the placement for the head to be sewn onto the body

β€” Ears :

Row 1 :

CH 2, SC 6 in first stitch. (6 stitches)

Info :

Alternatively, SC 6 into a magic circle

Row 2 :

*SC, INC* x 3

Row 3 :

*SC 2, INC* x 3

Info :

FO with SlSt

Info :

Sew ears onto head (I've provided a picture to use as a placement guide.)

β€” Pod :

Row 1 :

CH 12, join the ends into a loop with a SlSt. (You're just making a crochet ring with 12 stitches around.) (12 stitches)

Row 2 :

INC x 12 (24 stitches)

Row 3-4 :

SC x 24 (24 stitches)

Row 5 :

*SC 4, DEC* x 4 (20 stitches)

Row 6 :

DEC x 10 (10 stitches)

Row 7 :

DEC x 5 (5 stitches)

Row 8 :

SC 4, SlSt, FO.

Info :

Stuff pod (from the bottom)

Info :

Sew pod to the back of your Bulbasaur

β€” Arms and Legs :

Row 1 :

CH 2, SC 10 in first stitch. (10 stitches)

Info :

Alternatively, SC 10 into a magic circle

Row 2-5 :

SC x 10 (10 stitches)

Info :

FO with SlSt.

Info :

Stuff legs lightly, and sew them onto body. (see pictures to the right and below for placement.)

Info :

Next comes the markings! Cut out triangles/angled shapes of varying sizes from felt and fasten them with fabric glue or a hot glue gun onto your Bulbasaur.

Info :

And you're done!

Assembly Instructions

  • Place safety eyes between Row 7 and Row 8 of the head, spacing them 5 stitches apart, then secure following the safety eye instructions.
  • Sew the finished head onto the body aligning head Row 1 with the front of the body and ensuring increases face upwards for correct orientation.
  • Attach ears to the top of the head using the photo placement guide as reference and sew securely with a tapestry needle and matching yarn.
  • Stuff the pod from the bottom, then sew the pod to the back/top of the body so it sits centered behind the head; secure firmly with yarn.
  • Sew legs (arms and legs pieces) onto the body by spacing them evenly at the bottom sides; stuff lightly before closing and secure with whipstitch.

Important Notes

  • πŸ’‘Use stitch markers to keep track of the start of each round, especially during increases and decreases for symmetry.
  • πŸ’‘Stuff pieces gradually while shaping; stuffing as you go helps avoid lumps and lets you control the final form more precisely.
  • πŸ’‘Pin or hold pieces in place and check placement with the photos before sewing to ensure correct alignment and proportion.
  • πŸ’‘Weave in ends as you go for a cleaner finish and to avoid large tail bundles at the end of assembly.

This Bulbasaur amigurumi pattern gives you a tiny, lovable Pokemon to make and share. 🧢 The pattern is compact but detailed, perfect for an afternoon craft or a gift. 🧸 Add felt markings and a sewn-on pod for personality, and enjoy the smile it brings. ✨

You ask,

we answer.

FAQs

What size will the finished piece be?

The finished amigurumi measures approximately 8-12 cm tall when using worsted weight yarn and a 3.5mm hook; size may vary with yarn and tension.

Can I use different yarn weights for this pattern?

Yes, you can use different yarn weights but the final size will change; choose an appropriate hook for your yarn and expect a larger or smaller finished toy.

Do I need prior crochet experience for this pattern?

This pattern is rated intermediate, so basic knowledge of single crochet, increases, and decreases is recommended for best results.

How long does this project typically take to complete?

Most crocheters complete this project in 2-3 hours, though time may vary based on experience level and working pace.

Can I use safety eyes or sew on embroidered eyes instead?

You can use safety eyes as instructed, or embroider eyes for a child-safe toy; if embroidering, place stitches where eyes are indicated and secure tightly.