About This Bull Amigurumi Pattern
This pattern teaches you how to crochet a soft, plush bull amigurumi using Alize Softy yarn in two strands. You will make the head, body, arms, legs, muzzle, ears, horns and tail, then assemble and embroider finishing details. The instructions include exact round-by-round steps and clear assembly guidance to make sewing and finishing straightforward.
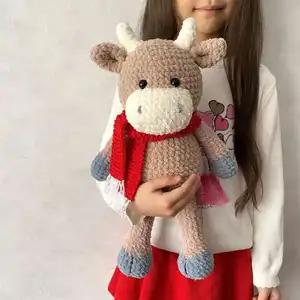
The finished toy measures approximately 39 cm tall when made with the recommended yarn and hook. Work in spiral rounds and use a marker to track the beginning of each round for consistent shaping.
Why You'll Love This Bull Amigurumi Pattern
I absolutely love this pattern because it combines soft textures and simple shaping to create an irresistibly cuddly character. I enjoyed designing the round muzzle and tiny horns which give the bull its sweet expression. I love that the pattern uses Alize Softy in two strands for a plush, tactile finish that kids adore. I also appreciate how the clear round-by-round instructions make assembly and finishing satisfying and stress-free.
Switch Things Up
I love how easy it is to customize this bull pattern by changing yarn colors; try soft pastels for a baby-friendly version or bold contrasts for a playful look.
You can make the toy larger or smaller by changing yarn weight and hook size - bulky yarn with a larger hook gives a chunky cuddly friend, while fingering weight yarn creates a mini version for keychains.
I often add tiny crocheted accessories like a scarf, little hat, or a bell collar to give the bull personality and seasonal variety.
Try embroidering different facial expressions by adjusting the placement of nostrils and the angle of the eyes to make each bull unique.
Swap the safety eyes for embroidered eyes if the toy is for very young children or to create a softer, handmade look.
For posability, I sometimes insert thin wire into the limbs before stuffing to allow the arms and legs to be gently posed.
Mix yarn textures for contrast—use plush yarn for the body and a smoother yarn for the muzzle to highlight facial features.
I also recommend experimenting with different tail brushes by varying the length and density of the strands for playful movement.
If you want a collectible set, I make bulls in a family of sizes and colors so they look great grouped together or as a themed gift set.
Don't hesitate to add tiny props like a crocheted flower, tiny carrot or a little blanket to personalize each finished bull for gifting.
Common Mistakes & How to Fix Them
✗ Skipping stitch markers when working in spiral rounds can cause lost or shifted round starts; place a marker at the start of every round or use a contrast thread to track rows.
✗ Not stuffing parts as you go leads to lumpy or misshapen sections; stuff gradually and evenly, especially the head and body, to keep smooth shaping.
✗ Changing colors without securing tails can lead to unraveling during play; weave in or secure color changes and leave sufficient tail to sew parts firmly.
✗ Rushing increases and decreases may create uneven shaping or gaps; count your stitches after each round and position increases/decreases with consistent tension.