๐Ÿงถ Beautiful โœจ Detailed ๐Ÿ’ Adorable

Bumble Blossom Amigurumi Pattern

Bumble Blossom Amigurumi Pattern
4.2โ˜… Rating
5-7 Hours Time Needed
2.4K Made This
โœ‚๏ธ

Intermediate Level

Ideal for those with basic crochet experience, featuring slightly more advanced stitches and techniques to expand your skills.

โฑ๏ธ

Weekend Treat

Takes 5-7 hours, making it an enjoyable project to finish over a couple of days.

๐Ÿงธ

Cute Companion

An adorable friend to cherish, handcrafted with love to bring comfort and joy for years to come.

About This Bumble Blossom Amigurumi Pattern

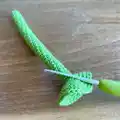
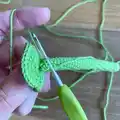
This pattern creates a delightful crocheted flower in a pot, complete with petals, a textured center, leaves, a stem and a tiny bumblebee. It uses sport weight yarn and works in continuous rounds with clear instructions for shaping and assembly. The pattern includes helpful photos showing key assembly steps so you can place and sew parts accurately.

Bumble Blossom Amigurumi Pattern crochet pattern - detailed view of completed project

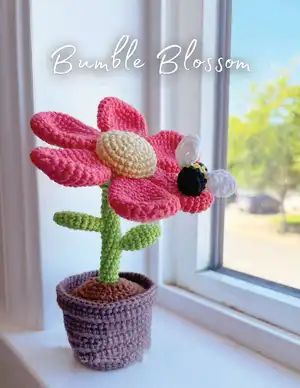
Perfect for gifting or brightening a windowsill, the finished piece stands about 12cm tall and 8.5cm wide. You will learn small amigurumi shaping techniques and simple color changes for the bumblebee.

Why You'll Love This Bumble Blossom Amigurumi Pattern

I absolutely love this pattern because it combines playful shaping with simple amigurumi techniques to create a tiny scene full of personality. I enjoyed designing the petal shaping so each petal has a soft, sculpted curve that looks delightful from every angle. The included bumblebee is such a fun, small finishing touch that adds charm and whimsy to the flower. Sewing the pieces together is satisfying and the step-by-step photos make assembly approachable and enjoyable.

Bumble Blossom Amigurumi Pattern step 1 - construction progress Bumble Blossom Amigurumi Pattern step 2 - assembly progress Bumble Blossom Amigurumi Pattern step 3 - details and accessories Bumble Blossom Amigurumi Pattern step 4 - final assembly and finishing

Switch Things Up

I love how easy it is to customize the Bumble Blossom by changing colors; try pastel petals for a springtime look or deep reds for a dramatic bloom.

I sometimes use bulky yarn and a larger hook to make a chunky statement flower that doubles as a soft toy for kids.

I also make mini versions for keychains by using a finer yarn and a smaller hook to create tiny, portable charms.

I often add embroidered veins or surface slip-stitch details to the leaves to give them more texture and interest.

For extra stability I will insert a thin floral wire into the stem before stuffing so I can pose the flower or adjust the angle easily.

Try swapping the pot colors or using variegated yarn for the pot to create a unique base every time.

I like to make a small bouquet of three flowers in different sizes and colors to create a cheerful arrangement in a larger pot.

You can turn the bumblebee into a ladybug or butterfly by changing the colors and wing shapes for seasonal variations.

Consider adding tiny buttons or beads to the center for a textured focal point, or stitch on tiny seeds for a whimsical look.

Don't be afraid to mix fibers like cotton for crisp stitches or acrylic for budget-friendly options โ€” each yarn gives the piece a different feel and finish.

Common Mistakes & How to Fix Them

โœ— Skipping stitch markers during long stem rounds can cause you to lose track of the start; place a marker at the beginning of the stem and move it every few rounds to stay aligned. โœ— Not stuffing the stem firmly enough will cause the finished flower to flop over; add stuffing gradually and consider inserting optional wire for extra support so the flower stands upright. โœ— Forgetting to leave long yarn tails when instructed makes sewing pieces together difficult; always cut yarn leaving the recommended long tail to sew parts neatly and securely. โœ— Pulling increases or decreases too tightly can distort the round shape; maintain even, moderate tension and count stitches after shaping rounds to ensure correct stitch counts.

Bumble Blossom Amigurumi Pattern

Bring a little garden indoors with this charming Bumble Blossom amigurumi pattern. You will crochet a cheerful flower, complete with petals, a textured center, leaves, a stem and a tiny bumblebee that perches on a petal. The pattern includes full, photographed assembly steps so you can sew everything together with confidence. Perfect as a handmade gift or bright decor for your home.

Intermediate 5-7 Hours

Materials Needed for Bumble Blossom Amigurumi Pattern

โ€” Main Fabric

  • 01
    Sport weight yarn (Schachenmayr Catania recommended)
  • 02
    Kamelie 00252 - pink (petals)
  • 03
    Honig 00206 - light yellow (flower center)
  • 04
    Greenery 00418 - green (stem, leaves, sepal)
  • 05
    Teddy 00161 - light brown (pot interior/top of dirt)
  • 06
    Marone 00157 - brown (dirt)
  • 07
    Sonne 00208 - yellow (bumblebee stripes)
  • 08
    Schwarz 00110 - black (bumblebee body)
  • 09
    Weiss 00106 - white (bumblebee wings)

โ€” Tools Required

  • 01
    Crochet hook size 2mm
  • 02
    Sewing needle
  • 03
    Stitch marker
  • 04
    Scissors
  • 05
    Yarn needle for sewing and weaving in ends
  • 06
    Polyester stuffing
  • 07
    Cardboard for the pot bottom
  • 08
    Optional wire for the stem (for reinforcement)
  • 09
    Pins for positioning pieces while sewing

Progress Tracker

0% Complete

โ€” Petals :

Info :

Using pink yarn.

Round 1 :

6 sc in mr (6)

Round 2 :

6 inc (12)

Round 3 :

(1 sc, 1 inc) x 6 (18)

Round 4 :

(2 sc, 1 inc) x 6 (24)

Round 5-7 :

24 sc (24) (3 rounds)

Round 8 :

(2 sc, 1 dec) x 6 (18)

Round 9-11 :

18 sc (18) (3 rounds)

Round 12 :

(1 sc, 1 dec) x 6 (12)

Round 13 :

12 sc (12)

Info :

Cut the yarn and fasten off, leaving a long tail for sewing. Do not add stuffing.

โ€” Stem :

Info :

Using green yarn.

Round 1 :

8 sc in mr (8)

Round 2-30 :

8 sc (8) (29 rounds)

Info :

Add stuffing material to the stem as you go along. It is important to stuff the stem very firmly to make sure the finished project stands up. Adding wire is encouraged to help the flower stand up, especially if your stitches tend to be looser.

Round 31 :

BLO (1 sc, 1 inc) x 4 (12)

Round 32 :

12 inc (24)

Round 33 :

(3 sc, 1 inc) x 6 (30)

Round 34 :

(9 sc, 1 inc) x 3 (33)

Round 35 :

33 sc (33)

Info :

Cut the yarn and fasten off invisibly.

Info :

Add the sepal to the stem. Holding the flower with the stem facing up, insert the hook into the last stitch of the remaining loops of round 31 and attach green yarn (pic 1). ch 4, 3-ch picot, ch 1, slst into the next loop in the row (pics 2-3). Repeat 7 more times in the remaining loops for a total of 8 sepal (pic 4). Cut yarn and fasten off invisibly.

โ€” Flower Center :

Info :

Using light yellow yarn.

Round 1 :

6 sc in mr (6)

Round 2 :

6 inc (12)

Round 3 :

(1 sc, 1 inc) x 6 (18)

Round 4 :

(2 sc, 1 inc) x 6 (24)

Round 5 :

(3 sc, 1 inc) x 6 (30)

Round 6 :

(9 sc, 1 inc) x 3 (33)

Round 7-8 :

33 sc (33) (2 rounds)

Info :

Cut the yarn and fasten off, leaving a long tail for sewing.

โ€” Leaves :

Info :

Using green yarn.

Round 1 :

5 sc in mr (5)

Round 2 :

(1 sc, 1 inc) x 2, 1 sc (7)

Round 3 :

(2 sc, 1 inc) x 2, 1 sc (9)

Round 4 :

(2 sc, 1 inc) x 3 (12)

Round 5-7 :

12 sc (12) (3 rounds)

Round 8 :

(2 sc, 1 dec) x 3 (9)

Round 9 :

(1 sc, 1 dec) x 3 (6)

Info :

Cut the yarn and fasten off, leaving a long tail for sewing. Do not add stuffing.

โ€” Pot :

Info :

Using light brown yarn.

Round 1 :

6 sc in mr (6)

Round 2 :

6 inc (12)

Round 3 :

(1 sc, 1 inc) x 6 (18)

Round 4 :

(2 sc, 1 inc) x 6 (24)

Round 5 :

(3 sc, 1 inc) x 6 (30)

Round 6 :

(4 sc, 1 inc) x 6 (36)

Round 7 :

(5 sc, 1 inc) x 6 (42)

Round 8 :

BLO 42 sc (42)

Round 9-11 :

42 sc (42) (3 rounds)

Round 12 :

(13 sc, 1 inc) x 3 (45)

Round 13-15 :

45 sc (45) (3 rounds)

Round 16 :

(14 sc, 1 inc) x 3 (48)

Round 17-19 :

48 sc (48) (3 rounds)

Round 20 :

FLO (7 dc, 1 dcinc) x 6 (54)

Round 21 :

54 sc (54)

Info :

Cut the yarn and fasten off invisibly.

โ€” Dirt :

Info :

Using brown yarn. The dirt will go inside the pot and is created in two parts: the hole in which the flower will be inserted and the top of the dirt. Begin by crocheting the hole.

Round 1 :

6 sc in mr (6)

Round 2 :

6 inc (12)

Round 3-14 :

12 sc (12) (12 rounds)

Info :

Cut the yarn and fasten off invisibly.

Info :

Begin to crochet the top of the dirt. Holding the hole with the opening facing up, insert the hook from the inside of the hole going out (pic 5). Re-attach the yarn and continue to crochet the dirt top (pics 6-7).

Round 15 :

(1 sc, 1 inc) x 6 (18)

Round 16 :

(2 sc, 1 inc) x 6 (24)

Round 17 :

(3 sc, 1 inc) x 6 (30)

Round 18 :

(4 sc, 1 inc) x 6 (36)

Round 19 :

(5 sc, 1 inc) x 6 (42)

Round 20 :

(6 sc, 1 inc) x 6 (48)

Info :

Cut the yarn and fasten off, leaving a long tail for sewing.

โ€” Bumblebee Wing :

Info :

Using white yarn, ch 4. Starting in the 2nd chain from the hook and working into both sides of the chain.

Round 1 :

1 sc, 1 hdc, 5 dc in the same stitch, 1 hdc, 1 sc (9)

Info :

Cut the yarn and fasten off, leaving a long tail for sewing.

โ€” Bumblebee Body :

Info :

Starting with black yarn.

Round 1 :

6 sc in mr (6)

Round 2 :

6 inc (12)

Round 3 :

12 sc (12)

Info :

Switch to yellow yarn.

Round 4-5 :

12 sc (12) (2 rounds)

Info :

Switch to black yarn.

Round 6-7 :

12 sc (12) (2 rounds)

Info :

Begin to add stuffing material, adding more as you go along if needed.

Info :

Switch to yellow yarn.

Round 8 :

6 dec (6)

Info :

Cut the yarn and use the yarn tail to close the remaining stitches.

โ€” Assembly :

Info :

Begin to assemble the flower by attaching the stem to the center piece. Place the center piece on the stem and sew the pieces together using the yarn tail of the center piece (pics 8-9). Add stuffing before sewing the last remaining stitches closed (pics 10-11).

Info :

Attach the petals by sewing along the rounds where the stem and center piece were connected (pic 12). The petals will fit closely next to one another when attached, with very little space between one another (pic 13).

Info :

Position the leaves on either side of the stem and sew in place using the long yarn tails.

Info :

Before assembling the pot, cut out a piece of cardboard and add to the bottom of the pot for added stability.

Info :

Attach the dirt to the pot by sewing into the remaining loops of round 20 of the pot (pics 16-18). Add stuffing before sewing the last remaining loops closed (pic 19).

Info :

Take your time adding the stuffing and make sure the hole is centered in the pot. This will help the flower stand up without falling over.

Info :

Sew the wings to the bumblebee body between rounds 4 and 5 of the body using the long yarn tails.

Assembly Instructions

  • Attach the stem to the flower center by placing the center piece on the stem and sewing them together using the long yarn tail from the center piece, securing firmly and adding stuffing before closing.
  • Sew each petal to the flower by stitching along the rounds where the stem and center were connected, spacing the six petals closely so there is little gap between them.
  • Position the two leaves on opposite sides of the stem and sew them in place using the long yarn tails left when finishing the leaves.
  • Cut a circle of cardboard to fit the bottom of the pot and insert it for stability before attaching the dirt piece.
  • Sew the dirt piece into the remaining loops of round 20 of the pot to secure the dirt inside the pot, adding stuffing as needed before finishing the final stitches.
  • Sew the bumblebee wings to the bumblebee body between rounds 4 and 5, then use the yarn tail to close the bee and finish sewing.

Important Notes

  • ๐Ÿ’กWork stitches tightly for an amigurumi finish so the stuffing does not show through the fabric.
  • ๐Ÿ’กEach round is worked in a spiral and does not need to be joined unless otherwise specified in the instructions.
  • ๐Ÿ’กThe stem can be reinforced with wire for added stability if your stitches are looser or the finished flower needs extra support.
  • ๐Ÿ’กLeave long yarn tails where instructed to make assembly and sewing pieces together easier and neater.

This Bumble Blossom pattern is a joyful little project that brings a handcrafted smile to any shelf or windowsill.๐ŸŒธ The mix of sculpted petals, a textured center, and a tiny bumblebee makes it a sweet gift or charming decor piece.๐Ÿงถ Enjoy the satisfying process of shaping, stuffing, and sewing โ€” and then watch it brighten your day!โœจ

You ask,

we answer.

FAQs

What size will the finished piece be?

The finished project will be approximately 12cm tall by 8.5cm wide when using the recommended sport weight yarn and 2mm hook.

Can I use different yarn weights for this pattern?

Yes, but changing yarn weight will change the final size and may require a different hook; using a bulkier yarn with a larger hook will make a bigger, chunkier version, while thinner yarn will create a smaller piece.

Do I need prior crochet experience for this pattern?

This pattern is rated intermediate, so basic knowledge of single crochet, increases, decreases and working in the round is recommended for best results.

How long does this project typically take to complete?

Most crocheters complete this project in 5-7 hours, though time may vary based on experience level, customization and assembly speed.