🧢 Beautiful ✨ Detailed πŸ’ Adorable

Bunny baby rattle with teether ring Amigurumi Pattern

Bunny baby rattle with teether ring Amigurumi Pattern
4.6β˜… Rating
2-3 Hours Time Needed
1.8K Made This
βœ‚οΈ

Beginner Friendly Level

Perfect for those just starting their crochet journey, with clear instructions and simple techniques

⏱️

Bite-Sized Project

Finishes in 2-4 hoursβ€”perfect for an afternoon of creative relaxation.

🎁

Tiny Treasure

Small, sweet, and gift-worthy creations that fit perfectly in the palm of your hand with detailed charm.

About This Bunny baby rattle with teether ring Amigurumi Pattern

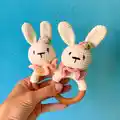
This pattern creates an adorable bunny baby rattle attached to a 6 cm wooden teether ring. The design combines a crocheted head with a hidden rattle ball, folded ears, a wrapped wooden ring body, a frilled collar, and a small decorative flower. Photo references and a linked video tutorial make each step clear and easy to follow.

Bunny baby rattle with teether ring Amigurumi Pattern crochet pattern - detailed view of completed project

The finished rattle is compact and perfect for little hands, combining the softness of yarn with the hardness of wood for sensory play. All pieces are designed to be sewn tightly for safety when used as a baby toy.

Why You'll Love This Bunny baby rattle with teether ring Amigurumi Pattern

I absolutely love this pattern because it turns a simple wooden ring into a charming, tactile toy that babies adore. I enjoy how the hidden rattle adds delightful sound while the wooden ring doubles as a teether. The small size makes it quick to crochet and perfect for gifting, and the step-by-step photos and video support make it accessible to new amigurumi makers. This pattern lets me add small personal touches β€” a tiny flower or different collar colors β€” to make each rattle unique and special.

Bunny baby rattle with teether ring Amigurumi Pattern step 1 - construction progress Bunny baby rattle with teether ring Amigurumi Pattern step 2 - assembly progress Bunny baby rattle with teether ring Amigurumi Pattern step 3 - details and accessories Bunny baby rattle with teether ring Amigurumi Pattern step 4 - final assembly and finishing

Switch Things Up

I love to change up the colors to create different moods for this little bunny β€” pastel shades make a soft baby-safe look while bright colors create a playful toy.

I sometimes swap the suggested Sport weight yarn for a slightly bulkier yarn and a larger hook to create a chunkier, cuddlier rattle; this increases the overall size but keeps the same technique.

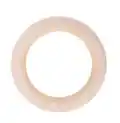
I often replace the wooden ring with a painted or patterned wooden ring for a more personalized finishing touch β€” just ensure the ring is baby-safe and smooth.

For a minimalist look I skip the collar and embroider a tiny heart or name on the head using contrasting yarn for a custom gift.

I like to make a matching set by crocheting several tiny flowers in different colors and attaching them around the collar for a garland effect.

If I want a safer option for very young babies I secure the rattle ball inside a small crocheted pouch before inserting so the ball cannot become exposed even if the head seam loosens.

I sometimes add small bells or a different noise maker instead of the plastic rattle ball for a gentler sound, but I always ensure it is secured inside the head and well padded to avoid hard contact.

To change the personality, I adjust the eye placement or move the nose slightly up or down β€” small changes in facial placement create very different expressions.

I like to experiment with embroidery styles for the muzzle: a simple straight nose or a small triangle nose shifts the style from modern to more classic amigurumi.

When gifting, I add a tiny bow or a small crocheted pacifier holder in a matching color to make a coordinated baby shower present that feels extra special.

Common Mistakes & How to Fix Them

βœ— Skipping the instruction to stuff the head firmly before inserting the rattle ball; stuff gradually and securely before adding the rattle so it sits in place and the head keeps its shape. βœ— Not cutting the yarn with a long tail for sewing after rounds finish; leave a long tail at the end of pieces to make sewing parts together easier and more secure. βœ— Failing to wrap the wooden ring tightly with the body strip; measure and sew snugly around the ring so the body hugs the ring completely and does not shift during use. βœ— Placing the ears incorrectly between rounds 4 and 5 without pinning; use pins to mark placement and fold the ears lengthwise to create the dimple before sewing to ensure even symmetry and a neat finish.

Bunny baby rattle with teether ring Amigurumi Pattern

Make a sweet handmade bunny baby rattle with a wooden teether ring. This pattern guides you through crocheting the head, ears, body wrap for the ring, collar, and a decorative flower, with clear step-by-step instructions and photo references. Youll love the small size thats perfect for little hands and the included tips for safe assembly and finishing. A technique video is available for each step to help you along the way.

Beginner Friendly 2-3 Hours

Materials Needed for Bunny baby rattle with teether ring Amigurumi Pattern

β€” Main Fabric

  • 01
    Yarn Art Jeans (color 05) - approx. 90 yards (main color)
  • 02
    Yarn Art Jeans (any color for decoration) - approx. 5 yards (accent)
  • 03
    Suggested yarn: Sport/Baby weight (Category 2 fine)

β€” Tools Required

  • 01
    Crochet hook size 2.00 mm
  • 02
    Wooden ring 6 cm / 2.5" diameter
  • 03
    Rattle ball 24 mm / 1" diameter
  • 04
    Polyester fiberfill for stuffing
  • 05
    Black yarn for embroidering eyes and nose
  • 06
    Sewing needle for assembly
  • 07
    Pins for positioning pieces
  • 08
    Scissors
  • 09
    Stitch markers (optional)

Progress Tracker

0% Complete

β€” Head :

Info :

Crochet by spiral.

Round 1 :

6 sc in Magic ring [fig 1] (6)

Round 2 :

6 inc (12)

Round 3 :

(1 sc, inc) * 6 (18)

Round 4 :

(2 sc, inc) * 6 (24)

Round 5 :

(3 sc, inc) * 6 (30)

Round 6 :

(4 sc, inc) *6 [fig 2] (36)

Round 7 :

(5 sc, inc) * 6 (42)

Round 8 :

(6 sc, inc) * 6 (48)

Round 9-15 :

48 sc [fig 3]

Round 16 :

(6 sc, dec) * 6 (42)

Round 17 :

(5 sc, dec) * 6 (36)

Round 18 :

(4 sc, dec) * 6 (30)

Round 19 :

(3 sc, dec) * 6 (24)

Info :

Stuff the head firmly and insert the rattle ball [fig 4]

Round 20 :

(2 sc, dec) * 6 (18)

Round 21 :

(1 sc, dec) * 6 (12)

Round 22 :

(sc) * 6 (6)

Info :

Cut the yarn with long tail [fig 5].

β€” Ears :

Info :

Make 2. Crochet by spiral.

Round 1 :

6 sc in Magic ring (6)

Round 2 :

6 inc (12)

Round 3 :

(2 sc, inc) * 4 (16)

Rounds 4-11 :

16 sc

Round 12 :

(6 sc, dec) * 2 (14)

Round 13 :

14 sc

Round 14 :

(4 sc, dec) * 2 (12)

Round 15 :

12 sc

Round 16 :

(4 sc, dec) * 2 (10)

Info :

Cut the yarn with long tail approx. 15 cm /6" [fig 6]. Make the second ear.

β€” Body :

Info :

Working in rows. Start with foundation chain.

Info :

NOTE that you may need to increase or decrease the number of rows to match your wooden ring. It should `hug` wooden ring completely.

Info :

Chain 25.

Rows 1-9 :

24 sc, ch 1 and turn [fig 7]

Info :

Cut the yarn leaving a long tail for sewing. Wrap the ring and sew along [fig 8].

β€” Collar :

Info :

Working in rows. Using brown yarn.

Info :

Chain 20

Row 1 :

ch 2, 1 dc in the 20th ch, *2 dc in the next st* till the end, turn [fig 9]

Row 2 :

ch 2, *2 dc in the next st* till the end.

Info :

Cut the yarn leaving a long tail for sewing [fig 10].

β€” Assembling :

Step 1 :

Attach the head to the middle of the body. And sew it, firmly as you can, so it doesn’t move when shaking [fig 11]

Step 2 :

Fold the ears in half lengthwise so that a dimple forms at the base. Sew the ears between round 4 and 5. Use the sewing pins to place and fixate the ears. [fig 12]

Step 3 :

Place the collar between the body and head and sew the ends together into a ring. To prevent it from dangling, sew it to the head in several places [fig 13,14].

Step 4 :

Take black yarn and embroider the nose and eyes. Please, refer to the pictures! [fig 15]

Info :

Between the 11th and 12th rows embroider the horizontal line of the nose (the width of the nose is about 4 sc). From the middle down, embroider the nose with a vertical line in 2 rows.

Info :

Embroider the eyes at a distance of 2 sc in the direction of the horizontal line of the nose.

Info :

Make sure the muzzle is symmetrical :)

β€” Flower :

Info :

Add some personality to your toy. Complete it with a bow or decorate it with a flower.

Info :

Chain 10 [fig 17].

Row 1 :

ch 1, 4 sc in one ch, sl-st, 4 hdc in one ch, sl-st, 4 dc in one ch, sl-st, change color of the yarn: (1 hdc, 2 dc, 2 trc, 2 dc, 1 hdc) in one ch, sl-st, (1 hdc, 2 dc, 2 tr, 2 dc, 1 hdc) in one ch.

Info :

Cut the yarn. Roll up and give the shape of a flower [fig 18-19]. Sew tightly.

Info :

Please sew all pieces tightly because a baby will play with it! Do not leave toys unattended in the crib!

Assembly Instructions

  • Attach the head to the middle of the wrapped wooden ring body and sew it firmly so it does not move when shaken (refer to fig 11).
  • Fold each ear lengthwise to create a dimple at the base, then sew the ears between rounds 4 and 5, using pins to hold placement while stitching (refer to fig 12).
  • Wrap the crocheted body strip around the wooden ring, align the ends and sew them together into a ring; then sew several stitches from the collar to the head to prevent dangling (refer to figs 7-8 and 13-14).
  • Place the collar between the body and head before final sewing; sew the collar ends into a ring and tack it to the head in several places to secure (refer to figs 13,14).
  • Embroider the nose and eyes using black yarn between the 11th and 12th rows for the horizontal nose line and add a vertical line downwards in 2 rows; place eyes two stitches from the nose line for symmetry (refer to fig 15).

Important Notes

  • πŸ’‘Always use a crochet hook that achieves the specified gauge: 24 stitches and 25 rows = 4" (10cm) in single crochet to ensure the final size matches the pattern.
  • πŸ’‘Sew all pieces tightly and securely because this toy is intended for babies; avoid loose parts and check all seams carefully after finishing.
  • πŸ’‘Leave long tails when cutting yarn for pieces that will be sewn together to make assembly easier and stronger.

This Bunny Baby Rattle pattern makes a delightful, pocket-friendly toy that doubles as a teether with gentle wooden textures and a soft yarn head. The design is quick to crochet, easy to customize with different colors, and comes with step-by-step photos and a linked video to guide you. Perfect for gifts, baby showers, or a sweet handmade keepsake. 🧢🍼

You ask,

we answer.

FAQs

What size will the finished piece be?

The rattle diameter will be approximately 2 1/2" (6 cm) and the total height with the ring will be about 5 1/2" (14 cm) when using the recommended yarn and hook size.

Can I use different yarn weights for this pattern?

Yes, you can use different yarn weights, but the final size will change; choose an appropriate hook size for your yarn and adjust the number of rows for the body strip to fit your wooden ring.

Do I need prior crochet experience for this pattern?

This pattern is rated beginner friendly (advanced beginner) and uses basic amigurumi techniques such as single crochet in spiral, increases, decreases, and working in rows, so basic crochet skills are recommended.

How long does this project typically take to complete?

Most crocheters complete this project in 2-3 hours, though time may vary based on experience level and customization choices.