🧢 Beautiful ✨ Detailed πŸ’ Adorable

Bunny Bag Pattern

Bunny Bag Pattern
4.3β˜… Rating
2-4 Hours Time Needed
2.7K Made This
βœ‚οΈ

Beginner Friendly Level

Perfect for those just starting their crochet journey, with clear instructions and simple techniques

⏱️

Bite-Sized Project

Finishes in 2-4 hoursβ€”perfect for an afternoon of creative relaxation.

✨

Stylish Touch

An elegant detail to elevate any look, combining traditional techniques with contemporary design sensibilities.

About This Bunny Bag Pattern

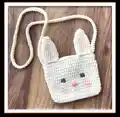
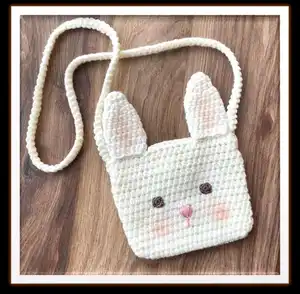
This pattern makes a small, adorable bunny bag with ears, embroidered face details, and a long cord strap. You will crochet a rectangular body in half double crochet, add a tiny flap closure with a wooden button, and make two ears and eyes to sew on. The instructions include hook sizes, yarn suggestions, and helpful photos for assembly. It is designed to be quick, beginner-friendly, and customizable.

Bunny Bag Pattern crochet pattern - detailed view of completed project

Great for beginners who know basic stitches and want a portable project. The finished bag is compact and sweet β€” perfect for gifts or little ones to wear.

Why You'll Love This Bunny Bag Pattern

I absolutely love this pattern because it combines simplicity with irresistible charm. I enjoy how fast it comes together, turning a small amount of yarn into a delightful bunny bag in just a few hours. The cord strap and tiny flap give it a finished, wearable look I am proud to share. I also love that you can easily personalize it with different colors, blush on the cheeks, or embroidered expressions to make each bag unique.

Bunny Bag Pattern step 1 - construction progress Bunny Bag Pattern step 2 - assembly progress Bunny Bag Pattern step 3 - details and accessories Bunny Bag Pattern step 4 - final assembly and finishing

Switch Things Up

I often change the color of the body to make seasonal or themed bunnies β€” pastel pinks for spring or soft gray for neutral tones.

I like to make the bag larger by using a thicker yarn and a larger hook, which gives a chunky, cuddle-friendly version perfect for kids.

For a mini keychain version, use thinner yarn and a 2.0–2.5mm hook and shorten the strap to attach to a keyring.

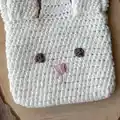
I sometimes embroider different expressions β€” a smiling mouth, sleepy eyes, or tiny freckles β€” to give each bag its own personality.

Try lining the inside with felt or a small fabric pouch if you want extra durability and to protect small items inside the bag.

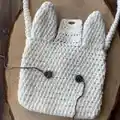
I also experiment with different closure options: a snap button, magnetic clasp, or a crochet loop and button for varied looks.

For a sparkly finish, use a yarn that has a metallic thread or add bead accents around the flap edge for subtle shine.

To create a sibling set, make bags in coordinating colors and slightly different sizes for matching but distinct gifts.

I sometimes add tiny crocheted accessories like a bow tie or little flowers to the ear base to customize each bunny.

When gifting, I stitch a small label inside or attach a tiny tag with the recipient's initial for a personal touch.

Common Mistakes & How to Fix Them

βœ— Skipping the stitch count after the foundation chain can lead to incorrect shaping; always count your stitches at the end of the first round to confirm the correct total. βœ— Not making a slip stitch at the end of rounds will cause misaligned joins and uneven edges; finish each round with a slip stitch and begin the next round with ch2 as instructed. βœ— Sewing ears to only one row of stitches can make them loose over time; sew the ear back to the back loop and the front to the front loop and fasten the strap over two rows for extra support. βœ— Using a much larger or smaller hook than recommended will alter the final size and tension; match the hook sizes suggested or adjust yarn weight and recheck gauge to achieve the intended dimensions. βœ— Forgetting to leave long yarn tails when fastening off makes sewing parts difficult later; cut the yarn long for sewing at the end of ears and eyes so you have enough length to attach them securely.

Bunny Bag Pattern

Make a cute bunny-shaped mini bag with this easy crochet pattern designed for quick and charming results. You will work simple half double crochets to create a small pouch, add adorable ears, and finish with a cord strap and button closure. The pattern includes clear step-by-step rounds, materials, and helpful photos so you can complete it with confidence. Perfect as a handmade gift or a sweet accessory for little ones.

Beginner Friendly 2-4 Hours

Materials Needed for Bunny Bag Pattern

β€” Main Fabric

  • 01
    Alize Cotton Gold Pratica yarn - Color 63 Cream - 220m/100g (main body)
  • 02
    Small amount of Catania brand pink yarn for nose and cheek color (or similar fine yarn)
  • 03
    Small amount of Catania brand brown yarn for eyes (or similar fine yarn)
  • 04
    Optional: small amount of blush or makeup for cheek and inner ear coloring

β€” Tools Required

  • 01
    Crochet hook size 3.0mm for body and ears
  • 02
    Crochet hook size 3.5mm for strap cord
  • 03
    Crochet hook size 2.2mm for eyes (details)
  • 04
    Wooden button for closure
  • 05
    Needle for sewing and embroidery
  • 06
    Scissors
  • 07
    Powder crayon or powder blush for cheeks and ear coloring (optional)
  • 08
    Yarn to match colors noted

Progress Tracker

0% Complete

β€” Materials and Tools :

Info :

Alize cotton gold pratica yarn - color 63 cream - 220m/100gr (or different brand yarn of the same thickness). 3mm hook, 3.5mm hook, 2.2mm hook. A small amount of catania brand pink and brown yarn for eyes and nose (or different brand yarn of the same thickness). Wooden button. Needle for sewing. Scissors. Powder crayon or powder blush for cheek and ear coloring (optional).

β€” Terms :

Infos :

Ch: chain. Mr: magic ring. Sc: single crochet. Hdc: half double crochet. HdcInc: half double crochet increase. Slst: slip stitch. St/Sts: stitch/stitches. * repeat the brackets* times. (...) numbers in brackets show us the number of the stitch we get at the end of the round.

β€” Notes :

Infos :

Chains at the beginning of the rounds won't be counted as hdc. It can be useful to use stitch marker or different colored yarn to see the beginning of round. The bag will be 11cm (4,33inch) length and 13cm (5,11inch) width if you use the same materials with me. (except ears)

β€” Bunny Body :

Info :

Make a slst at the end of each round and begin with ch2 at the beginnings new round. With cream color yarn and 3mm hook;

Round 1 :

Ch22, turn back and starting from 3rd; 1- 19hdc, into same st; 4hdc, Continue with otherside 18hdc, into last st; 3hdc (44)

Round 2 :

(20hdc, 2hdcinc)*2 (48)

Round 3-14 :

(12 rounds) 48hdc (48)

Info :

Fasten off and cut the yarn.

β€” Tiny Closure Piece :

Info :

Now we're going to crochet a tiny closure piece for the bag. Make a slst at the end of each round and begin with ch2 at the beginnings new round.

Info :

Count back at the finishing point and add yarn to the 15th stitch.

Round 1-6 :

(6 rounds) 8hdc

Round 7 :

2hdc, ch3 (skip 3sts) starting from 4th; 3hdc.

Info :

Now sew a wooden button on the back. Now you can close your bag whenever you want ☺

β€” Bunny Ears :

Info :

Make 2 of them. With cream color yarn and 3mm hook; Make a slst at the end of each round and begin with ch2 at the beginnings new round.

Round 1 :

Into MR 6hdc (6)

Round 2 :

(2hdc, 1hdcinc)*2 (8)

Round 3 :

(3hdc, 1hdcinc)*2 (10)

Round 4 :

(1hdc, 1hdcinc)*5 (15)

Round 5-10 :

(6 rounds) 15hdc (15)

Info :

Fasten off with a slst and cut the yarn long for sewing.

Info :

Fasten the ears to the 7 loops on both sides of the tiny flap in the middle of the bag. Sew the back of the ear to the back loop and the front to the front loop. You can get support from the photos.

β€” Bag Strap :

Info :

With cream color yarn and 3.5mm hook; I crocheted with the cord technique β†’ When starting, leave enough yarn for sewing.

Info :

Ch2, skip first st and crochet 1sc. Rotate the cord and crochet 1sc into the loop I showed in the photo. Turn it again and from two loops insert your hook under them, crochet 1sc. We will do the same until we reach 85cm in length.

Info :

You can get support from photos. My friend's youtube video will help you with this. Link is here. https://youtu.be/9VfL0iB7308

Info :

Sew the strap just side the ears. Don't cut the yarn! Sew the strap with two rows of ears and fasten them together. This way the ears will not fall off.

β€” Bunny Eyes :

Info :

Make 2 of them. With brown color yarn and 2.2mm hook;

Round 1 :

Into MR 6sc

Info :

Fasten off and cut the yarn long for sewing. Count from top to bottom. Sew the eyes to the 7th row with a distance of 7hdc

β€” Nose :

Info :

Embroider a tiny nose as in the photo with pink yarn and needle.

Info :

Finally, you can color the cheeks and ears if you want. I used make-up blush because I didn't want it to be permanent.

Assembly Instructions

  • Sew the tiny closure flap onto the top back of the bag and attach a wooden button centered on the bag back to match the flap closure.
  • Fasten the ears to the 7 loops on both sides of the tiny flap in the middle of the bag, sewing the back of each ear to the back loop and the front to the front loop for a neat finish.
  • Sew the eyes to the 7th row from the top with a distance of 7 hdc between them, using long yarn tails to secure and stitch in place.
  • Position the strap beside the ears and sew the strap down through two rows and the ear bases so the ears and strap are fastened together and will not fall off.
  • Embroider the nose with pink yarn as shown in photos and optionally color the cheeks and inner ears with powder blush for a soft, removable finish.

Important Notes

  • πŸ’‘Chains at the beginning of rounds are not counted as HDCβ€”always begin shaping from the correct stitch after the ch2.
  • πŸ’‘Use a stitch marker or a contrasting length of yarn to mark the beginning of each round for accurate counting and alignment.
  • πŸ’‘The bag finished size is approximately 11cm length and 13cm width when using the specified yarn and hook sizes (ears excluded).
  • πŸ’‘Leave long yarn tails when fastening off pieces you will sew later (ears, eyes) to make assembly easier and stronger.

This Bunny Bag pattern is a sweet and speedy project that makes an adorable little accessory for kids or as a gift. The design is compact, beginner-friendly, and full of charm with embroidered features and a wooden button closure. Try different yarn colors or add tiny accessories to personalize your bunny bag. 🧢🐰✨

You ask,

we answer.

FAQs

What size will the finished piece be?

The finished bag measures approximately 11 cm (4.33 inches) in length and 13 cm (5.11 inches) in width when using the recommended yarn and hook sizes (ears not included).

Can I use different yarn weights for this pattern?

Yes, you can use different yarn weights, but this will change the final size; choose an appropriate hook for your yarn and check the stitch tension to maintain proportions.

Do I need prior crochet experience for this pattern?

This pattern is rated beginner friendly; basic knowledge of chain, single crochet, and half double crochet is helpful, and the instructions include step-by-step rounds and photos to guide you.

How long does this project typically take to complete?

Most crocheters finish this project in 2-4 hours, depending on experience, attention to detail in assembly, and whether you add blush or embroidery details.