🧢 Beautiful ✨ Detailed πŸ’ Adorable

Bunny Garland Pattern

Bunny Garland Pattern
4.8β˜… Rating
2-4 Hours Time Needed
2.6K Made This
βœ‚οΈ

Beginner Friendly Level

Perfect for those just starting their crochet journey, with clear instructions and simple techniques

⏱️

Bite-Sized Project

Finishes in 2-4 hoursβ€”perfect for an afternoon of creative relaxation.

🏑

Cozy Accent

A warm touch for your space that transforms ordinary corners into inviting nooks filled with handmade charm.

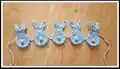
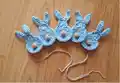
About This Bunny Garland Pattern

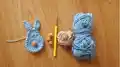
This pattern teaches you how to crochet tiny bunny motifs and join them into a charming garland perfect for nurseries or seasonal displays. Each bunny is quick to make and uses small amounts of cotton yarn to create a delicate, lightweight banner. The pattern includes step-by-step instructions, clear photos, and guidance for attaching a cord and pompoms.

Bunny Garland Pattern crochet pattern - detailed view of completed project

Ideal for beginners, this design uses simple stitches like double crochet and treble crochet to form the bunny shape. Make as many bunnies as you wish and customize spacing or colors to suit your project.

Why You'll Love This Bunny Garland Pattern

I absolutely love this pattern because it turns a few basic stitches into a delightful, whimsical decoration that brightens any room. I enjoy how quick each bunny works up β€” they are satisfying small projects that build up into a beautiful garland. I also love that it uses tiny amounts of yarn, so you can use scraps and experiment with colors. The steps are straightforward and photo-guided, which makes it easy for me to relax and enjoy the process while creating something charming.

Bunny Garland Pattern step 1 - construction progress Bunny Garland Pattern step 2 - assembly progress Bunny Garland Pattern step 3 - details and accessories Bunny Garland Pattern step 4 - final assembly and finishing

Switch Things Up

I love customizing this garland by changing yarn colors; try pastel shades for a soft nursery look or bright colors for a party vibe.

You can make the bunnies bigger or smaller by switching yarn weight and hook size; bulky yarn with a larger hook creates chunky bunnies, while fine yarn makes delicate minis.

I often replace the pompom tails with small buttons or embroidered tails to add texture and personality.

Swap the cord color to match seasonal themes β€” green for spring, red for festive decor, or neutral tones for everyday use.

I sometimes vary spacing between motifs: reduce the chain count for tightly grouped bunnies or increase chains to create a spaced-out banner.

Try alternating two or three colors for the bunnies to create a patterned garland with repeating color sequences.

I also like to add small crocheted flowers or leaves between bunnies for a floral garland twist that suits springtime decor.

For a more durable hanging, I occasionally braid three strands of yarn for the cord instead of a simple chain for extra strength and visual interest.

If I want to make a mobile, I shorten the cord pieces and attach bunnies to a wooden hoop or branch for a cute hanging display.

I recommend experimenting with different pompom sizes or materials β€” felted balls give a cozy look while yarn pompoms keep everything soft and cohesive.

Common Mistakes & How to Fix Them
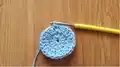
βœ— Skipping the magic ring tightening step can leave a hole in the center of the bunny; pull the thread firmly to close the ring before joining with a slip stitch. βœ— Not counting the double crochets in the second round leads to uneven circles; make sure you have 24 stitches after Row 2 by counting each Dc carefully. βœ— Placing the ears in the wrong treble crochet positions will create an asymmetrical head; reference the 3rd and 5th Tc placement and mark them if needed. βœ— Attaching the cord too tightly distorts the bunny shapes and pulls them inward; slip stitch loosely over the neck area and adjust tension for a flat look.

Bunny Garland Pattern

Make a sweet crocheted bunny garland to brighten a nursery, baby shower, or seasonal decor. This pattern walks you through tiny bunny motifs and a simple corded garland so you can create a charming handmade banner. Suitable for quick makes and perfect as a thoughtful gift or whimsical room accent.

Beginner Friendly 2-4 Hours

Materials Needed for Bunny Garland Pattern

β€” Main Fabric

  • 01
    Cotton yarn suitable for a 3.5 mm crochet hook - approximately 5 grams blue yarn per bunny (main color)
  • 02
    Soft brown yarn (or any color you prefer) for the cord - approximately 5 grams additional for the whole garland cord
  • 03
    Small pompoms (approximately 1 cm diameter) for bunny tails - color matching the cord

β€” Tools Required

  • 01
    Crochet hook 3.5 mm
  • 02
    Small pompoms (1 cm diameter) for tails
  • 03
    Fabric or crafts glue (to secure the pompoms to the bunny shapes)

Progress Tracker

0% Complete

β€” Bunny :

Round 1 :

On a magic ring Ch 2 (counts as a double crochet) and then add 11 Dc into the ring (12 stitches in total). Pull the thread to close the ring and join with a Sst.

Round 2 :

Ch 2 (counts as a double crochet) and then add 1 Dc in the same stitch from Row 1. Continue adding two Dc over each of the stitches from Row 1 (24 stitches in total). Join with a Sst.

Round 3 :

Now you need to make the head of the bunny. Skip one stich from previous row and in the next stitch add 7 Tc (into the same stitch). Skip one stitch and Sst in the following one.

Info :

Now let's make the ears. The ears will be located in the 3rd and 5th Tc (from left to right) of the bunny head, as shown.

Round 4 :

Follow the steps below: Turn the back side of the bunny body towards you and Sst back from where you ended the bunny head to where you will start your first ear (3 Sst).

Round 5 :

Ch 7

Round 6 :

Skip the first chain and then Sc on the next two chains from hook and Dc in the following four chains (6 stitches in total over the chain). Sst in the same stitch from previous row (exactly where you stated the chain).

Round 7 :

Sst over the next two stitches from previous row (effectively positioning your crochet hook in place to start the second ear).

Round 8 :

Make the second year just as you made the first one.

Round 9 :

Weave in ends and your bunny is finished!

Info :

Here’s how it looks when you turn it back to the front again: Now glue the pompom over the center of the body of the bunny…

β€” Garland :

Round 1 :

To make the garland, Ch 50 and then Sst over the back of the first bunny, at the "neck" area:

Round 2 :

This is how it should look from the front:

Round 3 :

Ch 30 and do the same to the next bunny.

Round 4 :

Repeat until you have all the bunnies attached to the cord. Finish with a Ch 50 to match the initial chain. You may or may not want to weave in in the ends of the cord on either side.

Round 5 :

If you need a longer or shorter piece of cord at each end or a wider/smaller space between the bunnies, adjust the number of chains accordingly.

Assembly Instructions

  • Glue a 1 cm pompom over the center of the body of each finished bunny to create the tail, using fabric or crafts glue and allowing to dry completely.
  • To attach the first bunny to the cord: Ch 50 and then Sst over the back of the first bunny at the "neck" area, securing it onto the cord.
  • For spacing, Ch 30 between bunnies (or adjust the number of chains to change spacing) and Sst over the neck area of each subsequent bunny to attach to the cord.
  • Repeat chain-and-attach steps until all bunnies are secured; finish the cord with a Ch 50 to match the starting chain and decide whether to weave in the cord ends or leave them.
  • Weave in loose yarn ends on each bunny after assembly to tidy the motifs before final placement.

Important Notes

  • πŸ’‘Make sure to pull the magic ring tightly closed before joining with a slip stitch to avoid a hole in the center of the bunny.
  • πŸ’‘Glue pompoms carefully and allow adequate drying time so they remain secure on the bunny body.
  • πŸ’‘Adjust the number of chains between bunnies to change spacing or alter cord length at each end for desired placement.

Create a sweet Bunny Garland to brighten a nursery, party, or seasonal display with tiny crocheted bunnies and soft pompoms. This pattern is quick to make and uses only small amounts of cotton yarn, making it perfect for scrap-busting and handmade gifts. Have fun customizing colors and spacing to make a garland that's uniquely yours! 🧢🐰

You ask,

we answer.

FAQs

What size will the finished piece be?

Each bunny measures about 11 cm tall and 5 cm wide; the sample garland with 5 bunnies measures approximately 95 cm including the cord.

Can I change the spacing between bunnies on the cord?

Yes, adjust the number of chains between attachments (the pattern uses Ch 30 between bunnies) to make the spacing wider or narrower.

Do I need advanced skills to make this garland?

No, this pattern is beginner friendly and uses basic stitches like double crochet and treble crochet; photo steps help guide you through assembly.

How should I attach the pompoms?

Use fabric or crafts glue to secure 1 cm pompoms to the center of each bunny and allow them to dry fully before handling the garland.