🧢 Beautiful ✨ Detailed πŸ’ Adorable

Bunny with Basket Amigurumi Pattern

Bunny with Basket Amigurumi Pattern
4.6β˜… Rating
5-7 Hours Time Needed
1.5K Made This
βœ‚οΈ

Intermediate Level

Ideal for those with basic crochet experience, featuring slightly more advanced stitches and techniques to expand your skills.

⏱️

Weekend Treat

Takes 5-7 hours, making it an enjoyable project to finish over a couple of days.

🧸

Cute Companion

An adorable friend to cherish, handcrafted with love to bring comfort and joy for years to come.

About This Bunny with Basket Amigurumi Pattern

This pattern creates a small handmade bunny complete with a hat, flower, removable basket and a tiny crocheted egg. It features clear round-by-round instructions for each separate piece so you can assemble everything with confidence. The finished toy is compact and detailed, perfect for gifting or display.

Bunny with Basket Amigurumi Pattern crochet pattern - detailed view of completed project

Includes instructions for head, body, arms, ears, hat, basket, egg, flower and shorts. Uses common amigurumi techniques with helpful photos for guidance.

Why You'll Love This Bunny with Basket Amigurumi Pattern

I absolutely love this pattern because it brings together tiny accessories and a sweet character in one compact project. I enjoy adding the little basket and egg β€” those finishing touches give the bunny character and personality. I also love that the hat and flower make the doll feel custom and hand-finished. The pattern balances simple rounds with small shaping, so I can relax while still making something special.

Bunny with Basket Amigurumi Pattern step 1 - construction progress Bunny with Basket Amigurumi Pattern step 2 - assembly progress Bunny with Basket Amigurumi Pattern step 3 - details and accessories Bunny with Basket Amigurumi Pattern step 4 - final assembly and finishing

Switch Things Up

I love how easily this pattern can be customized with color changes to create different looks; switch the hat and shorts colors for new personalities.

I often change yarn weight and hook size to make mini keychain versions or larger plushies β€” bulky yarn and a larger hook makes a cuddlier toy.

I like to embroider different facial expressions for variety; moving the eyes or altering mouth placement completely changes the character.

For seasonal versions, I’ll swap the egg colors and add tiny embroidered patterns on the egg to match holidays or events.

I sometimes replace safety eyes with embroidered eyes for a toddler-safe toy; this keeps the face secure and child-friendly.

Try adding wire inside the limbs for poseable arms if you want a display piece that can hold the basket in different positions.

Add tiny crocheted props like a scarf, tiny carrots, or a headband to expand play possibilities and make it more unique.

Feel free to use variegated or speckled yarns for the shorts or hat to create textured, colorful effects without changing stitches.

I often use buttons or small beads as extra decoration on the shorts strap β€” just be sure to sew them on very securely if the toy is for a child.

Experiment with different flower styles for the hat: larger petals, layered flowers, or beaded centers all make charming variations.

Common Mistakes & How to Fix Them

βœ— Skipping stitch markers during continuous rounds leads to losing track of the round start; place a marker at the first stitch of every round to stay on track. βœ— Forgetting to stuff gradually causes lumps and uneven shaping; stuff small amounts at a time and shape as you go for a smooth finish. βœ— Placing safety eyes after too many rounds can misposition them; add the safety eyes between the recommended rounds (rnd 13-14 for the head) and check spacing before securing. βœ— Pulling yarn too tightly when joining parts will distort the shape; use gentle, even tension and pin pieces in place before sewing to ensure correct positioning.

Bunny with Basket Amigurumi Pattern

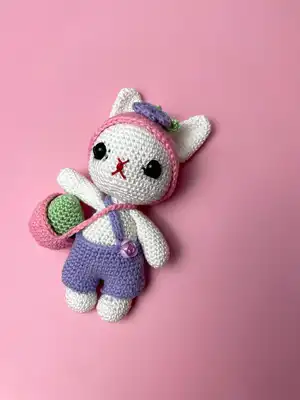
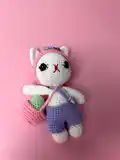
Make a sweet little bunny with a removable hat, basket and tiny egg β€” perfect for gifting or seasonal decor. This pattern walks you through every piece including head, body, arms, ears, hat, basket, egg and floral accents. You will enjoy creating detailed accessories and a charming finished toy that fits in the palm of your hand.

Intermediate 5-7 Hours

Materials Needed for Bunny with Basket Amigurumi Pattern

β€” Main Fabric

  • 01
    Yarn suitable for 2.5 mm hook (light fingering/sport weight recommended) - Main Color: White (A)
  • 02
    Color B: Blue / Purple (shorts and strap) - small amount
  • 03
    Color C: Fuchsia / Pink (hat and basket) - small amount
  • 04
    Accent color: Red - very small amount for mouth embroidery
  • 05
    Accent color: Green - small amount for leaf and egg
  • 06
    Accent color: Lavender/Purple - small amount for flower

β€” Tools Required

  • 01
    Crochet hook size 2.5 mm (or size that fits your yarn)
  • 02
    Scissors
  • 03
    Polyester stuffing
  • 04
    Tapestry/yarn needle for sewing and weaving ends
  • 05
    Stitch marker
  • 06
    Pins for assembly
  • 07
    Safety eyes (pair) for the head
  • 08
    Small awl or needle to open layers for finishing details
  • 09
    Buttons for decoration (optional)

Progress Tracker

0% Complete

β€” Legs & Body :

Rnd 1- :

Rnd 1-6 sc in a mr

Rnd 2 :

Rnd 2-6 sc inc(12)

Rnd 3 :

Rnd 3-(6 times)1 sc into sc next inc(18)

Rnd 4 :

Rnd 4-6-(3 ring)sc into sc(18)

Rnd 5 :

Rnd 7-4 sc into sc(4 sc dec)4 sc into sc(14)

Rnd 6 :

Rnd 8-5 sc into sc (2 sc dec)5 sc into sc(12)

Rnd 7-9 :

Rnd 9-11-(3 ring)sc into sc(12)

Info :

Assemble and stuff the legs.

Rnd 12 :

Rnd 12-sc into sc(24)

Rnd 13 :

Rnd 13-(6 times)3 sc into sc next inc(30)

Rnd 14 :

Rnd 14-sc into sc(30)

Rnd 15 :

Rnd 15-(6 times)4 sc into sc next inc(36)

Rnd 16-20 :

Rnd 16-20-(5 ring)sc into sc(36)

Rnd 21 :

Rnd 21-(6 times)4 sc into sc next dec(30)

Info :

Stuff the body tightly. Keep filling as you go.

Rnd 22 :

Rnd 22-sc into sc(30)

Rnd 23 :

Rnd 23-(6 times)3 sc into sc next dec(24)

Rnd 24 :

Rnd 24-sc into sc(24)

Rnd 25 :

Rnd 25-(6 times)2 sc into sc next dec(18)

Rnd 26 :

Rnd 26-sc into sc(18)

Rnd 27 :

Rnd 27-(6 times)1 sc into sc next dec(12)

Rnd 28-31 :

Rnd 28-31-(4 ring)sc into sc(12)fo.

β€” Head :

Rnd 1- :

Rnd 1-8 sc in a mr

Rnd 2 :

Rnd 2-8 sc inc(16)

Rnd 3 :

Rnd 3-(8 times)1 sc into sc next inc(24)

Rnd 4 :

Rnd 4-(8 times)2 sc into sc next inc(32)

Rnd 5 :

Rnd 5-(8 times)3 sc into sc next inc(40)

Rnd 6 :

Rnd 6-(8 times)4 sc into sc next inc(48)

Rnd 7-11 :

Rnd 7-11-(5 ring)sc into sc(48)

Rnd 12 :

Rnd 12-(6 times)7 sc into sc next inc(54)

Rnd 13-15 :

Rnd 13-15-(3 ring)sc into sc(54)

Rnd 16 :

Rnd 16-(6 times)8 sc into sc next inc(60)

Rnd 17 :

Rnd 17-(6 times)8 sc into sc next dec(54)

Rnd 18 :

Rnd 18-3 sc into sc(5 times)7 sc into sc next dec 4 sc into sc(48)

Rnd 19 :

Rnd 19-(6 times)6 sc into sc next dec(42)

Rnd 20 :

Rnd 20-2 sc into sc(5 times)5 sc into sc next dec 3 sc into sc(36)

Rnd 21 :

Rnd 21-(6 times)4 sc into sc next dec(30)

Info :

Stuff the head tightly. Keep filling as you go. Place the safe eyes between rnd 13-14. There should be 9 sc between them.

Rnd 22 :

Rnd 22-1 sc into sc(5 times)3 sc into sc next dec 2 sc into sc(24)

Rnd 23 :

Rnd 23-(8 times)1 sc into sc next dec(16)fo.Leave a long thread end to sew

β€” Hat :

Rnd 1- :

Rnd 1-6 sc in a mr

Rnd 2 :

Rnd 2-6 sc inc(12)

Rnd 3 :

Rnd 3-(6 times)1 sc into sc next inc(18)

Rnd 4 :

Rnd 4-(6 times)2 sc into sc next inc(24)

Rnd 5 :

Rnd 5-(6 times)3 sc into sc next inc(30)

Rnd 6 :

Rnd 6-(6 times)4 sc into sc next inc(36)

Rnd 7 :

Rnd 7-(6 times)5 sc into sc next inc(42)

Rnd 8 :

Rnd 8-(6 times)6 sc into sc next inc(48)

Rnd 9-14 :

Rnd 9-14-(6 ring)sc into sc(48)

Rnd 15 :

Rnd 15-sc into hdc(48 hdc)fo.

β€” Arms :

Rnd 1- :

Rnd 1-6 sc in a mr

Rnd 2 :

Rnd 2-6 sc inc(12)

Rnd 3-15 :

Rnd 3- 15-(13 ring)sc into sc(12)

Info :

Fill the arms a little

Rnd 16 :

Rnd 16-Straighten it. Dip the awl into both layers. 6 sc fo. Leave a long thread to sew on.

β€” Ears - MAKE 2 :

Rnd 1- :

Rnd 1-6 sc in a mr

Rnd 2 :

Rnd 2-6 sc inc(12)

Rnd 3 :

Rnd 3-sc into sc(12)

Rnd 4 :

Rnd 4-2 sc inc(14)

Rnd 5 :

Rnd 5-sc into sc(14)

Rnd 6 :

Rnd 6-2 sc inc(16)

Rnd 7 :

Rnd 7-sc into sc(16)

Rnd 8 :

Rnd 8-2 sc inc(18)

Rnd 9 :

Rnd 9-sc into sc(18)

Rnd 10 :

Rnd 10-2 sc inc(20)

Rnd 11 :

Rnd 11-sc into sc(20)

Rnd 12 :

Rnd 12-2 sc inc(22)

Rnd 13-14 :

Rnd 13-14(2 ring)sc into sc(22)

Rnd 15 :

Rnd 15-(4 times)3 sc into sc next dec(18)

Rnd 16 :

Rnd 16-(4 times)2 sc into sc next dec(14)

Rnd 17 :

Rnd 17-Straighten it. Dip the awl into both layers. 7 sc fo. Leave a long thread to sew on.

β€” Basket :

Rnd 1- :

Rnd 1-6 sc in a mr

Rnd 2 :

Rnd 2-6 sc inc(12)

Rnd 3 :

Rnd 3-(6 times)1 sc into sc next inc(18)

Rnd 4 :

Rnd 4-(6 times)2 sc into sc next inc(24)

Rnd 5 :

Rnd 5-in flo sc into sc(24)

Rnd 6 :

Rnd 6-(6 times)3 sc into sc next inc(30)

Rnd 7-10 :

Rnd 7-10-(4 ring)sc into sc(30)

Rnd 11 :

Rnd 11-30 ch.

β€” Egg :

Rnd 1- :

Rnd 1-6 sc in a mr

Rnd 2 :

Rnd 2-6 sc inc(12)

Rnd 3 :

Rnd 3-2 sc inc(14)

Rnd 4 :

Rnd 4-2 sc inc(16)

Rnd 5 :

Rnd 5-2 sc inc(18)

Rnd 6 :

Rnd 6-2 sc inc(20)

Rnd 7 :

Rnd 7-2 sc inc(22)

Rnd 8 :

Rnd 8-2 sc inc(24)

Rnd 9-12 :

Rnd 9-12-(4 ring)sc into sc(24) Tightly fill the egg

Rnd 13 :

Rnd 13-(6 times)2 sc into sc next dec(18)

Rnd 14 :

Rnd 14-(6 times)1 sc into sc next dec(12)

Rnd 15 :

Rnd 15-6 sc dec(6)fo.

β€” Flower :

Rnd 1- :

B COLOR Rnd 1-10 sc in a mr

Rnd 2 :

Rnd 2-(5 times)1 sc into 3 cr 1 sc into sc fo. Leave a long thread end to sew.

Leaf :

-C color- Rnd 1-(2 times)10 ch turn 10 ch into 10 hdc fo.Leave a long thread end to sew.

β€” Short :

Rnd 1- :

B COLOR MAKE 2 Rnd 1-21 ch. Combine.

Rnd 2 :

Rnd 2-4-(3 ring)ch into sc(20 sc) Combine.

Rnd 3 :

Rnd 5-sc into sc(40)

Rnd 4-6 :

Rnd 6-8-(3 ring)sc into sc(40)

Rnd 7 :

Rnd 9-(8 times)3 sc into sc next dec(32)

Rnd 8 :

Rnd 10-11(2 ring)sc into sc(32)

Rnd 9 :

Rnd 12-3 sc into sc 20 ch.Turn

Rnd 10 :

Rnd 13-ch into sc(20 sc)fo.

β€” Joining Parts :

Joining :

Sew sleeves to both sides, rnd-27.

Joining :

Sew the ears on both sides, on top of the hat to rnd-3.

Joining :

Sew flowers and leaves to the top of the hat.

Assembly Instructions

  • Sew sleeves (arms) to both sides of the body at around round 27, positioning them symmetrically and securing firmly with a whipstitch.
  • Attach the head to the body opening, aligning the neck opening to the top of the body and sewing with a mattress or whipstitch using the long tail left from the head.
  • Position and sew the ears on top of the hat at around hat rnd-3, then sew the hat onto the head if desired, or place it as a removable accessory.
  • Sew the small flower and leaf to the top of the hat using the long thread ends left from those pieces, stitching securely so they sit flat.
  • Assemble and stuff the legs before joining; sew the legs to the bottom of the body ensuring even spacing and stable attachment.
  • Attach the basket strap by chaining 30 (rnd 11) and securing ends inside the basket; sew the basket onto the arm or position as a removable accessory.

Important Notes

  • πŸ’‘Place safety eyes between rounds 13-14 of the head with 9 single crochets between them for correct facial placement.
  • πŸ’‘Keep stuffing the head and body tightly but in small amounts as you work to maintain smooth shaping and avoid lumps.
  • πŸ’‘Use stitch markers to mark the start of each round when working in continuous spirals for accurate stitch counts.
  • πŸ’‘Pin all pieces in place before sewing to check positioning and symmetry, adjusting as needed for best appearance.

This adorable bunny with basket is a delightful little project you can finish in a weekend. It combines tiny accessories and charming details for a handmade gift that's full of personality. Whether you keep it or gift it, this sweet companion will bring smiles and handmade warmth. 🧢🌸🐰

You ask,

we answer.

FAQs

What size will the finished piece be?

The finished amigurumi measures around 15 cm in circumference and about 7 cm in length using the recommended yarn and a 2.5 mm hook.

Can I use different yarn weights for this pattern?

Yes, you can use a different yarn weight but it will change the final size; adjust your hook size accordingly and expect differences in detail and firmness.

Do I need prior crochet experience for this pattern?

This pattern is rated intermediate, so basic knowledge of single crochet, increases, decreases, and working in the round is recommended.

How long does this project typically take to complete?

Most crocheters complete this project in 5-7 hours, depending on experience level, assembly work, and customization choices.