🧢 Beautiful ✨ Detailed πŸ’ Adorable

Bunny with Carrot Amigurumi Pattern

Bunny with Carrot Amigurumi Pattern
4.0β˜… Rating
5-7 Hours Time Needed
2.1K Made This
βœ‚οΈ

Intermediate Level

Ideal for those with basic crochet experience, featuring slightly more advanced stitches and techniques to expand your skills.

⏱️

Weekend Treat

Takes 5-7 hours, making it an enjoyable project to finish over a couple of days.

🧸

Cute Companion

An adorable friend to cherish, handcrafted with love to bring comfort and joy for years to come.

About This Bunny with Carrot Amigurumi Pattern

This pattern teaches you how to crochet a sweet seated bunny holding a carrot, complete with clothes and tiny hanger details. It includes separate instructions for head, body, arms, legs, ears, clothes, jumpsuit hangers and a carrot accessory. You will learn shaping techniques using increases, decreases and front/back loop work for neat edges. Clear round-by-round instructions make assembly straightforward.

Bunny with Carrot Amigurumi Pattern crochet pattern - detailed view of completed project

Suitable for intermediate crocheters comfortable with amigurumi basics and simple garment shaping. Finished toy measures about 20 cm in circumference and 10 cm in length.

Why You'll Love This Bunny with Carrot Amigurumi Pattern

I absolutely love this pattern because it brings a gentle, characterful bunny to life with simple motifs and careful shaping. I enjoy the balance of quick-to-make small parts and the satisfying assembly that creates personality. I appreciate how the collar and jumpsuit details add charm without complicated techniques. I designed this pattern so you can customize colors easily and make a keepsake toy to gift or display.

Bunny with Carrot Amigurumi Pattern step 1 - construction progress Bunny with Carrot Amigurumi Pattern step 2 - assembly progress Bunny with Carrot Amigurumi Pattern step 3 - details and accessories Bunny with Carrot Amigurumi Pattern step 4 - final assembly and finishing

Switch Things Up

I love customizing this bunny by changing yarn colors to match seasons; soft pastels make a nursery-friendly version, while bright colors add playful personality.

I sometimes use a slightly thicker yarn and a larger hook to create a chunkier cuddly bunny, or a finer yarn for a delicate collectible sized toy.

I often add embroidered details like blushing cheeks or stitched eyebrows to increase the expressiveness and charm of the face.

I like swapping the jumpsuit color and adding tiny pockets or buttons to make each bunny unique and give it character.

For the carrot, I experiment with different orange shades and add tiny surface crochet details to mimic texture for a realistic look.

I recommend trying safety eyes of different sizes to see which proportion you prefer; smaller eyes create a more delicate look, larger eyes are more playful.

If I want a poseable toy, I sometimes insert a short wire into the limbs to allow slight movement and positioning for display.

For gift versions, I add a tiny crocheted scarf or a removable hat to create seasonal looks that are easy to swap.

I also experiment with yarn fiber: cotton gives a neat finish and is easy to clean, while acrylic can be plusher and more durable for play.

When making a mini keychain version, I reduce hook size and yarn thickness, and attach a small ring at the top of the head for portability.

Common Mistakes & How to Fix Them

βœ— Placing safety eyes too low or too high will change the expression; follow the instruction to place the safe eyes between Rnd-13-14 and ensure there are 8 sc between them. βœ— Not stuffing gradually can create lumps or an uneven shape; stuff the head and body tightly but in small increments while sculpting to maintain even form. βœ— Skipping stitch markers during rounds can cause miscounts and uneven shaping; use a marker at the start of each round and move it each round to stay on track. βœ— Pulling stitches too tight when changing color will distort collars or edges; switch colors gently and keep consistent tension, especially when working in FLO or BLO. βœ— Forgetting to leave long thread ends for sewing makes assembly difficult; leave long tails on limbs and clothing pieces so you can securely sew them in place later.

Bunny with Carrot Amigurumi Pattern

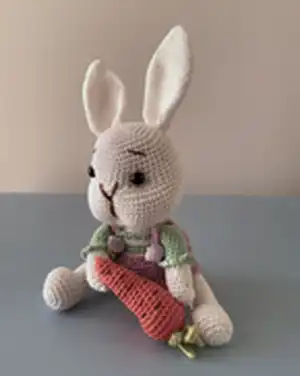
Make a charming handmade bunny holding a carrot with this detailed amigurumi pattern. You'll enjoy step-by-step rounds for head, body, limbs, ears, clothes and a cute carrot accessory. The pattern is designed to guide you through shaping, stuffing and assembly so your little bunny sits perfectly. Perfect for gifting or adding to your handmade toy collection.

Intermediate 5-7 Hours

Materials Needed for Bunny with Carrot Amigurumi Pattern

β€” Main Fabric

  • 01
    Yarn - Main Color: White (used for head, body, limbs and ears)
  • 02
    Color A: Green (used for collar, sleeves and leaves)
  • 03
    Color B: Lilac (used for jumpsuit/clothes)
  • 04
    Color C: Orange (used for carrot)
  • 05
    Note: The PDF lists 'Yarn' without specific weight or amounts; use a yarn that suits 2.5 mm hook (sport/fingering weight suggested) and adjust quantities for multiple pieces.

β€” Tools Required

  • 01
    Crochet hook size 2.5 mm (or a size that fits your yarn)
  • 02
    Scissors
  • 03
    Polyester stuffing
  • 04
    Tapestry/yarn needle for sewing and embroidery
  • 05
    Stitch markers
  • 06
    Pins for assembly
  • 07
    Safety eyes (place between Rnd-13-14; size as desired)
  • 08
    Optional: small buttons for jumpsuit hanger detail

Progress Tracker

0% Complete

β€” Head & Body :

Round 1-6 :

sc in a mr

Round 2 :

6 sc inc(12)

Round 3 :

(6 times)1 sc into sc next inc(18)

Round 4 :

(6 times)2 sc into sc next inc(24)

Round 5 :

(6 times)3 sc into sc next inc(30)

Round 6 :

(6 times)4 sc into sc next inc(36)

Round 7 :

(6 times)5 sc into sc next inc(42)

Round 8 :

(6 times)6 sc into sc next inc(48)

Round 9-16 :

(8 ring)sc into sc(48)

Round 17-18 :

sc into sc(12 sc inc)18 sc into sc(60 sc)

Round 18-23 :

(6 ring)sc into sc(60)

Info :

Place the safe eyes between Rnd-13-14. There should be 8 sc between them

Round 24 :

(6 times)9 sc into sc nest dec(54)

Round 25 :

(6 times)8 sc into sc next dec(48)

Round 26 :

(6 times)7 sc into sc next dec(42)

Round 27 :

(6 times)6 sc into sc next dec(36)

Round 28 :

(6 times)5 sc into sc next dec(30)

Info :

Stuff the head tightly. keep filling as you go

Round 29 :

(6 times)4 sc into sc nest dec(24)

Round 30-33 :

(4 ring)sc into sc(24)

Round 34 :

(6 times)3 sc into sc next inc(30)

Round 35 :

(6 times)4 sc into sc next inc(36)

Round 36 :

in flo sc into sc(36) where the collar is

Round 37 :

(6 times)5 sc into sc next inc(42)

Round 38 :

(6 times)6 sc into sc next inc(48)

Round 39 :

(6 times)7 sc into sc next inc(54)

Info :

A color-

Round 40-46 :

(7 ring)sc into sc(54)

Info :

Main color-

Round 47-54 :

(8 ring)sc into sc(54)

Round 55 :

In flo sc into sc(54)

Round 56 :

(6 times)7 sc into sc next dec(48)

Round 57 :

(6 times)6 sc into sc next dec(42)

Round 58 :

(6 times)5 sc into sc next dec(36)

Round 59 :

(6 times)4 sc into sc next dec(30)

Info :

Stuff the body tightly. keep filling as you go

Round 60 :

(6 times)3 sc into sc next dec(24)

Round 61 :

(6 times)2 sc into sc next dec(18)

Round 62 :

(6 times)1 sc into sc next dec(12)

Round 63 :

6 sc dec(6)fo.

β€” Arms :

Info :

MAKE 2 - MAIN COLOR

Round 1-6 :

sc in a mr

Round 2 :

6 sc inc(12)

Round 3 :

(2 times)5 sc into sc next inc(14)

Round 4-8 :

(5 ring)sc into sc(14)

Info :

A color-

Round 9 :

in flo sc into sc(14) fill the sleeves

Round 10-18 :

(9 ring)sc into sc(14)

Round 19 :

Straighten it. sink the needle into both layers. 7 sc fo. Leave a long thread end to sew on.

β€” Legs :

Info :

MAKE 2 - MAIN COLOR

Round 1-6 :

sc in a mr

Round 2 :

6 sc inc(12)

Round 3 :

(6 times)1 sc into sc next inc(18)

Round 4-5 :

(2 ring)sc into sc(18)

Round 6-7 :

sc into sc(4 sc inc)7 sc into sc(22)

Round 7-8 :

(2 ring)sc into sc(22)

Round 9 :

7 sc into sc(4 sc dec)7 sc into sc(18)

Info :

Stuff the legs. keep filling as you go

Round 10 :

6 sc into sc(4 sc dec)6 sc into sc(14)

Round 11-24 :

((14 ring)sc into sc(14)

Round 25 :

Straighten it. sink the needle into both layers. 6 sc fo. Leave a long thread end to sew on.

β€” Ears :

Info :

MAKE 2 - MAIN COLOR

Round 1-6 :

sc in a mr

Round 2 :

2 sc inc(8)

Round 3 :

2 sc inc(10)

Round 4 :

2 sc inc(12)

Round 5 :

2 sc inc(14)

Round 6 :

2 sc inc(16)

Round 7 :

2 sc inc(18)

Round 8 :

2 sc inc(20)

Round 9 :

2 sc inc(22)

Round 10 :

2 sc inc(24)

Round 11 :

2 sc inc(26)

Round 12-23 :

(12 ring)sc into sc(26)

Round 24 :

2 sc dec(24)

Round 25 :

2 sc dec(22)

Round 26 :

2 sc dec(20)

Round 27 :

2 sc dec(18)fo.

Info :

Leave a long thread to sew on.

β€” Clothes :

Round 1-8 :

sc in a mr

Round 2 :

8 sc inc(16)

Round 3 :

(8 times)1 sc into sc next inc(24)

Round 4 :

(8 times)2 sc into sc next inc(32)

Round 5 :

(8 times)3 sc into sc next inc(40)

Round 6 :

(8 times)4 sc into sc next inc(48)

Round 7 :

(8 times)5 sc into sc next inc(56)

Round 8 :

(8 times)6 sc into cr next inc(64 cr)

Round 9 :

cr into cr(64)

Round 10 :

10 ch.10 cr leave blank (22 cr)10 ch. 10 cr leave blank (22 cr)

Round 11 :

10 ch into cr (22 cr into cr)10 ch into cr(22 cr into cr)(64 cr)

Round 12 :

cr into cr(64)

Round 13 :

cr into sc(64 sc)

Round 14 :

(21 times)1 sc into sc next dec(42)

Round 15 :

sc into sc(42)

Info :

LEG DETAIL - (3 ring)sc into sc(22)fo. clean the tip of the thread.

β€” Jumpsuit Hanger :

Info :

MAKE 2

Round 1 :

1-25 ch.

Round 2 :

2-25 ch into sc(24)fo.Leave a long thread to sew

β€” Carrot :

Round 1-8 :

sc in a mr

Round 2 :

8 sc inc(16)

Round 3 :

(8 times)1 sc into sc next inc(24)

Round 4-6 :

(3 ring)sc into sc(24)

Round 7 :

2 sc dec(22)

Round 8 :

2 sc dec(20)

Round 9 :

2 sc dec(18)

Round 10 :

2 sc dec(16)

Info :

Fill the carrot. keep filling as you go

Round 11 :

sc into sc(16)

Round 12 :

2 sc dec (14)

Round 13 :

2 sc dec(12)

Round 14 :

2 sc dec(10)

Round 15 :

2 sc dec(8)

Round 16 :

2 sc dec(6)fo.clean the tip of the thread.

Section :

LEAVES - GREEN

Round 1 :

(5 times)1 sc into 7 ch.ch into 6 sc fo.

β€” Joining Parts :

Info :

Sew sleeves to both sides, Rnd 36

Info :

Sew the legs to both sides between Rnd 50-55. Sleeve detail-rnd-9-In blo sc into 3 ch.

Info :

Sew the ears to both sides Rnd-5.

Assembly Instructions

  • Attach sleeves to both sides at Round 36, matching the collar area; sew sleeves securely with a yarn needle using the long thread ends left from the sleeve finishing.
  • Position and sew the legs to both sides of the body between Rounds 50-55, spacing them evenly for a seated pose and using the long thread ends left at the leg tops to secure.
  • Sew the ears to both sides at Round 5 of each ear, aligning them symmetrically on the head and using the long thread tails to stitch through the head rounds.
  • Sew arms to the body at the shoulder area beside the collar (refer to sleeve placement), aligning them to allow the bunny to hold the carrot and securing with hidden whipstitch.
  • Attach the jumpsuit hanger pieces (make 2) to the front of the jumpsuit using the long thread tail, and add buttons or decorative beads as shown in photos.

Important Notes

  • πŸ’‘Place the safety eyes between Rnd-13-14 with 8 single crochets between them to achieve the correct facial placement.
  • πŸ’‘Stuff the head, body and limbs gradually and firmly as you go; overstuffing can distort shapes while understuffing will make parts floppy.
  • πŸ’‘Leave long thread ends when finishing limbs, ears and clothing pieces to make sewing on parts easier and more secure.
  • πŸ’‘Use stitch markers at the beginning of rounds, especially when working increases and decreases, to maintain correct stitch counts.

This lovable bunny pattern brings a sweet handmade friend into your home with charming clothes and a carrot accessory. It combines simple shaping and thoughtful details so you can customize colors and finishes with ease. Whether you make one as a gift or start a collection, this little bunny is sure to become treasured. 🧢🐰✨

You ask,

we answer.

FAQs

What size will the finished piece be?

The finished amigurumi measures around 20 cm in circumference and about 10 cm in length using the recommended hook and yarn weight.

Can I use a different hook or yarn weight?

Yes, you can substitute yarn weight and hook size, but this will change the final size; adjust stuffing and assembly accordingly to keep proportions.

Where should I place the safety eyes?

Place the safety eyes between rounds 13-14 of the head, leaving 8 single crochet stitches between them as specified in the pattern.

Do I need advanced skills to make the clothes and carrot?

This pattern is rated intermediate; basic amigurumi techniques are required, and the clothing uses standard crochet stitches with some shaping but no advanced techniques.

How long does the project typically take?

Most crocheters complete this project in 5-7 hours, depending on experience, customization and assembly time.