🧢 Beautiful ✨ Detailed πŸ’ Adorable

Bunny's House Amigurumi Pattern

Bunny's House Amigurumi Pattern
4.8β˜… Rating
5-7 Hours Time Needed
2.9K Made This
βœ‚οΈ

Intermediate Level

Ideal for those with basic crochet experience, featuring slightly more advanced stitches and techniques to expand your skills.

⏱️

Weekend Treat

Takes 5-7 hours, making it an enjoyable project to finish over a couple of days.

🧸

Cute Companion

An adorable friend to cherish, handcrafted with love to bring comfort and joy for years to come.

About This Bunny's House Amigurumi Pattern

This pattern creates a detailed Bunny's House amigurumi set with multiple bunnies and accessories. You will make standing, sitting and baby bunnies along with a cabbage bed and newborn envelope. The designs use lace weight yarn and tiny 1mm hook for delicate, collectible results. Clear photos and step-by-step rounds help with shaping and assembly.

Bunny's House Amigurumi Pattern crochet pattern - detailed view of completed project

Includes full materials and abbreviation lists, plus assembly and finishing instructions. Perfect for expanding amigurumi skills and creating tiny, giftable toys.

Why You'll Love This Bunny's House Amigurumi Pattern

I absolutely love this pattern because it combines so many tiny, detailed elements into a single charming playset. I enjoy the small-scale work and the way the pieces come together to create a little scene full of personality. The instructions include helpful photos and clear rounds which make shaping tiny parts so satisfying. I also love how customizable the set is β€” you can change colors or add details to make each bunny unique.

Bunny's House Amigurumi Pattern step 1 - construction progress Bunny's House Amigurumi Pattern step 2 - assembly progress Bunny's House Amigurumi Pattern step 3 - details and accessories Bunny's House Amigurumi Pattern step 4 - final assembly and finishing

Switch Things Up

I love to change the color palette to create seasonal bunnies β€” try pastel shades for spring or warm browns and oranges for autumn.

You can make the bunnies larger or smaller by switching yarn weight and hook size; a thicker yarn makes a cuddly larger version while very fine yarn makes a tiny collectible.

I often embroider different facial expressions by adjusting eye placement and mouth shape to give each bunny a unique personality.

Consider adding removable clothes or tiny crocheted scarves and hats to make playsets with interchangeable outfits.

Swap the glue eyes for safety eyes or embroidered eyes for a fully handmade, child-safe toy if desired.

Experiment with adding wire inside limbs for posability if you want bendable arms or legs for display.

Try using variegated yarn for the cabbage or leaves to create a textured, multi-tone effect effortlessly.

Add beads, sequins or tiny buttons as accents on the carrot house or envelope to create sparkle and interest.

I recommend personalizing the newborn envelope with initials or tiny embroidered motifs for a bespoke gift.

Make a whole family set by varying sizes and colors and display them together as a charming little scene.

Common Mistakes & How to Fix Them

βœ— Skipping the row marker can make round tracking very confusing; place a marker at the start of every round to stay aligned with increases and decreases. βœ— Stuffing too much or too little changes the shape drastically; stuff gradually and shape as you go to keep proportions consistent. βœ— Changing color without securing ends often leads to loose loops and unraveling; weave in or secure color joins immediately when possible. βœ— Rushing decreases can create holes or uneven edges; work decreases slowly and check stitch counts after each decrease round to maintain correct stitch totals. βœ— Ignoring placement guides for eyes and facial details results in awkward expressions; follow the specified rounds and stitch distances for accurate placement.

Bunny's House Amigurumi Pattern

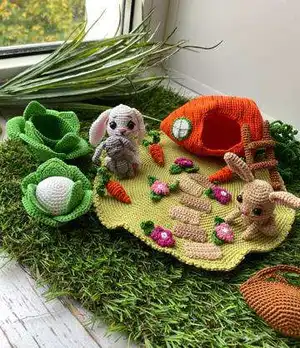
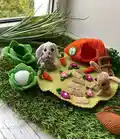
Create a charming miniature bunny playset complete with standing, sitting and baby bunnies, a carrot house, cabbage bed and a cozy newborn envelope. This pattern guides you through tiny amigurumi construction with clear step-by-step rounds, photos, and finishing tips. Perfect for making collectible bunnies, nursery decor, or thoughtful handmade gifts. You will enjoy detailed assembly instructions and ideas for personalizing each piece.

Intermediate 5-7 Hours

Materials Needed for Bunny's House Amigurumi Pattern

β€” Main Fabric

  • 01
    Lace weight / 1ply yarn Vita Pelican (50g /330m) - main yarn type
  • 02
    N3854 - Pink (as indicated)
  • 03
    N3951 - White (as indicated)
  • 04
    N3952 - Black (for details)
  • 05
    N3954 - Light brown
  • 06
    N3966 - Orange
  • 07
    N3976 - Beige
  • 08
    N3995 - Green
  • 09
    N3973 - Brown
  • 10
    N4011 - Gray
  • 11
    N4002 - Purple
  • 12
    N4335 - Light green

β€” Tools Required

  • 01
    Crochet hook size 1.0 mm
  • 02
    Stuffing material, fiberfill
  • 03
    Needle for sewing pieces together
  • 04
    Glue eyes 4mm (2 pairs)
  • 05
    Super glue
  • 06
    Pink pastel for toning
  • 07
    Black acrylic paint
  • 08
    Scissors

Progress Tracker

0% Complete

β€” Standing bunny Body-Head :

Round 1 :

6sc in MR

Info :

Place row marker here.

Round 2 :

6inc (12)

Round 3 :

(1sc, inc) *6 (18)

Round 4 :

(2sc, inc) *6 (24)

Round 5 :

(3sc, inc) *6 (30)

Round 6-8 :

30sc (3 rounds) (30)

Round 9 :

(1sc, dec) *6, 12sc (24)

Round 10-14 :

24sc (5 rounds) (24)

Round 15 :

(2sc, dec) *6 (18)

Round 16 :

18sc (18)

Info :

Stuff with fiberfill in the process.

Round 17 :

18inc (36)

Round 18 :

(5sc, inc) *6 (42)

Round 19-23 :

42sc (5 rounds) (42)

Round 24 :

(5sc, dec) *6 (36)

Round 25 :

(4sc, dec) *6 (30)

Round 26-29 :

30sc (4 rounds) (30)

Round 30 :

(3sc, dec) *6 (24)

Info :

Stuff the head with fiberfill.

Round 31 :

(2sc, dec) *6 (18)

Round 32 :

(1sc, dec) *6 (12)

Round 33 :

6dec

Info :

Fasten off, cut the yarn, weave in the yarn ends.

β€” Hind legs (make 2) :

Round 1 :

Chain 6. Start in the second chain from the hook: inc, 3sc, 3sc in the last chain, 4sc (12)

Round 2 :

Change color to White. 2inc, 3sc, 3inc, 3sc, inc (18)

Round 3 :

8sc, (4-dc Bobble st, sc) *3, 4sc (18)

Info :

Stuff with fiberfill in the process.

Round 4 :

4sc, 6dec, 2sc (12)

Round 5 :

(2sc, dec) *3 (9)

Round 6 :

(1sc, dec) *3 (6)

Round 7-10 :

6sc (4 rounds) (6)

Info :

Fasten off, cut the yarn, weave in the yarn ends.

β€” Ears (make 2) :

Round 1 :

6sc in MR

Info :

Place row marker here.

Round 2 :

(1sc, inc) *3 (9)

Round 3 :

9sc (9)

Round 4 :

(2sc, inc) *3 (12)

Round 5 :

12sc (12)

Round 6 :

(1sc, inc) *6 (18)

Round 7-10 :

18sc (4 rounds) (18)

Round 11 :

(1sc, dec) *6 (12)

Round 12-16 :

12sc (5 rounds) (12)

Round 17 :

6dec (6)

Round 18 :

6sc. Do not stuff.

Info :

Leave a long tail for sewing.

β€” Front legs (make 2) :

Round 1 :

6sc in MR

Info :

Place row marker here.

Round 2-3 :

6sc (2 rounds) (6)

Info :

Stuff with fiberfill in the process.

Round 4 :

inc, 5sc (7)

Round 5-8 :

7sc (4 rounds) (7)

Round 9 :

3sc, dec, 2sc (6)

Info :

Fasten off, cut the yarn, weave in the yarn ends.

β€” Tail :

Round 1 :

6sc in MR

Info :

Place row marker here.

Round 2 :

6inc (12)

Round 3 :

12sc (12)

Round 4 :

6dec

Info :

Stuff with fiberfill. Leave a long tail for sewing.

β€” Assembly :

Info :

Tighten cheeks following the pictures below. Glue the eyes between rounds 23-24 at a distance of 6-8 sc.

Info :

Fasten the legs and arms with a thread mount. Attach the legs and arms using a long needle and thread (look at the pictures below). Sew the tail to the body.

Info :

Sew the ears to the head.

Info :

Embroider a nose with pink thread. Embroider the outlines of the nose, mouth and eyebrows with a black thread. Use pink pastel to paint the cheeks and the inside of the ears.

β€” Sitting rabbit Ears (make 2) :

Round 1 :

6sc in MR

Info :

Place row marker here.

Round 2 :

(1sc, inc) *3 (9)

Round 3 :

9sc (9)

Round 4 :

(2sc, inc) *3 (12)

Round 5 :

12sc (12)

Round 6 :

(1sc, inc) *6 (18)

Round 7-9 :

18sc (3 rounds) (18)

Round 10 :

(1sc, dec) *6 (12)

Round 11-14 :

12sc (4 rounds) (12)

Round 15 :

6dec (6)

Info :

Do not stuff. Leave a long tail for sewing.

β€” Sitting rabbit Body :

Round 1 :

6sc in MR

Info :

Place row marker here.

Round 2 :

6inc (12)

Round 3 :

(1sc, inc) *6 (18)

Round 4 :

(2sc, inc) *6 (24)

Round 5 :

(3sc, inc) *6 (30)

Round 6-8 :

30sc (3 rounds) (30)

Round 9 :

(1sc, dec) *6, 12sc (24)

Round 10-14 :

24sc (5 rounds) (24)

Info :

Stuff with fiberfill in the process.

Round 15 :

(2sc, dec) *6 (18)

Round 16 :

(1sc, dec) *6 (12)

Round 17 :

6dec

β€” Sitting rabbit Head :

Round 1 :

6sc in MR

Info :

Place row marker here.

Round 2 :

6inc (12)

Round 3 :

(1sc, inc) *6 (18)

Round 4 :

(2sc, inc) *6 (24)

Round 5 :

(3sc, inc) *6 (30)

Round 6 :

(4sc, inc) *6 (36)

Round 7 :

(5sc, inc) *6 (42)

Round 8-10 :

42sc (3 rounds) (42)

Round 11 :

(5sc, dec) *6 (36)

Round 12 :

(4sc, dec) *6 (30)

Round 13-16 :

30sc (4 rounds) (30)

Round 17 :

(3sc, dec) *6 (24)

Info :

Stuff the head with fiberfill.

Round 18 :

(2sc, dec) *6 (18)

Round 19 :

(1sc, dec) *6 (12)

Round 20 :

6dec

Info :

Fasten off, cut the yarn, weave in the yarn ends.

β€” Sitting rabbit Front legs (make 2) :

Round 1 :

6sc in MR

Info :

Place row marker here.

Round 2-3 :

6sc (2 rounds) (6)

Info :

Stuff with fiberfill in the process.

Round 4 :

inc, 5sc (7)

Round 5-8 :

7sc (4 rounds) (7)

Round 9 :

3sc, dec, 2sc (6)

Info :

Fasten off, cut the yarn, weave in the yarn ends.

β€” Sitting rabbit Hind legs (make 2) :

Round 1 :

Chain 6. Start in the second chain from the hook: inc, 3sc, 3sc in the last chain, 4sc (12)

Round 2 :

Change color to Beige. 2inc, 3sc, 3inc, 3sc, inc (18)

Round 3 :

8sc, (4-dc Bobble st , sc) *3, 4sc (18)

Info :

Stuff with fiberfill in the process.

Round 4 :

4sc, 6dec, 2sc (12)

Round 5 :

(2sc, dec) *3 (9)

Round 6 :

(1sc, dec) *3 (6)

Round 7-9 :

6sc (3 rounds) (6)

Info :

Fasten off, cut the yarn, weave in the yarn ends.

β€” Sitting rabbit Tail :

Round 1 :

6sc in MR

Info :

Place row marker here.

Round 2 :

6inc (12)

Round 3 :

12sc (12)

Round 4 :

6dec

Info :

Stuff with fiberfill. Leave a long tail for sewing.

β€” Assembly (sitting rabbit) :

Info :

Tighten cheeks following the pictures below. Sew the head to the body.

Info :

Fasten the legs and arms with a thread mount. Attach the front legs and hind legs using a long needle and thread (look at the pictures below). Sew the tail to the body.

Info :

Sew the ears to the head.

Info :

Embroider a nose with a pink thread. Embroider a mouth and eyes with a black thread. Glue eyes between rounds 10-11 at a distance of 6-8 sc. Use pink pastel to paint the cheeks and the inside of the ears.

β€” Baby Bunny Ears (make 2) :

Round 1 :

6sc in MR

Info :

Place row marker here.

Round 2 :

6sc (6)

Round 3 :

(1sc, inc) *3 (9)

Round 4 :

9sc (9)

Round 5 :

(2sc, inc) *3 (12)

Round 6-7 :

12sc (2 rounds) (12)

Round 8 :

6dec (6)

Info :

Do not stuff. Leave a long tail for sewing.

β€” Baby Bunny Hind legs (make 2) :

Round 1 :

8sc in MR

Info :

Place row marker here.

Round 2 :

Change color to Gray. 8sc (8)

Round 3 :

2sc, 2dec, 2sc (6)

Info :

Stuff with fiberfill in the process.

Round 4-7 :

6sc (4 rounds)

Info :

Fasten off, cut the yarn, weave in the yarn ends.

β€” Baby Bunny Front legs (make 2) :

Round 1 :

6sc in MR

Info :

Place row marker here.

Round 2-6 :

6sc (5 rounds) (6)

Info :

Stuff with fiberfill in the process. Fasten off, cut the yarn, weave in the yarn ends.

β€” Baby Bunny Body-Head :

Body Round 1 :

6sc in MR

Info :

Place row marker here.

Body Round 2 :

6inc (12)

Body Round 3 :

(1sc, inc) *6 (18)

Body Round 4-7 :

18sc (4 rounds) (18)

Body Round 8 :

(1sc, dec) *6 (12)

Body Round 9-11 :

12sc (3 rounds)

Info :

Stuff with fiberfill in the process.

Head Round 12 :

12inc (24)

Head Round 13-15 :

24sc (3 rounds) (24)

Head Round 16 :

(2sc, dec) *6 (18)

Head Round 17-19 :

18sc (3 rounds)

Head Round 20 :

(1sc, dec) *6 (12)

Info :

Stuff the head with fiberfill. 21. 6dec. Fasten off, cut the yarn, weave in the yarn ends.

β€” Baby Bunny Tail :

Round 1 :

6sc in MR

Info :

Place row marker here.

Round 2 :

(1sc, inc) *3 (9)

Round 3 :

9sc (9)

Round 4 :

(1sc, dec) *3 (6)

Info :

Stuff with fiberfill. Leave a long tail for sewing.

β€” Baby Bunny Assembly :

Info :

Fasten the legs and arms with a thread mount. Attach the front legs and hind legs using a long needle and thread (look at the pictures). Sew the tail to the body. Sew the ears to the head. Embroider a nose with a pink thread. Embroider a mouth and eyes with a black thread. Use pink pastels to paint the cheeks and the inside of the ears.

β€” Newborn envelope :

Round 1 :

With White yarn. Work in rows. Chain 13. From the second chain on the hook: 12sc, turn (12)

Round 2-36 :

ch1, 12sc, turn (35 rows) (12)

Round 37 :

ch1, dec, 8sc, dec, turn (10)

Round 38 :

ch1, 10sc, turn (10)

Round 39 :

ch1, dec, 6sc, dec, turn (8)

Round 40 :

ch1, 8sc, turn (8)

Round 41 :

ch1, dec, 4sc, dec, turn (6)

Round 42 :

ch1, 6sc

Info :

Fasten off, cut the yarn, weave in the yarn ends. Fold the envelope in half and crochet around with pink yarn, connecting the part on the sides: ch1, (sc, 3dc in one stitch) * 26. Cut the yarn and fasten off. Put the bunny into the envelope.

β€” Cabbage bed :

Round 1 :

With Green yarn. 6sc in MR

Info :

Place row marker here.

Round 2 :

6inc (12)

Round 3 :

(1sc, inc) *6 (18)

Round 4 :

(2sc, inc) *6 (24)

Round 5 :

(3sc, inc) *6 (30)

Round 6 :

(4sc, inc) *6 (36)

Round 7 :

(5sc, inc) *6 (42)

Round 8 :

(6sc, inc) *6 (48)

Round 9-11 :

48sc (3 rounds) (48)

Round 12 :

(7sc, inc) *6 (54)

Round 13-19 :

54sc (7 rounds) (54)

Info :

Fasten off, cut the yarn, weave in the yarn ends.

β€” Inner (small) leaves (make 4) :

Round 1 :

With Green yarn. Work in rows. 5sc in MR, turn

Round 2 :

ch1, 2sc, 3sc inc, 2sc, turn (7)

Round 3 :

ch1, sc, inc, sc, 3sc inc, sc, inc, sc, turn (11)

Round 4 :

ch1, 2sc, inc, 2sc, 3sc inc, 2sc, inc, 2sc, turn (15)

Round 5 :

ch1, 3sc, inc, 3sc, 3sc inc, 3sc, inc, 3sc, turn (19)

Assembly Instructions

  • Tighten the cheeks by pulling yarn and shaping the head, then glue eyes between the rounds indicated (standing bunny: between rounds 23-24, sitting and baby instructions specify their rounds).
  • Fasten legs and arms with a thread mount: use a long needle and strong thread through the limb and body to secure for a sturdy attachment.
  • Sew ears to the head positioning them symmetrically and reinforcing with a few stitches so they lay as pictured.
  • Sew the tail to the lower back of the body using the long tail left from the tail piece and secure with several passes.
  • Fold the newborn envelope in half and crochet around the edges with pink yarn, connecting both sides as instructed, then place the bunny inside.
  • Use pink pastel to tone the cheeks and inside ears after facial embroidery; allow paint to dry before final handling.

Important Notes

  • πŸ’‘Use a stitch marker to mark the beginning of each round to avoid losing track when working many small rounds.
  • πŸ’‘Work with consistent tension and avoid overstuffing, stuffing gradually to maintain smooth even shapes.
  • πŸ’‘Weave in ends or secure color changes as you go to prevent long tails and loose ends when working tiny pieces.
  • πŸ’‘Follow the eye placement rounds exactly for balanced facial expressions and refer to the photos when attaching glue eyes.
  • πŸ’‘When joining limbs with thread mounts, pass the thread multiple times through each limb and the body to ensure secure attachment.

This delightful Bunny's House set brings tiny handmade magic to your home with bunnies, a carrot house and cabbage bed. Handcrafted details and tiny-scale work make each piece a unique collectible. Perfect as a gift or charming nursery decoration β€” happy crocheting! 🧢🐰

You ask,

we answer.

FAQs

What size will the finished piece be?

When using the indicated lace weight yarn and 1mm hook, the standing bunny measures approximately 7-8 cm (3 inches) tall; the flower meadow diameter is about 20 cm and the carrot house measures roughly 12 cm long by 5 cm wide and 6 cm high.

Can I use different yarn weights for this pattern?

Yes, but the final size will change; using a thicker yarn and larger hook will produce bigger, chunkier bunnies while thinner yarn will make miniatures β€” adjust hook size accordingly.

Do I need prior crochet experience for this pattern?

This pattern is rated Intermediate and assumes familiarity with magic ring, increases, decreases, bobble stitches and working in rounds and rows; beginner experience with these techniques is recommended.

How long does this project typically take to complete?

Most crafters finish the main bunny pieces and basic accessories in 5-7 hours, though time will vary depending on experience and how many accessory pieces you make.