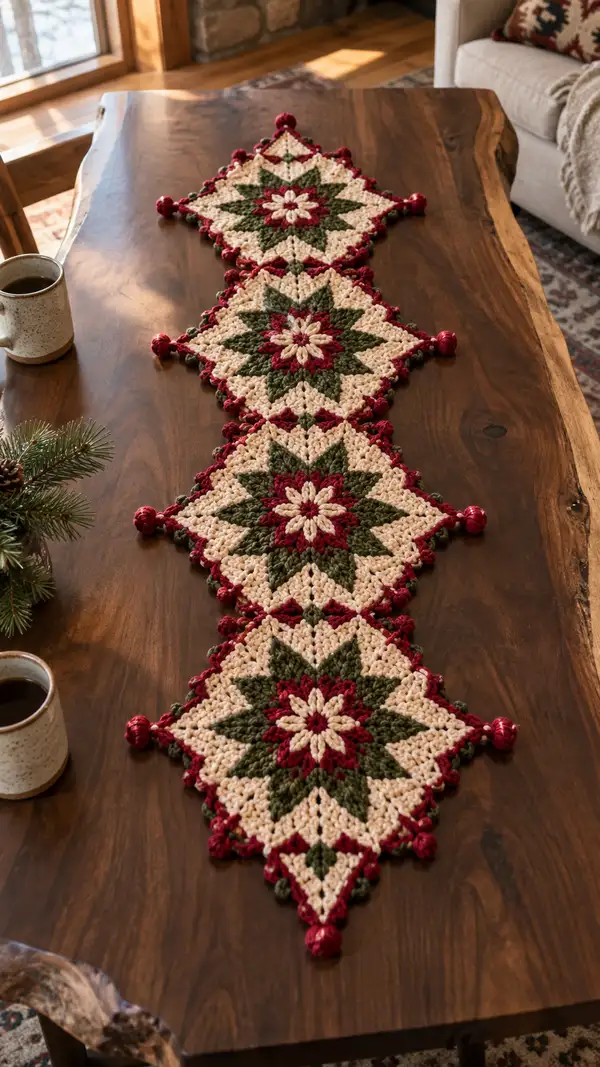
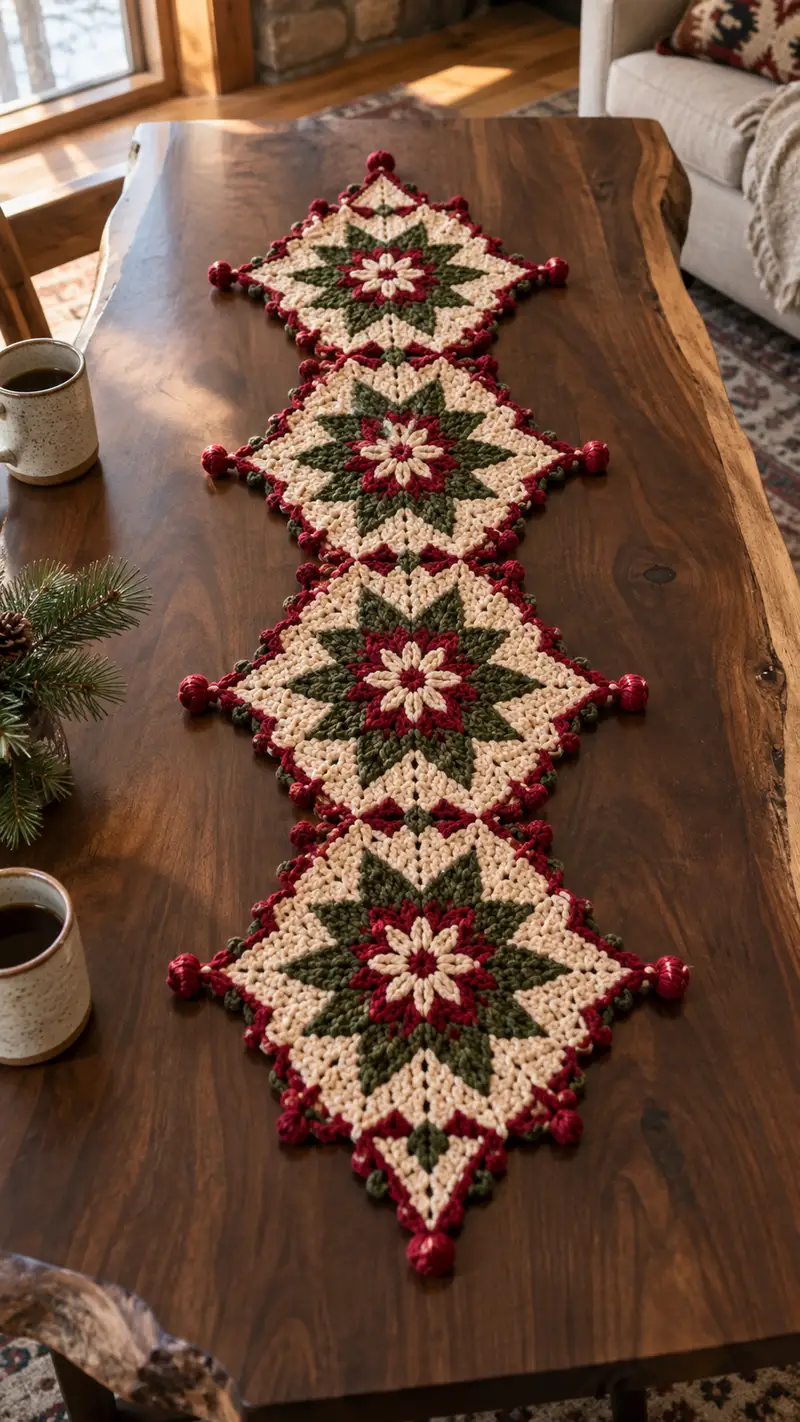
Create a warm, festive table runner composed of linked star medallion diamonds in rich burgundy, deep forest green and soft cream. This pattern yields a linear runner made of repeating diamond motifs with a textured puff-star center, lacy chain joins, and decorative pom-pom corner tassels. Suitable for seasonal tables or year-round rustic decor, finished with a crocheted scalloped border for a polished look.
Progress Tracker
0% Complete
— Note on pattern structure :
Info :
This pattern describes one diamond star medallion motif, then shows how to join multiple motifs in a straight runner. The motif is worked flat in the round to form a square-on-point diamond. All rounds are worked continuously unless otherwise noted; use a stitch marker to mark the beginning of each round. Color changes are indicated with Info sections. Measurements: one finished diamond measures approximately 11" (28cm) corner to corner when using worsted weight yarn and a 5.5mm hook. The sample runner shows four motifs joined (approx. 44-46" long). Adjust number of motifs to desired length.
— Center Flower (Rounds 1-12) :
Round 1 :
With cream (Color A), mr, ch1, 8 sc in mr. Pull tight and join with sl st to first sc or continue in spiral (8)
Round 2 :
2 sc in each st around (16)
Round 3 :
(1 sc, inc) x 8 (24)
Round 4 :
(2 sc, inc) x 8 (32)
Info :
Place a removable stitch marker at the start of Round 5; we will create the first round of puff petals. Work puffs with consistent yarn loop height for even petals.
Round 5 :
Change to burgundy (Color B). *Ch2, make a 5-loop puff stitch in next st (yarn over and pull up loop 5 times, yarn over and pull through all loops), ch1, sl st in next st; rep from * around to make 8 puff petals, ending with sl st to join at base (the round will have 32 base stitches but visible petals = 8 clusters)
Info :
Switch to cream (Color A) for an inner tidy round to anchor petals. Work behind petals into base stitches to create a neat center ring.
Round 6 :
With cream, ch1, sc in each base st around (32)
Round 7 :
(3 sc, inc) x 8 (40)
Round 8 :
(4 sc, inc) x 8 (48)
Info :
Round counts now are 48; we will begin shaping the eight-point star by building groups of stitches that will form points. Keep stitch marker at round start for accuracy.
Round 9 :
Change to forest green (Color C). *In next 6 sts: (1 dc in first st, ch1, 1 puff in next st, ch1, 1 dc in next st), skip 0 sts; rep around forming 8 star point bases (48)
Round 10 :
With forest green, ch2, work (2 dc, ch2, 2 dc) into the ch1 space of each star point base to create a fuller point (this adds decorative stitches but keep the same repeat count; work 1 cluster per point) (48)
Round 11 :
With forest green, sc in each st around to tidy (48)
Info :
We will now build an outer set of star points in alternating color to create layered star. Maintain tension to keep points flat; do not overwork puffs.
Round 12 :
Change to burgundy. *(ch3, tr in space between point clusters from previous round, ch3, sl st in next sc) x 8 to outline points and create small arches (48)
— Star Point Expansion (Rounds 13-28) :
Round 13 :
With burgundy, (1 sc in next 3 sts, inc) x 12 — note: we are increasing in 12 sections to broaden the motif (60)
Info :
If you prefer more dramatic star points, work BLO in this round to create a ridge for the next decorative round.
Round 14 :
With burgundy, 1 sc in each st around (60)
Round 15 :
Change to cream. *(3 dc in next st, ch1, skip 1) repeat placement to create textured fans on the background spaces between star points (60)
Round 16 :
With cream, sc in each st around to even out texture (60)
Info :
Begin shaping toward a square-on-point diamond by extending 4 corner 'lobes' while keeping sides straight. We'll work increases on four sections and maintain others to form corners.
Round 17 :
With forest green, *(2 sc, inc) in corner sections x 4, then 1 sc in each stitch of side sections to complete the round — overall increase of 8 sts (68)
Round 18 :
With forest green, 1 sc in each st around (68)
Round 19 :
Change to cream. Work (1 hdc, ch2, 1 hdc) into designated corner v-spaces (the four corner lobes), and sc across side stitches to begin diamond shaping (68)
Round 20 :
With cream, 1 sc in each st around (68)
Info :
At the end of Round 20 the motif should look roughly circular with four emerging corners. Check for symmetry; if a corner looks weak, add an extra sc at the tip next round to stabilize.
Round 21 :
Change to burgundy. Work *(ch2, 3 tr cluster into next corner space, ch2, sl st into next st) around the 4 corner spaces to strengthen points (68)
Round 22 :
With burgundy, sc in each st around (68)
Round 23 :
With cream, (3 sc, inc) x 17 + 1 sc — arranged evenly around to add 17 increases across the round to reach 85 sts total (85)
Info :
Round 23 intentionally increases to expand the square shape; use stitch markers to split round into 8 even segments if you prefer exact placement for decorative elements.
Round 24 :
With cream, 1 sc in each st around (85)
Round 25 :
Change to forest green. *(ch3, skip 2, 2 dc in next 2 sts, ch1) repeat around creating decorative arches; stitch count remains 85 as ch spaces are worked into same sites (85)
Round 26 :
With forest green, sc in each st around to even edges (85)
Info :
We will now establish the diamond outline by creating 4 extended corners with focused increases; this will square the motif neatly so it sits diamond-shaped when rotated.
Round 27 :
With burgundy, in each corner section work (1 sc, inc, 2 sc, inc, 1 sc) which increases 2 sts per corner x4 = +8 (93)
Round 28 :
With burgundy, sc around (93)
— Background and Square Formation (Rounds 29-48) :
Round 29 :
Change to cream. *(5 sc, ch3, 5 sc) across side panels into the flat spaces between corner lobes to create a lacy panel; keep stitch count 93 by working ch3 into existing sites (93)
Round 30 :
With cream, sc in each st around (93)
Round 31 :
With forest green, work (1 sc in next 11 sts, inc) x 8 to subtly widen corners and keep the diamond proportionate — this is +8 -> (101)
Round 32 :
With forest green, sc around (101)
Info :
From here the outer rounds will be primarily even rounds with decorative cluster rounds inserted. Use a light blocking after finishing each motif to flatten it before joining.
Round 33 :
With cream, (2 sc, inc) x 25 + 1 sc = (126) — distributed evenly to expand motif to a usable diamond size (126)
Round 34 :
With cream, 1 sc in each st around (126)
Round 35 :
Change to burgundy. *(ch2, sc in next st, ch2, sl st in next 4th st) repeat decorative arches around the motif; stitch count 126
Round 36 :
With burgundy, sc in each st around (126)
Info :
We will add a raised ridge using BLO to create a subtle edge that will later help when joining motifs. Switch to BLO on the next round.
Round 37 :
With forest green, 1 sc in each st BLO around (126)
Round 38 :
With forest green, sc in each st around (126)
Round 39 :
Change to cream. Work *(4 sc, ch3, 4 sc) spaced evenly to create corner v-spaces; maintain 126 stitch architecture by placing ch3 into existing stitch spaces (126)
Round 40 :
With cream, sc in each st around (126)
Info :
By round 40 your medallion should be a generous diamond shape approx 11" across. If making a larger runner, add extra even rounds here before joining motifs.
Round 41 :
With burgundy, *(in corner v-space: (sc, picot (ch3, sl st into base), sc) ), sc along sides between corners — count remains 126
Round 42 :
With burgundy, sc in each st around (126)
Round 43 :
Change to forest green. *(1 sc, inc) x 42 — distributed evenly around to reach 168 sts total (168)
Round 44 :
With forest green, sc around (168)
Round 45 :
With cream, work a decorative cluster round: *(1 sc, ch2, puff in next st, ch1, 1 sc) repeat around — stitch count remains 168
Round 46 :
With cream, sc around (168)
Info :
We will prepare motifs for join-as-you-go. Decide which corner points will be used as join points: the four main corners are recommended. Mark these corner stitches with pins or removable markers so joins align across motifs.
Round 47 :
With burgundy, sc in each st around placing a contrasting sc in the four corner tip stitches to visually mark the join points (168)
Round 48 :
With burgundy, sl st to finish round and fasten off leaving a 24" tail for joining if working join-as-you-go (168)
— Motif Blocking & Prep :
Info :
Block each motif flat to true diamond shape. Pin corner tips to the same measurement so joining is consistent. Lightly spritz with water and allow to dry before joining. If you plan to sew motifs instead of join-as-you-go, leave longer tails for mattress stitch.
— Joining Motifs (Rounds 49-74) :
Info :
You can join motifs by whipstitch, slip-stitch join, or join-as-you-go. The instructions here describe a join-as-you-go slip-stitch method along each corner. When joining, work into the final round of the new motif and slip-stitch into the corresponding sites of an already-finished motif. All join rounds below assume joining the second motif onto an existing motif placed to the top of it; adjust orientation as you work along the runner.
Round 49 :
With cream, prepare second motif up to Round 46 and do not fasten off. Align motifs corner-to-corner. Begin at a corner tip: sl st into corner tip of existing motif, ch1, sl st into next corresponding st on new motif; continue around the small triangle corner area with sl st joins to attach the two motifs at that corner (this will use roughly 5-8 sl st depending on motif edge)
Round 50 :
Continue joining along the first side between corners: working in the final round of the new motif, sl st into every 3rd st of the attached motif to create lacy chain joins; continue until the adjacent corner is reached (do not fasten off) — the total stitches engaged along the join will vary but maintain even spacing for neatness
Info :
When joining multiple motifs in a straight line, join two adjacent corners for each pair to produce the linked diamond silhouette seen in the photo. For a sturdier join work sl st through both loop legs of final round stitches of each motif.
Round 51 :
At next corner, repeat corner join as Round 49, then continue joining until all four corners that touch a neighbor are secured. Fasten off and weave in tails. Each pair of motifs should share two corner joins that align along the runner seam.
Info :
For the sample runner of 4 motifs the joining pattern is linear: motif1 joins motif2 at one corner, motif2 joins motif3 at the next corner, etc., so that the diamonds form a chain. If creating a wider runner, join additional motifs at the other corners accordingly.
Round 53 :
After joining full length, examine joins. If there are gaps along the seams, reinforce with sc or hdc stitches worked into the join spaces from the back side. Keep joins tidy by matching colors — use burgundy for a decorative seam look or cream to blend.
Round 54 :
Work a tidy slip-stitch round in cream along the entire outside edge of the runner to even the joins and create a base for the final scalloped border. Sl st evenly around all outer edges and corners; maintain consistent tension so runner lies flat.
Info :
Before final outer border, decide on pom-pom placement. The sample has small pompoms at each exposed corner of the runner - prepare pom-poms now or leave instructions for the end.
Round 56 :
Fasten off remaining working motif ends and weave in all tails so the surface is clean. At least 1" of tail inside joins is recommended to ensure strong seams.
— Outer Scalloped Border (Rounds 57-86) :
Round 57 :
With burgundy, join at any outer edge stitch with sl st, ch1. Work *sc, ch3, skip 2 sts, sc in next st* around all outer edges to create scalloped chain points; when turning a corner, work (sc, ch5, sc) into the corner tip to form a larger loop at each diamond point. Count will vary; maintain pattern repeat around corners.
Round 58 :
With burgundy, into each ch3 loop work (sc, hdc, 3 dc, hdc, sc) to form a full scallop. Into corner ch5 work (sc, hdc, 5 dc, hdc, sc). This will add visual weight and make pom-pom anchors more secure.
Round 59 :
With burgundy, sc in each st and sc in top of each scallop to tidy (this will not change overall stitch count but creates a consistent border base)
Round 60 :
Change to forest green. Into each scallop top work *sc, picot (ch3 sl st into base), sc* to create a small decorative bobble at regular intervals (note: picot is decorative and should not significantly change stitch count)
Info :
Work slowly across long runs of scallops to ensure even spacing. Use a small measuring tape to check that scallop centers align across motif joins for visual continuity.
Round 61 :
With forest green, sc around to secure the picots and smooth the border.
Round 62 :
With cream, work a decorative chain cluster between scallops: *ch4, sc in next scallop top* repeat to create a little looped garland around the runner (count unchanged)
Round 63 :
With cream, sc around to finish and tidy all loops (even round)
Round 64 :
With burgundy, do an accent ridge in BLO along the rounds nearest the join seams to help the runner lie flat: 1 sc BLO in each st around the entire runner edge (final edge sts approx 168-200 depending on number of motifs)
Info :
If you want a chunkier border, repeat Rounds 57-64 to add another layer of scallops; otherwise proceed to prepare pompoms and final finishing.
Round 66 :
With burgundy, sc around final edge once more to create a neat edge for pom-pom attachment (even round)
Round 67 :
Fasten off and weave in ends thoroughly; leave 6-8" tails at corner points for pom-pom attachment if you prefer sewing pompoms rather than gluing.
— Pom-Poms and Tassels (Rounds 87-96 instructions) :
Info :
The photo shows small round pom-poms at each exposed corner of the runner. You may make matching yarn pom-poms in burgundy and attach them with yarn tails or make slightly larger jingle pom-poms if desired. The following instructions describe a hand-wound pom-pom method and sewing it securely to the outer corner ch5 tip.
Round 87 :
Make 8 small pom-poms (one for each outer exposed corner) by winding worsted weight yarn around a 1.25" cardboard ring about 50-70 times for a compact pom. Tie a length of yarn through the center tightly, cut between rings, trim to round, and fluff.
Info :
For extra durability, stitch through the pom's core with the long tail and around the corner ch5 loop of the runner several times to anchor. Knot and weave tail inside the runner for a tidy finish.
Round 89 :
Sew pom-poms to each outer corner: thread the long tail through the yarn needle, pierce the runner near the corner tip, then pass needle back through the pom center several times. Make at least 6 passes for stability, then knot and weave tail into runner interior.
Round 90 :
Trim pom-poms evenly and shape with scissors for a neat round look. If you prefer less bulk, create tassels instead by folding 10-15 lengths of yarn in half, looping through corner tip and securing with a tight wrap.
— Final Finishing (Rounds 91-100) :
Round 91 :
Steam-block the entire runner lightly while pins remain in place to retain diamond points. Do not over-wet; low heat steam will relax stitches and flatten joins.
Round 92 :
Check all joins and weave in any remaining tails. Use small whipstitch reinforcements from the underside if joins feel loose.
Round 93 :
Trim any stray fibers and shape scallops with small curved scissors for polished edge definition.
Round 94 :
Optional: Lightly starch the runner for a more formal table setting; try spray starch or diluted fabric stiffener, test on a scrap piece first.
Round 95 :
Final inspection: ensure pompoms are secure, edges are even, and runner sits flat. If any corner droops, add an extra sc or hdc at the corner tip to pull it into shape.
Round 96 :
Enjoy your finished runner! The pattern above gives detailed motif instructions; for extended runners make more motifs and repeat joining steps as required.
— Alternative Finish Options & Variations :
Info :
Variation A: Make motifs larger by adding extra sc rounds in cream before border; Variation B: Omit pompoms and add a beaded fringe; Variation C: Use monochrome yarn for a modern look; Variation D: Work outer scallops in a contrasting color for a bold frame.
Completing this star medallion runner brings such cozy satisfaction — each puff petal and scalloped edge builds a warm centerpiece that feels handcrafted and festive. The layered star points and tiny pom-pom tassels give it a charming, vintage holiday look you'll be proud to display. Whether for family dinners or quiet winter mornings with coffee, this runner creates an inviting table in every season. 🧶✨ Happy crocheting and enjoy the glow it brings to your home! 🎄