🧢 Beautiful ✨ Detailed πŸ’ Adorable

Buzz Lightyear Amigurumi Pattern

Buzz Lightyear Amigurumi Pattern
4.0β˜… Rating
5-7 Hours Time Needed
1.3K Made This
βœ‚οΈ

Intermediate Level

Ideal for those with basic crochet experience, featuring slightly more advanced stitches and techniques to expand your skills.

⏱️

Weekend Treat

Takes 5-7 hours, making it an enjoyable project to finish over a couple of days.

🧸

Cute Companion

An adorable friend to cherish, handcrafted with love to bring comfort and joy for years to come.

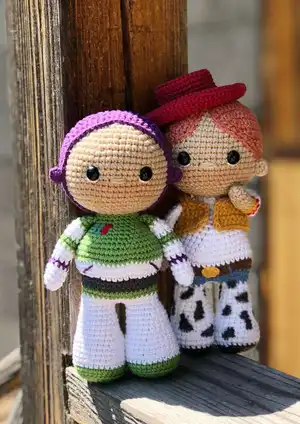
About This Buzz Lightyear Amigurumi Pattern

This pattern teaches you how to crochet a detailed Buzz Lightyear amigurumi inspired by Toy Story. You will work small pieces and assemble them into a charming, collectible toy. The pattern uses cotton yarns and color changes to achieve the distinctive look.

Buzz Lightyear Amigurumi Pattern crochet pattern - detailed view of completed project

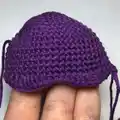
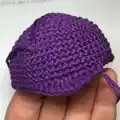
Includes step-by-step rounds for head, body, legs, hands and accessories. Detailed photos and assembly notes help you place eyes and sew parts accurately.

Why You'll Love This Buzz Lightyear Amigurumi Pattern

I absolutely love this pattern because it brings a playful character to life with simple crochet techniques and charming details. I enjoyed designing the color changes and little emblem that make Buzz instantly recognizable. The pattern balances structure and creativity so you can add personal touches. I find the step-by-step photos especially helpful when assembling the pieces, and they always make the finishing process satisfying.

Buzz Lightyear Amigurumi Pattern step 1 - construction progress Buzz Lightyear Amigurumi Pattern step 2 - assembly progress Buzz Lightyear Amigurumi Pattern step 3 - details and accessories Buzz Lightyear Amigurumi Pattern step 4 - final assembly and finishing

Switch Things Up

I love how easy it is to customize the colors of this Buzz pattern; I often switch to pastel greens or blues for a softer look.

I sometimes make a mini version by using a smaller hook and thinner yarn to create keychain-sized pals.

I also like adding embroidered details or tiny felt badges to personalize each amigurumi for gifts.

I recommend trying different eye sizes to change the character's expression β€” larger eyes make it cuter, smaller eyes make it more realistic.

If you want a sturdier toy, I suggest using a firmer stuffing and adding a cardboard base in the feet for balance.

I enjoy mixing yarn textures for interest; a slightly fluffy yarn for the helmet edge gives a fun contrast.

For kids, I sometimes skip plastic eyes and embroider the pupils for safety and durability.

I often add a pipe-cleaner or thin wire in the arms to pose them, which makes for playful display options.

Try tiny accessories like a crocheted helmet visor or small badges to make each Buzz uniquely yours.

I encourage you to experiment β€” changing colors, sizes, and tiny details will make every finished piece special and one-of-a-kind.

Common Mistakes & How to Fix Them
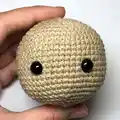
βœ— Skipping the safety eye placement step can throw off facial symmetry; insert safety eyes between rows 15-16 and measure spacing before securing. βœ— Forgetting to leave long tails when instructed makes sewing parts difficult later; always leave a long tail for sewing when the pattern specifically requests it. βœ— Not stuffing gradually causes lumps and misshapen curves; stuff little by little and shape as you go to maintain an even surface. βœ— Changing yarn colors without fastening off neatly can create loose ends and messy joins; change colors cleanly and weave in or secure tails as recommended. βœ— Ignoring BLO rounds when specified will change the texture and fit of parts; work back loops only (BLO) exactly where the pattern indicates for correct shaping.

Buzz Lightyear Amigurumi Pattern

Create your own adorable Buzz Lightyear amigurumi with this detailed crochet pattern. You will follow step-by-step instructions for the head, body, legs, hands, ears and decorative details. Perfect for making a handmade Toy Story-inspired companion to cherish or gift. The pattern includes materials, abbreviations and clear assembly guidance to help you finish with confidence.

Intermediate 5-7 Hours

Materials Needed for Buzz Lightyear Amigurumi Pattern

β€” Main Fabric

  • 01
    Alize Cotton Gold - 126
  • 02
    Alize Cotton Gold - 152
  • 03
    Alize Cotton Gold - 55
  • 04
    Drops Love You 7 - 10
  • 05
    Drops I Love You 7 - 04

β€” Tools Required

  • 01
    Fiber filling (polyester stuffing)
  • 02
    Hook size No.2 (2.0 mm)
  • 03
    Tapestry needle for sewing
  • 04
    Scissors
  • 05
    Plastic safety eyes diameter 7-8 mm
  • 06
    Stitch markers (recommended)

Progress Tracker

0% Complete

β€” Head :

Round 1 :

6 sc in mr

Round 2 :

6 inc (12)

Round 3 :

(1 sc, inc) x 6 (18)

Round 4 :

(2 sc, inc) x 6 (24)

Round 5 :

(3 sc, inc) x 6 (30)

Round 6 :

(4 sc, inc) x 6 (36)

Round 7 :

(5 sc, inc) x 6 (42)

Round 8 :

(6 sc, inc) x 6 (48)

Round 9 :

(7 sc, inc) x 6 (54)

Rounds 10-19 :

54 sc

Info :

Between the 15-16 rows insert safety eyes, 7-8 mm in diameter.

Round 20 :

(7 sc, dec) x 6 (48)

Round 21 :

(6 sc, dec) x 6 (42)

Info :

Stuff

Round 22 :

(5 sc, dec) x 6 (36)

Round 23 :

(4 sc, dec) x 6 (30)

Round 24 :

(3 sc, dec) x 6 (24)

Round 25 :

(2 sc, dec) x 6 (18)

Round 26 :

(1 sc, dec) x 6 (12)

Info :

Stuff

β€” Detail for head :

Start :

Start working with purple yarn color:

Round 1 :

6 sc in mr

Round 2 :

6 inc (12)

Round 3 :

(1 sc, inc) x 6 (18)

Round 4 :

(2 sc, inc) x 6 (24)

Round 5 :

(3 sc, inc) x 6 (30)

Round 6 :

(4 sc, inc) x 6 (36)

Round 7 :

(5 sc, inc) x 6 (42)

Round 8 :

(6 sc, inc) x 6 (48)

Round 9 :

(7 sc, inc) x 6 (54)

Rounds 10-16 :

54 sc

Round 17 :

(hdc, 2 dc, 2 inc (dc), 2 dc, hdc, 2 sc) x 2, 34 sc (58)

Round 18 :

(hdc, dc x 8, hdc, 2 sc) x 2, 34 sc (58)

Round 19 :

22 hdc, 36 sc (58)

Round 20 :

58 sc

Info :

Leave a long tail for sewing

Info :

Sew the detail on the head

β€” Ears :

Start :

Start working with purple color:

Round 1 :

6 sc in mr

Info :

Leave a long tail for sewing

β€” Start forming head :

Step 1 :

Between the 16-17 rows sew on ears. Distance from ears to eyes 5-6 sc.

Step 2 :

Embroider nose.

Step 3 :

Start forming eyes: -Embroider eyes: insert the white threaded needle on bottom of the eye and thread it to the bottom as shown in the picture. Bring the thread out near the second eye and repeat the same steps.

Step 4 :

Toned cheeks

β€” Legs :

Start :

Start working with green color:

Round 1 :

6 sc in mr

Round 2 :

6 inc (12)

Round 3 :

(1 sc, inc) x 6 (18)

Round 4 :

(2 sc, inc) x 6 (24)

Round 5 :

(3 sc, inc) x 6 (30)

Round 6 :

BLO 30 sc

Round 7 :

30 sc

Round 8 :

Change yarn color to the white color: 30 sc

Round 9 :

(8 sc, dec) x 3 (27)

Rounds 10-11 :

27 sc

Round 12 :

(7 sc, dec) x 3 (24)

Round 13 :

24 sc

Round 14 :

(6 sc, dec) x 3 (21)

Rounds 15-16 :

21 sc

Round 17 :

(5 sc, dec) x 3 (18)

Round 18 :

18 sc

Round 19 :

(4 sc, dec) x 3 (15)

Info :

Stuff

Info :

Crochet second leg the some way and continue crocheting the body.

Info :

Do not cut off the thread on the second leg and continue crocheting the body. The gap between the legs should be 3 ch:

Round :

15 sc on the leg, 3 sc on the chain, 15 sc on the leg, 3 sc on the chain (36)

Round :

36 sc

Round :

Change yarn color to the green color: 36 sc

Round :

36 sc

Round :

Change yarn color to the grey color: 36 sc

Rounds 6-7 :

36 sc

Round 8 :

Change yarn color to the white color: BLO (5 sc, inc) x 6 (42)

Round 9 :

(6 sc, inc) x 6 (48)

Round 10 :

(7 sc, inc) x 6 (54)

Round 11 :

Change yarn color to the green color: 54 sc

Rounds 12-13 :

54 sc

Round 14 :

(7 sc, dec) x 6 (48)

Round 15 :

(6 sc, dec) x 6 (42)

Round 16 :

(5 sc, dec) x 6 (36)

Round 17 :

(4 sc, dec) x 6 (30)

Info :

Stuff

Round 18 :

30 sc

Round 19 :

(3 sc, dec) x 6 (24)

Rounds 20-21 :

24 sc

Info :

Stuff

β€” Assembly :

Step :

Sew the head to the body

Step :

Embroider emblem with blue and red thread

Step :

Sew the detail on the head

Step :

Sew the head to the body

Step :

Sew the hands to the body

β€” Hands :

Start :

Start working with white color:

Round 1 :

6 sc in mr

Round 2 :

(1 sc, inc) x 3 (9)

Rounds 3-5 :

9 sc

Round 6 :

Change yarn color to the purple color: 9 sc

Round 7 :

Change yarn color to the white color: 9 sc

Rounds 8-9 :

9 sc

Round 10 :

Change yarn color to the green color: 9 sc

Round 11 :

9 sc

Round 12 :

Change yarn color to the white color: 9 sc

Rounds 13-14 :

9 sc

Round 15 :

Change yarn color to the green color: 9 sc

Rounds 16-17 :

9 sc

Info :

Stuff

Info :

Sew the hands to the body.

Assembly Instructions

  • Sew the head to the body aligning the bottom of the head opening with the top of the body and stitch securely using a tapestry needle.
  • Between rows 16-17 sew on the ears; position ears so the distance from ears to eyes is 5-6 single crochet stitches.
  • Sew the hands to the body on either side at the arm openings, matching stripes and angling slightly for a natural pose.
  • Embroider the chest emblem with blue and red thread as shown in the photos, stitching short straight stitches to recreate the motif.
  • Insert safety eyes between rows 15-16, 7-8 mm in diameter, and secure washers on the inside before stuffing fully.
  • Leave long tails when finishing parts (detail, ears, legs) to make sewing pieces together easier and more secure.

Important Notes

  • πŸ’‘Use stitch markers to keep track of the start of each round and during increases and decreases for consistent shaping.
  • πŸ’‘Stuff pieces gradually and firmly but not overly tight to maintain soft, rounded shapes and prevent stitching gaps.
  • πŸ’‘Leave long tails for sewing on smaller details (ears, hat detail) so you have enough length to attach pieces securely.
  • πŸ’‘When changing colors, carry yarn or weave ends neatly to minimize bulk inside the toy and keep color bands tidy.

This Buzz Lightyear amigurumi pattern captures the iconic look with playful details and colorwork. Perfect for collectors and gift makers alike. Make a matching set with other characters and bring Toy Story magic home! 🧢✨

You ask,

we answer.

FAQs

What size will the finished piece be?

The finished amigurumi will be approximately 20-25 cm tall depending on yarn tension and exact hook size used.

Can I use different yarn weights for this pattern?

Yes, you can substitute yarn weights, but your finished size will change; adjust hook size accordingly and note that color changes and stitch counts remain the same.

Do I need prior crochet experience for this pattern?

This pattern is rated intermediate, so familiarity with single crochet, increases, decreases, BLO and basic color changes is recommended.

How long does this project typically take to complete?

Most crocheters complete this project in 5-7 hours, but time may vary depending on experience level and assembly detail.