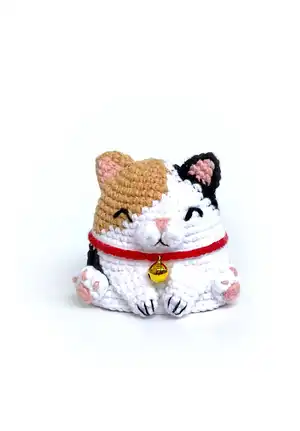
About This Calico Cat Amigurumi Pattern
This pattern creates a small, squat calico cat amigurumi with separate pieces for the head/body, ears, muzzle, legs, paws, tail and a tiny fish accessory. It uses continuous spiral rounds, color changes, and simple bobble stitches to form the paws and muzzle. The design is written in US crochet terms and includes special stitch notes like invisible finish and surface slip stitches.
You can make single toys or reversible paired toys by joining two bodies together; instructions and tips for both options are included. The pattern includes assembly directions and placement references to help you sew parts in the correct position.
Why You'll Love This Calico Cat Amigurumi Pattern
I absolutely love this pattern because it turns simple stitches into a character full of personality with minimal materials. I enjoy how the color changes and tiny bobble paws add so much charm without complicated shaping. The pattern is flexible—I often change the color palette to create different cat breeds and each variation feels fresh. It is also rewarding to assemble and see the little cat come to life as you sew the pieces together.
Switch Things Up
I love how versatile this pattern is for customization! You can change the color palette to make tabby, calico, siamese or solid-color cats by swapping the main color changes.
Make a reversible pair by creating two bodies with different color layouts and join them following the reversible joining instructions; leave a long yarn tail when you begin to allow for joining.
Adjust the final size by using different yarn weights and corresponding hook sizes — bulky yarn with a larger hook will give you a chunky toy while finer yarn makes a mini keychain-sized cat.
I often add tiny accessories like crocheted bows, little fish, or tiny hats to personalize each cat — these are simple to crochet and sew on.
Try embroidering different facial expressions by repositioning the eye and mouth stitches; moving the eyes slightly changes the personality dramatically.
Use felt or safety eyes if you prefer a different look, but for a small child-safe toy, embroider the eyes with 1-ply yarn instead.
For a weighted base, add a small disc of dense stuffing or a few beads inside the cardboard base to help the toy sit sturdily on shelves.
I sometimes add a tiny bell or collar using contrasting yarn colors to make a gift-ready toy that looks polished and complete.
Experiment with texture by working some rounds in BLO or FLO to create stripes or ridges on the body for a fun tactile effect.
If you like posing your toys, insert a thin wire inside the tail to make it slightly posable, or add wire inside the legs for subtle shaping.
Common Mistakes & How to Fix Them
✗ Skipping stitch markers can make you lose track of the beginning of a spiral; place a marker at the first stitch of every round and move it up as you work.
✗ Changing colors without cutting and starting a new yarn tail can tighten the fabric and distort shaping; cut and start a new yarn each time you change color for reversible pieces.
✗ Not stuffing as you go causes uneven shaping and lumps; stuff gradually and shape as you progress, especially before decreasing rounds.
✗ Forgetting to leave long yarn tails for sewing small pieces will make attachment difficult; always leave the recommended long tails for sewing and invisible finish.