🧢 Beautiful ✨ Detailed πŸ’ Adorable

Canadian Maple Leaf Pattern

Canadian Maple Leaf Pattern
4.6β˜… Rating
2-3 Hours Time Needed
1.9K Made This
βœ‚οΈ

Intermediate Level

Ideal for those with basic crochet experience, featuring slightly more advanced stitches and techniques to expand your skills.

⏱️

Bite-Sized Project

Finishes in 2-4 hoursβ€”perfect for an afternoon of creative relaxation.

🏑

Cozy Accent

A warm touch for your space that transforms ordinary corners into inviting nooks filled with handmade charm.

About This Canadian Maple Leaf Pattern

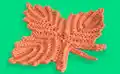
This pattern creates a Canadian maple leaf coaster or applique9 worked in small leaf sections and assembled together. The design uses post stitches for raised ribs and simple whip stitching to join pieces. The finished leaf measures roughly 8bd" x 7bd" using worsted weight yarn and a 4.5 mm hook.

Canadian Maple Leaf Pattern crochet pattern - detailed view of completed project

Includes a diagram for construction, step-by-step row instructions, photos for assembly, and wet-blocking tips. Make a single coaster or create a set in seasonal colors.

Why You'll Love This Canadian Maple Leaf Pattern

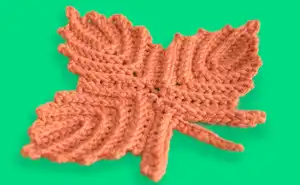
I absolutely love this pattern because it takes a classic shape and turns it into a textured, hand-crafted accent that is both decorative and functional. The use of front and back post single crochet adds lovely ribbed details that bring the leaf to life. I enjoy how quickly a single leaf comes together so you can make multiples in an afternoon and experiment with colors. Sewing the small leaves together is satisfying and the wet-blocking step really sharpens the shape, giving a polished, professional finish.

Canadian Maple Leaf Pattern step 1 - construction progress Canadian Maple Leaf Pattern step 2 - assembly progress Canadian Maple Leaf Pattern step 3 - details and accessories Canadian Maple Leaf Pattern step 4 - final assembly and finishing

Switch Things Up

I love experimenting with color when I make these leaves; I often switch to variegated yarns or two-tone combinations to emphasize the ribs and veins of the leaf.

Try different yarn weights and hooks to change the final size and texture: bulky yarn with a larger hook makes a plush coaster while fine yarn and a smaller hook create delicate applique9 pieces.

I sometimes add a simple surface crochet outline or a contrasting slip stitch border to highlight the leaf shape and make the edges pop.

For a rustic look, I use natural or muted fall colors and avoid blocking too aggressively so the leaf keeps a softer, handmade profile.

If I want a glossy, finished look, I block each leaf flat and press gently with steam after pinning so the ribs stay defined and crisp.

I also like to turn these into garlands by making several leaves in varying colors and sewing them onto a length of twine for seasonal displays.

If you prefer embellishments, add tiny embroidered veins or beads at the center to mimic dew drops for a delicate accent.

To create a mini version for keychains, I use fingering weight yarn and a 2.5 mm hook and shorten the stalk; I always reinforce the stalk with a few extra stitches so it stays sturdy.

I sometimes make sets in coordinating colors and package them as gifts; a small card with care instructions and optional wet blocking tips makes them extra special.

Don't be afraid to play with placement when assembling the three small leaves: rotating them slightly gives different looks, from symmetrical to more organic and natural shapes.

Common Mistakes & How to Fix Them
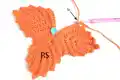
βœ— Skipping or not placing the center marker can cause misalignment when assembling the three small leaves; place a marker in the 9th stitch from the finishing row as instructed and check alignment before sewing. βœ— Counting stitches incorrectly after working the foundation chain and bottom loops leads to uneven edges; count carefully after Row 1 and again after each turning row to confirm stitch totals. βœ— Ignoring front and back post single crochet instructions will lose the raised rib effect; follow the Bpsc and Fpsc insertion directions precisely to maintain the leaf texture. βœ— Not wet blocking leaves after assembly can leave creases and warped edges; soak, shape, pin, and let the leaf dry flat to achieve the intended shape and smooth edges.
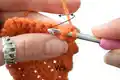
 βœ— Pulling yarn too tight when whip stitching leaves together creates puckering along seams; use gentle, even tension and remove markers as you go to keep seams flat and neat. βœ— Fastening off without leaving a long tail for sewing can make joining difficult; leave a long tail at finishing for sewing and weave in ends from the beginning as directed.

Canadian Maple Leaf Pattern

Make a beautiful Canadian Maple Leaf crochet coaster or applique9 with this clear, photo-assisted pattern. You will work small leaf motifs, stitch them together, and add a delicate stalk for a charming finished piece. Perfect as a seasonal coaster, applique, or small decorative accent for home and gifts.

Intermediate 2-3 Hours

Materials Needed for Canadian Maple Leaf Pattern

β€” Main Fabric

  • 01
    Red Heart Super Saver Yarn or any other worsted weight yarn (Medium / 4) as recommended in the pattern
  • 02
    Tip: Use a thinner yarn or thread with a smaller hook to make a smaller leaf (no specific weight given for smaller version)

β€” Tools Required

  • 01
    Crochet hook size 4.5 mm (G)
  • 02
    Tapestry needle & straight pins
  • 03
    Stitch markers
  • 04
    Blocking board (or interlocking play mat)
  • 05
    Scissors
  • 06
    Yarn needle for sewing

Progress Tracker

0% Complete

β€” Size :

Info :

8bd" (21.6 cm) from side to side. 7bd" (19 cm) from top to bottom. TIP: To make a smaller leaf, simply use a thinner yarn or thread & smaller size hook.

β€” Materials :

Info :

Red Heart Super Saver Yarn or any other worsted weight yarn (Medium / 4). Tapestry needle & straight pins. Stitch markers. Blocking board (or interlocking play mat).

β€” Hook :

Info :

4.5 mm (G)

β€” Gauge :

Info :

8 sc X 8 rows = 2" X 2" (5 X 5 cm). NOTE: The gauge is not very important for this item & your finished size may vary slightly.

β€” Special Stitches :

Info :

Whip stitch

Info :

Sc2(4)tog - [Insert hook in next st, yo & pull up a lp] 2(4) times; yo & pull through all lps on hook. 1(3) sts decreased.

Info :

Back post single crochet (Bpsc) - insert hook from back to front to back around post of next st, yo & pull up a lp; yo & pull yarn through 2 lps on hook.

Info :

Front post single crochet (Fpsc) - insert hook from front to back to front around post of next st, yo & pull up a lp; yo & pull yarn through 2 lps on hook.

β€” Abbreviations :

Infos :

Beg = Begin(ning). Bpsc = Back post single crochet. Ch(s) = Chain(s). Ea = Each. Fpsc = Front post single crochet. Lp(s) = Loop(s). Rnd(s) = Round(s). RS = Right Side. Sc = Single crochet. Sc2(4)tog = Single crochet 2(4) together. Sl st = Slip stitch. St(s) = Stitch(es). WS = Wrong Side. Yo = Yarn over. () = Parentheses are used in explanation. NOTE: This pattern is written using US terms.

β€” Small Leaf :

Info :

Make 3 small leaves to complete 1 Maple leaf (diagram 1). Work in rows.

To beg :

ch 10

Row 1 :

(RS) sc in second ch from hook; sc in next 7 chs; 5 sc in last ch; work across the bottom of foundation ch --> sc in next 6 chs; turn = 19 sts

Row 2 :

(WS) ch 1 (do not count as a st here & throughout); [fpsc around post of next st] 17 times (photos a-1 & a-2, page 4); turn = 17 sts

Row 3 :

(RS) ch 1; sc in next 8 sts; 5 sc in next st; sc in next 6 sts; turn = 19 sts

Row 4-7 :

repeat 2 more times rows 2 & 3

Row 8 :

same as Row 2

Finishing :

Fasten off, leaving a long tail for sewing; weave in the end from the beg. Turn & place a MARKER in 9th st from finishing (photo a-3).

β€” Assembling Maple Leaf :

Info :

Place all small leaves next to each other, with the markers meeting in the center (photo b-1).

Info :

With WS facing you, whip stitch the leaves together across 9 sts on the sides (photo b-2). Remove markers as you go from the left and right leaves, but keep the middle MARKER. Weave in the ends on WS.

β€” Leaf Stalk :

Info :

Make 1 (diagram 2, page 7).

To beg :

holding the leaf with RS facing you & with the center marker facing up, work ch 4 (photo c-1)

Row 1 :

(RS) work across the top 9 sts of right small leaf --> sc in first st on the right (photo c-2), sc in next 6 sts, sc2tog; skip st with MARKER & remove the MARKER (photo c-3); work across the top 9 sts of left small leaf --> sc2tog, sc in next 7 sts, ch 5 (photo c-4); turn = 16 sts & 2 chs on each side

Row 2 :

(WS) sc in second ch from hook; sc in next 3 chs; sc in next 6 sts; sc4tog; sc in next 6 sts; sc in next 4 chs (photo c-5, page 6); turn = 21 sts

Row 3 :

(RS) ch 1 (do not count as a st); [bpsc around post of next st] 10 times; ch 10 (photo c-6, page 6); sc in second ch from hook, sc in next 8 chs (photo c-7, page 6); [bpsc around post of next st] 10 times; sl st in last st (photo c-8, page 6) = 30 sts

Finishing :

Fasten off & weave in all the ends on WS.

β€” Wet Blocking :

Infos :

Wet blocking is optional, but recommended. Blocking removes creases & adjusts the shape of crochet pieces. 1. Soak the leaves in warm water; 2. Squeeze excess moisture out; 3. Lay the leaves flat on a blocking board (or interlocking play mat); 4. Shape & pin around the edges (photo d-1); 5. Let the leaves dry.

β€” Diagram 2 :

Info :

See diagram 2 on page 7 for stitch placement and seam locations for the completed leaf and stalk. All done! I hope you had a lot of fun :)

Assembly Instructions

  • Place all three small leaves with the markers meeting in the center; arrange so the right and left leaves mirror the center leaf before sewing.
  • With wrong sides facing you, whip stitch the leaves together across 9 stitches on each side, removing side markers as you go but keeping the center marker in place.
  • Attach the stalk by chaining 4 from the center with the RS facing you, then work Row 1 across the top stitches of the right and left small leaves following the pattern instructions.
  • Weave in all ends on the wrong side after assembling; secure seams with tidy whip stitch and hide tails inside the seamed area for a neat finish.
  • Wet block the assembled leaf by soaking, shaping and pinning on a blocking board to open the ribs and flatten the piece into the intended shape.

Important Notes

  • πŸ’‘Use stitch markers to identify the center and key positions; placing a marker in the 9th stitch from finishing is crucial for correct assembly.
  • πŸ’‘Work the post stitches (Fpsc and Bpsc) as described to achieve the raised rib texture; insert the hook from the correct direction for consistent results.
  • πŸ’‘The gauge is not critical for this pattern but will affect finished size; adjust yarn weight and hook size if you need a different finished measurement.
  • πŸ’‘Wet blocking is recommended to remove creases and refine edges; shape and pin while damp and allow to dry completely for best results.

This Canadian Maple Leaf pattern is a delightful little project that adds handmade charm to your home decor or gifts. Create coasters, applique9s, or a set of seasonal accents in fall colors for a warm, cozy touch. The textured ribs and neat seams make each finished leaf look professional and polished. 🍁🧢

You ask,

we answer.

FAQs

What size will the finished piece be?

The finished leaf measures approximately 8bd" (21.6 cm) from side to side and 7bd" (19 cm) from top to bottom using worsted weight yarn and a 4.5 mm hook.

Can I use different yarn weights for this pattern?

Yes, you can use different yarn weights, but this will change the final size; use a smaller hook for thinner yarns to keep the same fabric density and a larger hook for bulkier yarns.

Do I need to know post stitches to make this leaf?

Basic knowledge of front post and back post single crochet is recommended since the pattern uses Fpsc and Bpsc to create the raised ribs; photo references are provided to help.

How long does this project typically take to complete?

Most crocheters finish a single maple leaf in about 2-3 hours, though time may vary based on experience and whether you block and assemble multiple leaves.

Is wet blocking necessary?

Wet blocking is optional but recommended: it removes creases and helps the leaf open up and hold its shape for a professional look.