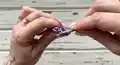
Make a chic, textured canvas handbag using sturdy 3mm polyester cord and simple crochet techniques. This pattern guides you step-by-step from the base canvas through embroidery, side panels, and final assembly so you can create a polished, ready-to-wear purse. Perfect for crafters who love structured bags with handmade details.
Progress Tracker
0% Complete
— Canvas :
Round 1 :
1 row. 25 SC from the 2nd loop from the hook on the back loop of the chain only, CH.
Round 2 :
2 row. 25 SC, CH.
Round 3 :
3 row. 25 SC, CH. Cut the end of the beginning of the crocheting, process with fire.
Info :
From the 3rd row crochet the 1st SC on the legs of the last SC and skip the 1st loop of the row.
Round 4 :
4 row. 25 SC, CH.
Round 5 :
5 row. 25 SC, CH.
Round 6-66 :
6-66 rows. 25 SC, CH.
Round 67 :
67 row. 25 SC. Don’t cut the thread.
— Base trim :
Info :
Crochet 2 SC in the last SC of the 67th row.
Round 1 :
Next crochet 65 SC in the each row.
Round 5 :
Next 65 SC in the each row.
Round 6 :
Then 1 SC in the 1st SC of the 67th row. Cut the thread, insert the hook under 1st SC of the row, pull the thread. Tighten back in the last loop.
Info :
Tighten the end through few loops, process with fire.
Round 7 :
Insert the hook in the any SC of the base trim. Pull the loop, insert the hook in the next SC, crochet SlSt.
Round 8 :
Next crochet SlSt in the each SC of the base trim.
Info :
Cut the thread and pull out the end.
Info :
Close the row: insert the hook under 1st SlSt of the row, pull the thread. Tighten back in the last loop. Tighten the ends through few loops, process with fire.
Info :
Now, after the base trim, the canvas consists of 68 rows.
— Embroidery :
Info :
Start embroidery from the top left corner.
Info :
The top is the future valve, where the crocheting of the fabric is finished (67th row).
Info :
Cut the thread about 4.4 yards (4 m) long, so there are fewer knots.
Round 1 :
Insert the needle under the base trim. Count 4 rows and 4 SC and insert the needle between the 4th and 5th SC.
Round 2 :
Insert the needle after 4th row again, then up under the base trim.
Round 3 :
Next embroider from left to right, down and right to left.
Round 4 :
Repeat rapport until the end of the canvas.
Info :
Don’t tighten the seams, but should not hang out.
Info :
Tie the knot when the thread runs out. Then join the threads with the lighter.
Info :
Hide the ends. Steam with the iron trough a damp cloth.
Info :
Embroidery looks like squares on the wrong side.
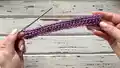
— Side part(*2) :
Round 1 :
1 row. 6 SC from the 2nd loop from the hook on the back loop of the chain only, CH.
Info :
Insert the hook trough the last SC. Over hook the end of the thread and pull out. Crochet in the end of the thread in the next row. Next crochet with the turning rows.
Round 2 :
2 row. 6 SC, CH.
Round 3 :
3 row. 6 SC, CH. From the 3rd row crochet the 1st SC on the legs of the last SC and skip the 1st loop of the row.
Round 4-18 :
4-18 row. 6 SC, CH.
Round 19 :
19 row. 6 SC, don’t cut the thread.
Round 20 :
Pull out the loop to the front side. Crochet 5 SlSt in the last row.
Info :
Leave the end about 60 inches (1.5 m) long for sewing. Cut the thread, pull out the end. Pull out the end to the wrong side again.
Info :
Similarly crochet the 2nd side part. Crochet the base trim with 5 SlSt in the other way.
Info :
That’s, the ends of the side parts will be on opposite sides.
Info :
Steam the side parts with an iron through a damp cloth.
— Assembly :
Info :
Turn the side of the canvas to himself, where the additional row of the base trim.
Info :
Count 10 rows (or 5 squares).
Info :
Place the marker between the rows in the loop of the base trim.
Info :
Then count 4 rows (or 2 squares). Place the markers between the rows. There should be 7 loops between the 1st and the 2nd markers.
Info :
Count 10 rows (or 5 squares) again. Place the markers. Its should be in the 19th loops from the 2nd markers.
Info :
Also, count 19 loops from the 1st markers. Place the markers in the 19th loops on the rounding.
Info :
Take the right side part. The side with the chain of the base trim with SlSt - front. The end of the thread on the left.
Info :
Put on the corners of the side part to the canvas. Take the plastic needle.
Info :
Make the securing stitches at the beginning. Next sew the side part with the canvas in each loop of the canvas and each row of the side part.
Info :
Sew to the marker, remove, make the stitch in the corner.
Info :
At down, sew 6 loops in the chain of the side part, make the 7th stitch in the knot.
Info :
Remove the marker, make the stitch in the corner. Then sew to the next marker.
Info :
Make securing stitches at the finish.
Info :
Strengthen and hide the end, process with fire.
This Canvas Handbag pattern turns sturdy 3mm cord into a structured, stylish purse you'll proudly carry every day. The embroidered diamond texture and neat base trim give a designer finish without complicated stitches. Make one as a gift or keep it for yourself — handcrafted charm that lasts. 🧶✨