🧶 Beautiful ✨ Detailed 💝 Adorable

Caro-The Coral Girl Amigurumi Pattern

Caro-The Coral Girl Amigurumi Pattern
4.8★ Rating
5-7 Hours Time Needed
3.0K Made This
✂️

Intermediate Level

Ideal for those with basic crochet experience, featuring slightly more advanced stitches and techniques to expand your skills.

⏱️

Weekend Treat

Takes 5-7 hours, making it an enjoyable project to finish over a couple of days.

🧸

Cute Companion

An adorable friend to cherish, handcrafted with love to bring comfort and joy for years to come.

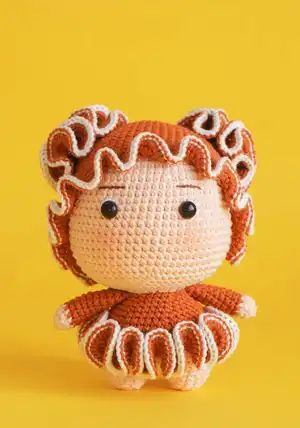
About This Caro-The Coral Girl Amigurumi Pattern

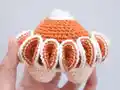
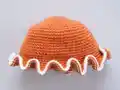
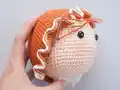
This pattern creates Caro, the Coral Girl — a sweet amigurumi with ruffled skirt details and curly hair buns. You will crochet the legs, body, head, arms, hat and decorative coral buns, then assemble them for a finished doll. The pattern uses three yarn colors and small hook sizes for tight stitches and neat shaping.

Caro-The Coral Girl Amigurumi Pattern crochet pattern - detailed view of completed project

Clear round-by-round instructions are provided for each piece and the ruffled details. Photographs and assembly notes guide placement and finishing for a professional look.

Why You'll Love This Caro-The Coral Girl Amigurumi Pattern

I absolutely love this pattern because it combines simple amigurumi shaping with playful, textured details that bring the character to life. The ruffled skirt and curly buns are fun to crochet and add so much personality. I enjoy how easy it is to customize the colors and scale of the doll, making each finished piece unique. Stitching the components together is satisfying and the finished doll has a charming, collectible quality.

Caro-The Coral Girl Amigurumi Pattern step 1 - construction progress Caro-The Coral Girl Amigurumi Pattern step 2 - assembly progress Caro-The Coral Girl Amigurumi Pattern step 3 - details and accessories Caro-The Coral Girl Amigurumi Pattern step 4 - final assembly and finishing

Switch Things Up

I love how easy it is to customize Caro by changing colors — I often swap the orange for pastel shades to create softer versions.

I sometimes use bulky yarn and a larger hook to make a chunky, cuddly doll that works great as a baby toy (but skip plastic pearls for baby-safe options).

I like to embroider a small smile or freckles with contrast thread to change the doll's expression and personality.

Try adding tiny accessories like a crocheted bow, necklace, or a mini shell to the dress for extra charm.

If you want a mini keychain version, use fingering weight yarn and a 1.75–2.0mm hook for a pocket-sized result.

I sometimes make the buns larger by adding an extra increase round to get extra curl and volume.

For a different look, change the white trim on the ruffles to a metallic or glitter yarn for sparkle.

I also recommend experimenting with eye types — safety eyes, embroidered eyes, or French knots all change the final expression.

To make the doll poseable, I carefully insert a short length of wire into the arms before stuffing and sewing to allow gentle positioning.

I often stitch small decorative pearls or beads onto the dress for a mermaid-inspired variation; if making for a child, avoid small beads for safety.

Common Mistakes & How to Fix Them

✗ Skipping stitch counts during increases leads to incorrect shaping; count stitches at the end of every round and mark every 10th stitch to stay on track. ✗ Not inserting safety eyes at the recommended round will place them too high or low; insert 10mm safety eyes between the 17th and 18th rounds, 8 stitches apart as instructed. ✗ Overstuffing early makes shaping the body and head difficult; stuff gradually, especially before closing decreases, to maintain smooth curves. ✗ Changing yarn without hiding tails creates messy joins; break yarn and leave long tails to weave in later or hide ends inside the piece while assembling.

Caro-The Coral Girl Amigurumi Pattern

Create Caro, a delightful coral-themed amigurumi doll with a ruffled dress and curly buns. This pattern walks you through each piece—legs, body, head, arms, hat and decorative buns—so you can crochet a charming handmade friend. With clear rounds and assembly photos, you can follow along and customize colors to make your own unique Coral Girl.

Intermediate 5-7 Hours

Materials Needed for Caro-The Coral Girl Amigurumi Pattern

— Main Fabric

  • 01
    Color A: skin color YarnArt Jeans 73 (50g, 160m)
  • 02
    Color B: orange YarnArt Jeans 85 (50g, 160m)
  • 03
    Color C: white YarnArt Jeans 03 (50g, 160m)

— Tools Required

  • 01
    Crochet hook size 2-2.5mm
  • 02
    Black safety eyes 10mm
  • 03
    Tapestry needles
  • 04
    Pins for assembly
  • 05
    Stitch markers
  • 06
    Scissors
  • 07
    Polyester stuffing

Progress Tracker

0% Complete

— Legs :

Round 1 :

sc 6 in a magic loop (6)

Round 2 :

[sc 1, inc] 3x (9)

Round 3 :

[sc 2, inc] 3x (12)

Round 4 :

[sc 3, inc] 3x (15)

Round 5 :

[sc 4, inc] 3x (18)

Info :

Make the 2nd leg similar to the 1st leg but do not break the yarn, connect with 1st leg with 1 slst. Continue crocheting sc 18 on the 1st leg and sc 18 on the 2nd leg 2 = 36. Continue to crochet through the body.

— Body :

Round 1 :

[sc 5, inc] 6x (42)

Round 2-4 :

sc 42 (3 rows), change to yarn B (42)

Round 5 :

sc 42 (42)

Round 6 :

(BLO) sc 42 (42)

Round 7-9 :

sc 42 (3 rows) (42)

Round 10 :

[sc 5, dec] 6x (36)

Round 11 :

sc 36 (36)

Round 12 :

[sc 4, dec] 6x (30)

Round 13 :

sc 30 (30)

Round 14 :

[sc 3, dec] 6x (24)

Round 15 :

sc 24 (24)

Info :

Break the yarn with a long rest, do not stuff. Turn the Body upside down, connect yarn B on the 1st stitch of the 6th rnd, we will crochet the Dress on the remaining loop of this rnd.

— Dress :

Round 1 :

inc 42 (84)

Round 2 :

inc 84 (168)

Round 3 :

inc 168, change to yarn C (336)

Round 4 :

(BLO) slst 336 (336)

Info :

Break the yarn, hide the remaining yarn.

— Arms :

Round 1 :

sc 6 in a magic loop (6)

Round 2 :

[sc 1, inc] 3x (9)

Round 3 :

sc 9 change to yarn B (9)

Round 4-12 :

sc 9 (9 rows) (9)

Info :

Break the yarn, stuff lightly the lower arms, use the tapestry needle to sew 2 edges together.

— Head :

Round 1 :

sc 6 into a magic loop (6)

Round 2 :

inc 6 (12)

Round 3 :

[sc 1, inc] 6x (18)

Round 4 :

sc 1, inc, [sc 2, inc] 5x, sc 1 (24)

Round 5 :

[sc 3, inc] 6x (30)

Round 6 :

sc 2, inc, [sc 4, inc] 5x, sc 2 (36)

Round 7 :

[sc 5, inc] 6x (42)

Round 8 :

sc 3, inc, [sc 6, inc] 5x, sc 3 (48)

Round 9 :

[sc 7, inc] 6x (54)

Round 10 :

sc 4, inc, [sc 8, inc] 5x, sc 4 (60)

Round 11 :

sc 60 (60)

Round 12 :

[sc 9, inc] 6x (66)

Round 13-24 :

sc 66 (12 rows), insert 10mm safety eyes between the 17th & 18th rnd, 8 sts apart (66)

Round 25 :

[sc 9, dec] 6x (60)

Round 26 :

[sc 8, dec] 6x (54)

Round 27 :

[sc 7, dec] 6x (48)

Round 28 :

[sc 6, dec] 6x (42)

Round 29 :

[sc 5, dec] 6x (36)

Round 30 :

[sc 4, dec] 6x (30)

Round 31 :

[sc 3, dec] 6x (24)

Info :

Break the yarn with a long rest to sew later. Stuff.

— Hat :

Round 1-10 :

crochet rnd 1-10 of the Head (60)

Round 11 :

[sc 9, inc] 6x (66)

Round 12-25 :

sc 66 (14 rows) (66)

Round 26 :

(FLO) inc 66 (132)

Round 27 :

[sc 1, inc] 66x, change to yarn C (198)

Round 28 :

(BLO) slst 198 (198)

Info :

Break the yarn with a long rest to sew later.

— Coral's Buns :

Info :

Note: leave a longer yarn before making the Magic Ring, this yarn will be the thread to attach the Buns to the Hat.

Round 1 :

sc 6 in a magic loop (6)

Round 2 :

inc 6 (12)

Round 3 :

inc 12 (24)

Round 4 :

inc 24 (42)

Round 5 :

inc 42 (84)

Round 6 :

inc 84, change to yarn C (168)

Round 7 :

(BLO) slst 168 (168)

Info :

Break the yarn, hide the remaining yarn. Tip: if you want to make a bigger and curlier Bun, just crochet 1 more rnd: inc 168 = 336 sts.

— Assembly :

Item Name (P1) :

Attach the Hat to the Head with the tapestry needle.

Item Name (P2) :

The Hat should look like this (photo reference).

Item Name (P3) :

Attach 2 Buns on the Hat using the long thread in the middle of the Magic Ring to attach the Buns.

Item Name (P4) :

Attach Arms on the Body and sew edges together as instructed.

Item Name (P5) :

Attach Head to the Body with a tapestry needle and secure. The Coral Girl is done ☺!

Assembly Instructions

  • Attach the Hat to the Head with the tapestry needle, aligning the hat edge to the head opening and sewing evenly around the brim.
  • Use the long thread left from the Magic Ring of each Bun to attach two Buns to the top sides of the Hat, positioning them symmetrically.
  • Attach the Arms on either side of the body between the rows where the dress meets the body and sew securely, tucking ends inside.
  • Sew the head to the body using the long tail left on the head, stitch around the neck opening and secure firmly.
  • Hide all remaining yarn tails inside the doll and weave ends neatly to prevent unraveling.

Important Notes

  • 💡Insert safety eyes between the 17th and 18th round of the head, spaced 8 stitches apart for correct placement.
  • 💡Break the yarn and leave long tails before assembly so you can sew pieces together easily and hide ends.
  • 💡Use the tapestry needle to sew paired leg/arm edges together and to attach small parts for a neat finish.

This Coral Girl is a charming amigurumi project that brings playful ruffles and curly buns to life. Make her in bright coral shades or customize the palette to match your style. Perfect as a handmade gift or a sweet addition to your collection. 🧶🌊😊

You ask,

we answer.

FAQs

What size will the finished piece be?

The finished amigurumi measures approximately 12-15 cm tall depending on tension and yarn used.

Can I use different yarn weights for this pattern?

Yes, you can change yarn weight but it will alter the final size; use an appropriate hook size to maintain stitch tension.

Do I need prior crochet experience for this pattern?

This pattern is rated intermediate and assumes familiarity with magic ring, single crochet, increases and decreases.

How long does this project typically take to complete?

Most crocheters complete this project in 5-7 hours, though time may vary with experience and customization.