🧢 Beautiful ✨ Detailed πŸ’ Adorable

Cascading Ripples Blanket Pattern

Cascading Ripples Blanket Pattern
4.0β˜… Rating
5-7 Hours Time Needed
2.4K Made This
βœ‚οΈ

Beginner Friendly Level

Perfect for those just starting their crochet journey, with clear instructions and simple techniques

⏱️

Weekend Treat

Takes 5-7 hours, making it an enjoyable project to finish over a couple of days.

πŸ€—

Soft Hug

Gentle, plush, and full of warmth, creating a sense of comfort and coziness wherever they find a home.

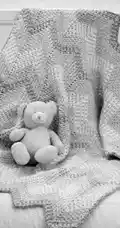
About This Cascading Ripples Blanket Pattern

This pattern creates a soft 36-inch square Cascading Ripples blanket worked with two strands of yarn held together. It features an easy ripple motif that alternates colors for a subtle cascading effect. The blanket is made in Bernat Baby Coordinates yarn and finished with a single-crochet edge for a neat look.

Cascading Ripples Blanket Pattern crochet pattern - detailed view of completed project

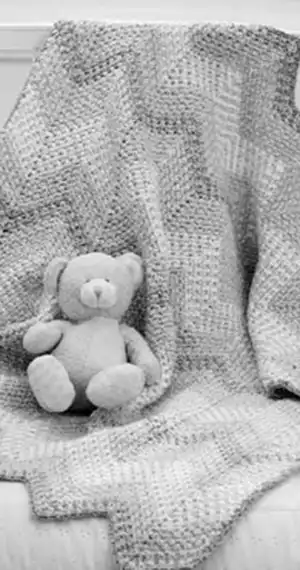
The design repeats a 24-row cascading ripple pattern and is worked flat from a foundation chain of 167 stitches. Full step-by-step instructions, materials, and edging details are included for straightforward assembly.

Why You'll Love This Cascading Ripples Blanket Pattern

I absolutely love this pattern because it blends simple stitches into a beautiful ripple texture that looks much more complex than it is. I enjoy holding two strands together to create that plush, cozy drape which is perfect for baby blankets or lap throws. The color changes are fun and forgiving, allowing you to play with palettes without needing advanced colorwork skills. Making this blanket feels relaxing and rewarding, and I always appreciate how quickly it grows row by row. It is a satisfying project to gift or keep for snuggly evenings.

Cascading Ripples Blanket Pattern step 1 - construction progress Cascading Ripples Blanket Pattern step 2 - assembly progress Cascading Ripples Blanket Pattern step 3 - details and accessories Cascading Ripples Blanket Pattern step 4 - final assembly and finishing

Switch Things Up

I love how easy it is to customize the colors in this pattern; try swapping the palette for pastels or bold contrasts to change the mood.

If you want a larger or smaller blanket, simply change the number of repeats or use a different yarn weight and adjust the hook size accordingly.

You can make a keychain or mini version by using fingering weight yarn and a much smaller hook for a tiny ripple sample that is super cute.

For a more rustic look, use a textured or boucle yarn held with a smooth strand to add subtle depth and interest to the ripples.

I often add embroidered initials or a small crocheted appliqu to personalize a gift blanket; sew it on after finishing the edging for a neat result.

Try adding a contrasting border color and a wider border of even single crochet rows to make the blanket feel more finished and frame the ripples.

To make the blanket reversible, work a continuous join technique for color changes and avoid turning on the final rows so both sides look tidy.

If you prefer a lighter blanket, use a single strand of a bulkier yarn and a larger hook, then test your gauge to match the desired drape.

I sometimes add a fringe to the short ends for a boho vibe β€” measure and attach evenly spaced tassels after weaving in ends.

For gifting, consider making matching accessories like a mini ripple scarf or cushion cover using the same color sequence to create a coordinated set.

Common Mistakes & How to Fix Them

βœ— Skipping the instruction to hold two strands together will change gauge and drape; always work holding two strands throughout to match the pattern. βœ— Forgetting to leave the first and last sc of each row unworked will distort the ripple edges; leave those stitches unworked as directed for the correct edge. βœ— Not marking every 50th chain when making the foundation chain can make counting difficult; place a marker at each 50th chain to keep your place. βœ— Turning after the final right-side row will flip the fabric and affect the edging instructions; follow the do not turn instruction where specified to keep the pattern orientation. βœ— Working with inconsistent tension between the two strands makes the fabric uneven; maintain even tension while holding both strands together for a uniform texture.

Cascading Ripples Blanket Pattern

Make a cozy, textured ripple blanket with this easy-to-follow pattern. Youll work holding two strands together to create a soft, squishy fabric and gentle color transitions. The pattern uses basic stitches and a repeating ripple motif to create a 36-inch square blanket. Perfect for gifting or cuddling on chilly days.

Beginner Friendly 5-7 Hours

Materials Needed for Cascading Ripples Blanket Pattern

β€” Main Fabric

  • 01
    Bernat Baby Coordinates (160 g / 5.6 oz)
  • 02
    Main Color (MC) (09131 Blue BonBon) - 2 balls
  • 03
    Contrast A (01005 Sky) - 2 balls
  • 04
    Contrast B (01009 Soft Blue) - 2 balls
  • 05
    Contrast C (01000 White) - 2 balls

β€” Tools Required

  • 01
    Crochet hook size 5.5 mm (U.S. I or 9) or size needed to obtain gauge
  • 02
    Scissors
  • 03
    Yarn needle for sewing in ends
  • 04
    Stitch markers (for marking every 50th chain and other places)
  • 05
    Measuring tape for gauge and finished size

Progress Tracker

0% Complete

β€” Measurement :

Info :

Approx 36 ins [91.5 cm] square.

β€” Gauge :

Info :

12 sc and 13 rows = 4 ins [10 cm] with 2 strands tog.

β€” Stitch Glossary :

Infos :

See page 24 for Helpful Hints. Approx = Approximately. Ch = Chain(s). Cont = Continue(ity). Pat = Pattern. Rep = Repeat. Sc = Single crochet. Sl st = Slip stitch. Sp(s) = Space(s). St(s) = Stitch(es). Tog = Together.

β€” Materials :

Info :

Bernat Baby Coordinates (160 g / 5.6 oz). Main Color (MC) (09131 Blue BonBon) 2 balls. Contrast A (01005 Sky) 2 balls. Contrast B (01009 Soft Blue) 2 balls. Contrast C (01000 White) 2 balls. Size 5.5 mm (U.S. I or 9) crochet hook or size needed to obtain gauge.

β€” Instructions :

Info :

Note: Entire blanket is worked holding 2 strands of yarn tog. First and last sc of each row is left unworked.

β€” Cascading Ripple Pat :

Row 1 :

With MC, work 1 row.

Row 2 :

With A, work 1 row.

Row 3 :

Rep last 2 rows once more.

Row 4 :

With B, work 1 row.

Row 5 :

With A, work 1 row.

Row 6 :

Rep last 2 rows twice more.

Row 7 :

With B, work 1 row.

Row 8 :

With C, work 1 row.

Row 9 :

Rep last 2 rows 3 times more.

Row 10 :

With B, work 1 row.

Row 11 :

With A, work 1 row.

Row 12 :

Rep last 2 rows twice more.

Info :

These 24 rows form Cascading Ripple Pat.

Info :

With 2 strands of MC, ch 167. Mark every 50th ch for easier counting.

1st row :

1 sc in 2nd ch from hook. *(Ch 1. Miss next ch, 1 sc in next ch) 6 times. Ch 2. (1 sc in next ch. Ch 1. Miss next ch) 6 times. 1 sc in next ch.** Miss next 2 ch. 1 sc in next ch. Rep from * 4 times more, then from * to ** once more. Fasten off. Turn. 166 sts.

2nd row :

Join 2 strands of A, with sl st to first ch-1 sp. Ch 1. 1 sc in same sp as sl st. (Ch 1. Miss next sc. 1 sc in next ch-1 sp) 5 times. Ch 1. *(1 sc. Ch 2. 1 sc) in next ch-2 sp. (Ch 1. Miss next sc. 1 sc in next ch-1 sp) 6 times. **Miss next 2 sc. (1 sc in next ch-1 sp. Ch 1. Miss next sc) 6 times. Rep from * 4 times more, then from * to ** once more. Fasten off. Turn. First 2 rows of Cascading Ripple Pat are complete.

Info :

Keeping cont of Cascading Ripple Pat, rep last row until Cascading Ripple Pat has been worked 5 times.

Next :

With MC, work 1 row.

Next :

With A, work 1 row.

Next :

With MC, work 1 row. Do not turn.

β€” Edging :

Info :

With 2 strands of MC, working along side edge of Blanket, proceed as follows: Ch 1. 1 sc in side of each sc down side of blanket. Fasten off.

Info :

Join 2 strands of MC with sl st to first sc on other side of Blanket. Ch 1. 1 sc in side of each sc up side of Blanket. Fasten off.

Assembly Instructions

  • Mark every 50th chain on the foundation chain of 167 for easier counting and even spacing before you begin the first row.
  • Work the cascading ripple pattern in color sequence exactly as written to create the intended 24-row repeat, keeping two strands held together throughout.
  • When the body of the blanket is complete, work the edging by single crocheting with 2 strands of MC down one side edge, fasten off, then join and single crochet up the opposite side edge.
  • Fasten off securely after finishing the edging and weave in all ends using a yarn needle to hide tails neatly along the wrong side.

Important Notes

  • πŸ’‘Use stitch markers to mark every 50th chain on the foundation chain to help maintain accurate stitch counts.
  • πŸ’‘Work holding two strands of yarn together for the entire blanket to achieve the correct gauge and fabric density.
  • πŸ’‘Leave the first and last single crochet of each row unworked to produce the correct ripple edges and finishing.

This Cascading Ripples Blanket is a cozy, textured throw thats soft to the touch and lovely to give as a gift. It uses two strands held together for a plush feel and a gentle ripple pattern that flows beautifully. Make one in your favorite palette and enjoy snuggly comfort every time you wrap up. 🧢✨

You ask,

we answer.

FAQs

What size will the finished piece be?

The finished blanket measures approximately 36 inches (91.5 cm) square when using the recommended yarn and 5.5 mm hook.

Can I use different yarn weights for this pattern?

Yes, but keep in mind that changing yarn weight and hook size will affect the finished size and drape; adjust the hook to obtain the specified gauge.

Do I need special skills to make this blanket?

No special skills are required; this pattern is rated beginner friendly and uses basic stitches like single crochet, chain, and slip stitch.

How long does this project typically take to complete?

Most crocheters complete this project in 5-7 hours, though time may vary depending on experience and working pace.