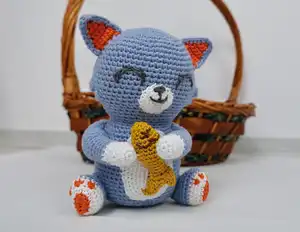
Make an adorable hand-crocheted cat holding a little fish. This charming amigurumi pattern guides you through each piece — head, torso, arms, legs, ears, tail, belly and tiny fish — with clear step-by-step rounds. Perfect as a thoughtful gift or a cozy addition to your handmade toy collection. Follow the full instructions and photos to assemble this sweet, huggable companion.
Progress Tracker
0% Complete
— Head and Torso :
Ring 1 :
Practice the ring 1: 1 magic ring, DO NOT COMBINE. Make 8 Sc into the ring, pull the rope tightly.
Ring 2 :
8 times (Sc into each Sc) (16 Sc)
Ring 3 :
8 times (Inc into 1 Sc, next to Sc) (24 Sc)
Ring 4 :
8 times (Inc into 2 Sc, next to Sc) (32 Sc)
Ring 5 :
8 times (Sc into next 3 Sc, next to Inc) (40 Sc)
Ring 6 :
8 times (Sc into next 4 Sc, next to Inc) (48 Sc)
Ring 7 :
8 times (Inc into next 5 Sc, next to Sc) (56 Sc)
Ring 8-16 :
(8 rings): Sc into each Sc through 8 rings (56 Sc)
Ring 17 :
14 Sc into Sc (3 sc into hdc) 22 Sc into sc (3 sc into hdc) 14 sc into sc (50 sc)
Ring 18 :
14 Sc into sc (3 hdc dec) 22 sc into sc (3 hdc dec) 14 sc into sc (50 sc)
Ring 19 :
13 sc into sc (3 sc into hdc) 18 sc into sc (3 sc into hdc) 13 sc into sc (50 sc)
Ring 20 :
13 sc into sc (3 hdc dec) 18 sc into sc (3 hdc dec) 13 sc into sc (44 sc)
Ring 21 :
Sc into Sc (44 Sc)
Ring 22 :
6 times Sc Dec (Sc into 6 Sc next Dec) (38 Sc)
Ring 23 :
6 times (Sc into every 5 Sc next Dec) (32 Sc) fill head tightly
Ring 24 :
Sc into each Sc (32 Sc)
Ring 25 :
Sc into each Sc through the ring (32 Sc)
Ring 26 :
Sc into each Sc through the ring (32 Sc)
Ring 27 :
8 times [Sc into each of the next 3 Sc, the next Inc] (40 Sc)
Ring 28 :
8 times [Sc into each of the next 4 Sc, the next Inc] (48 Sc)
Ring 29-35 :
(5 rings) Sc into each Sc (48 Sc)
Ring 36 :
2 times (Sc in each of the 11 Sc. Inc. in the next 2 Sc. In each of the of Inside each of the next 2 Scs, Inc. Sc into each of the next 11 Sc) (52 Sc)
Ring 37-43 :
(6 rings) Sc into each Sc (52 Sc)
Ring 44 :
2 times Sc Inc (Inc into 12 Sc in 2 Sc, Sc in next 24 Sc, Inc in next 2 Sc, Sc in next 12 Sc) (56 Sc)
Ring 45 :
2 times Sc Inc (Sc in 13 Sc, Inc in 3 Sc, Sc in next 24 Sc, Inc in next 3 Sc, Sc in next 13 Sc) (62 Sc)
Ring 46 :
Sc into each Sc (62 Sc)
Ring 47 :
6 times Sc Dec (Sc into 6 Sc next Dec) (56 Sc)
Ring 48 :
8 times Sc Dec (Sc into 5 Sc next Dec) (48 Sc)
Ring 49 :
6 times Sc Dec (Sc into 6 Sc next Dec) (42 Sc)
Ring 50 :
6 times Sc Dec (Sc into 5 Sc next Dec) (36 Sc)
Ring 51 :
8 times Sc Dec (Sc into 3 Sc next Dec) (28 Sc)
Ring 52 :
8 times Sc Dec (Sc into 2 Sc next Dec) (20 Sc)
Ring 53 :
6 times Sc Dec (Sc into 2 Sc next Dec) (12 Sc)
Info :
Tightly fill the body. Finish by subtracting the remaining Sc. Fasten Off (FO), clear the thread end.
— Arms :
Ring 1 :
Work a magic ring with thread A of color. Make 6 Sc into the ring, pull the rope tightly.
Ring 2 :
Inc inside each Sc (12 Sc)
Ring 3 :
Sc into each Sc along the ring (12 Sc)
Ring 4-10 :
(6 Rings) Inc into each Sc next to Inc (12 Sc)
Info :
Finish color A. Switch to the main color.
Ring 11 :
2 times Sc Inc (next 6 Sc into next Sc, next Inc) (14 times Sc)
Ring 12-14 :
(3 rings) Sc into each Sc (14 Sc)
Ring 15 :
2 times Sc Inc (next 7 Sc into next Sc, next Inc) (16 Sc)
Ring 16-19 :
(3 rings) Sc into each Sc (16 Sc)
Info :
Fill the sleeves, straighten the ring. Dip the crochet in every 2 layers. Make 8 Sc. Finish fo. Leave a long strand end for sewing.
— Tail :
Ring 1 :
Work a magic ring with thread A of color. Make 6 Sc into the ring, pull the rope tightly.
Ring 2 :
3 times Sc Inc (2 Sc into Sc, next to Inc) (9 Sc)
Ring 3 :
Sc into each Sc along the ring (9 Sc)
Ring 4 :
3 times Sc Inc (3 Sc into Sc next Inc) (12 Sc)
Ring 5-7 :
(3 rings) Sc into each Sc (12 of Sc)
Ring 8 :
2 times Sc Inc (5 Sc into Sc next Inc) (14 Sc)
Ring 9-12 :
(4 rings) Sc into each Sc along the ring (14 Sc)
Info :
Finish color A, switch to main color, start filling.
Ring 13 :
2 times Sc Inc (Next 6 Sc into Next Sc, next Inc) (16 Sc)
Ring 14-20 :
(6 rings) Sc into each Sc along the ring (16 Sc)
Ring 21 :
2 times Sc Inc (Sc into each 6 Sc, next Dec) (14 sc)
Ring 22-24 :
(3 rings) Sc into each Sc along the ring (12 Sc)
Info :
Fill the tail as you go.
Ring 25-45 :
(Sc into each Sc over 20 rings) (12 Sc in each ring)
Info :
Straighten the last loop, dip the crochet in every 2 layers, make 6 Sc. Finish fo. A long thread to sew.
— Belly :
Ring 1 :
Make 7 Fo. 2 Sc into the first Fo from the crochet, the next 2 Sc into the next 5 Sc. Work on rings that are not being worked on. Sc into 5 Sc, next 2 Sc. (14 sc)
Ring 2 :
3 Sc in the first Sc, 6 Sc in each of the next 6 Sc. 3 Sc in the next 1 Sc, Sc in the next 6 Sc (20 Sc)
Ring 3 :
4 times 3 Sc into Sc next Inc (26 grains Sc) Sc into ring 4
Ring 4 :
1 Sc next Inc (39 grains Sc)
Ring 5 :
Sc into each Sc (39 units of Sc)
Ring 6 :
Next 1 Sc into Inc. Sc into 5 Sc, Inc into next 1 Sc (41 Sc in)
Info :
Finish the closure chain, leave a long thread end to sew. Knit the mouth and eyes with the wrapping technique.
— Ears :
Info :
Make 2 with the main color yarn, 2 with the B color yarn, 4 with the yarn.
Info :
Make 2 Sc into Rnd 1: 2 Ch.
Rnd 2 :
1 Ch 2 Sc in the first Sc, 3 Sc in total
Rnd 3 :
1 Ch 2 Sc into the first Sc, total 4 Sc
Rnd 4 :
1 Ch 2 Sc in the first Sc, total 5 Sc
Rnd 5 :
1 Ch 2 Sc in the first Sc, 6 Sc in total
Rnd 6 :
1 Ch 2 Sc into the first Sc, total 7 Sc
Rnd 7 :
1 Ch 2 Sc into the first Sc, total 8 Sc
Info :
Combine with B color on the front and main color on the back.
Info :
Make the triangular shaped ears with the main color thread Sc into Sc.
Info :
Dip in both layers of the rings, turn them around.
— Legs :
Ring 1 :
5 pieces of Ch. Sink 2 times into the second chain from the crochet hook. Sc in each of the next 3 chains. Make 2 Sc in the next chain. Return to the non-worked loops of the chain. Make 3 Sc. Make 2 Sc for the next one. (12 sc)
Ring 2 :
Switch to A color rope, do not finish B color rope. Immerse 2 times in the first Sc. Sc for each of the 4 Sc, the next one is Inc. In the next 1 Sc, the next 1 Sc is in the next Inc. Sc into the next 4 Sc (16 Sc.)
Ring 3 :
Sc into each Sc along the ring (16 Sc)
Ring 4 :
Sc for each of the next 6 Sc. Switch to color B. 2 Sc in the next 1 Sc. Switch to color A. 1 Sc. Switch to B color again. 2 Sc in 1 Sc. Switch to color A. 1 Sc. Switch to B color again. 2 Sc in 1 Sc. Finish Sc in the next 6 Sc in the next Inc, B color.
Ring 5 :
Sc into each Sc through the ring. (20 grains Sc) Finish A color.
Ring 6 :
Switch to main color. Sc into each Sc through 2 rings (20 grains of Sc)
Ring 7 :
Sc for each of the next 7 Sc [3 times Sc Dec] for each of the next Sc
Ring 8 :
Sc for each of the next 8 Sc [3 times Sc Dec] for each of the next Sc.
Ring 9 :
Sc for each of the next 8 Sc [3 times Sc Dec] for each of the next Sc.
Ring 10 :
Sc for each of the next 7 Sc [2 times Sc Dec] for each of the next Sc.
Ring 11-14 :
(4 rings) Sc into each Sc. (15 sc)
Info :
Fill the leg. Flatten the last ring. Dip the crochet in both layers together. Make 7 Sc. Leave a long thread end for sewing.
— The Fish :
Ring 1 :
Work 1 magic ring with yarn of color C. Make 6 Sc into the ring. Pull the rope tightly.
Ring 2 :
2 times Sc Inc (Sc for each of the next 2 Sc, the next Inc) (8 times Sc)
Ring 3 :
Sc into each Sc along the ring (8 of Sc)
Ring 4 :
2 times Sc Inc (Next 3 Sc into Next Sc, next Inc) (10 of Sc)
Ring 5 :
2 times Sc Inc (Next 4 Sc into Next Sc, next Inc) (12 of Sc)
Ring 6-8 :
(3 rings) Sc into each Sc. (12 sc)
Ring 9 :
2 times Sc Inc (Next 5 Sc into Next Sc, next Inc) (14 of Sc)
Ring 10 :
2 times Sc Dec (Sc into next 5 Sc, next Dec) (12 of Sc)
Ring 11 :
2 times Sc Dec (Next 4 Sc into Next Sc, Next Dec) (10 Sc)
Ring 12 :
Sc into each Sc along the ring (10 Sc)
Ring 13 :
Divide the ring in half (Sc into previous 5 Sc, sink into each 2 layers of each Sc in the middle. Pull 1 chain, turn. Sc 5 Sc into each Sc. Turn 3 Sc and Finish 2 Sc.
— Mouth :
Ring 1 :
Work 1 magic ring with A color thread. Make 8 Sc into the ring. Pull the rope tightly.
Ring 2 :
8 times Sc Inc (Sc Inc into each Sc) (16 Sc.)
Ring 3 :
4 times Sc Inc (4 Sc into Sc, next to Inc) (20 of Sc)
Info :
Finish the closure chain, leave a long thread end to sew. Knit the mouth and eyes with the wrapping technique.
— Making of the Parts :
Item 1 :
Sew the ears to the 2 sides of the head in the ring 6-12.
Item 2 :
Sew the sleeves between the rings 30-37 on the 2 sides of the body. Bend forward on 2 arms and fasten.
Item 3 :
Sew the legs to the 2 sides of the torso between 44-47 on the right.
Item 4 :
Place the navel forward in the middle of the abdomen and sew. Sew the fish to the middle of the navel between the 2 arms. Also attach the arms tightly to the fish.
Item 5 :
Knit the mouth and eyes with the wrapping technique.
Item 6 :
Sew the tail from the back to the middle between 51 and 52.
This sweet Cat Who Loves The Fish is a joyful little project that brightens any shelf or nursery with its personality. 🧶 It uses small amounts of colorful yarn for delightful details and makes a heartfelt handmade gift. 🐟 Happy crocheting and enjoy every stitch of this cuddly companion! ✨