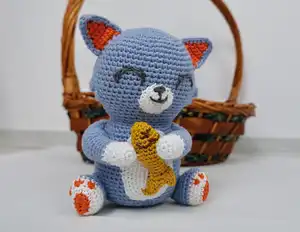
Create an adorable hand-crocheted cat holding a little fish with this detailed amigurumi pattern. You will find step-by-step rounds for head, torso, arms, legs, tail, ears, belly, fish and mouth — all written clearly so you can follow along. Perfect for gifting or decorating nurseries, this pattern uses simple shaping and charming color details to bring the character to life.
Progress Tracker
0% Complete
— Head and Torso :
Round 1 :
Practice the ring 1: 1 magic ring, DO NOT COMBINE. Make 8 Sc into the ring, pull the rope tightly.
Round 2 :
Ring 2: 8 times (Sc into each Sc) (16 Sc)
Round 3 :
Ring 3: 8 times (Inc into 1 Sc, next to Sc) (24 Sc)
Round 4 :
Ring 4: 8 times (Inc into 2 Sc, next to Sc) (32 Sc)
Round 5 :
Ring 5: 8 times (Sc into next 3 Sc, next to Inc) (40 Sc)
Round 6 :
Ring 6: 8 times (Sc into next 4 Sc, next to Inc) (48 Sc)
Round 7 :
Ring 7: 8 times (Inc into next 5 Sc, next to Sc) (56 Sc)
Round 8-16 :
Ring 8 - 16 (8 rings): Sc into each Sc through 8 rings (56 Sc)
Round 17 :
Ring 17: 14 Sc into Sc (3 sc into hdc) 22 Sc into sc (3 sc into hdc) 14 sc into sc (50 sc)
Round 18 :
Ring 18: 14 Sc into sc (3 hdc dec) 22 sc into sc (3 hdc dec) 14 sc into sc (50 sc)
Round 19 :
Ring 19: 13 sc into sc (3 sc into hdc) 18 sc into sc (3 sc into hdc) 13 sc into sc (50 sc)
Round 20 :
Ring 20: 13 sc into sc (3 hdc dec) 18 sc into sc (3 hdc dec) 13 sc into sc (44 sc)
Round 21 :
Ring 21: Sc into Sc (44 Sc)
Round 22 :
Ring 22: 6 times Sc Dec (Sc into 6 Sc next Dec) (38 Sc)
Round 23 :
Ring 23: 6 times (Sc into every 5 Sc next Dec) (32 Sc) fill head tightly
Round 24 :
Ring 24: Sc into each Sc (32 Sc)
Round 25 :
Ring 25: Sc into each Sc through the ring (32 Sc)
Round 26 :
Ring 26: Sc into each Sc through the ring (32 Sc)
Round 27 :
Ring 27: 8 times [Sc into each of the next 3 Sc, the next Inc] (40 Sc)
Round 28 :
Ring 28: 8 times [Sc into each of the next 4 Sc, the next Inc] (48 Sc)
Round 29-35 :
Ring 29-35: (5 rings) Sc into each Sc (48 Sc)
Round 36 :
Ring 36: 2 times (Sc in each of the 11 Sc. Inc. in the next 2 Sc. In each of the next 2 Scs, Inc. Sc into each of the next 11 Sc) (52 Sc)
Round 37-43 :
Ring 37-43: (6 rings) Sc into each Sc (52 Sc)
Round 44 :
Ring 44: 2 times Sc Inc (Inc into 12 Sc in 2 Sc, Sc in next 24 Sc, Inc in next 2 Sc, Sc in next 12 Sc) (56 Sc)
Round 45 :
Ring 45: 2 times Sc Inc (Sc in 13 Sc, Inc in 3 Sc, Sc in next 24 Sc, Inc in next 3 Sc, Sc in next 13 Sc) (62 Sc)
Round 46 :
Ring 46: Sc into each Sc (62 Sc)
Round 47 :
Ring 47: 6 times Sc Dec (Sc into 6 Sc next Dec) (56 Sc)
Round 48 :
Ring 48: 8 times Sc Dec (Sc into 5 Sc next Dec) (48 Sc)
Round 49 :
Ring 49: 6 times Sc Dec (Sc into 6 Sc next Dec) (42 Sc)
Round 50 :
Ring 50: 6 times Sc Dec (Sc into 5 Sc next Dec) (36 Sc)
Round 51 :
Ring 51: 8 times Sc Dec (Sc into 3 Sc next Dec) (28 Sc)
Round 52 :
Ring 52: 8 times Sc Dec (Sc into 2 Sc next Dec) (20 Sc)
Round 53 :
Ring 53: 6 times Sc Dec (Sc into 2 Sc next Dec) (12 Sc)
Info :
Tightly fill the body. Finish by subtracting the remaining Sc. Fasten Off (FO), clear the thread end.
— Arms :
Round 1 :
Ring 1: Work a magic ring with thread A of color. Make 6 Sc into the ring, pull the rope tightly.
Round 2 :
Ring 2: Inc inside each Sc (12 Sc)
Round 3 :
Ring 3: Sc into each Sc along the ring (12 Sc)
Round 4-10 :
Ring 4-10: (6 Rings) Inc into each Sc next to Inc (12 Sc)
Info :
Finish color A. Switch to the main color.
Round 11 :
Ring 11: 2 times Sc Inc (next 6 Sc into next Sc, next Inc) (14 Sc)
Round 12-14 :
Ring 12-14: (3 rings) Sc into each Sc (14 Sc)
Round 15 :
Ring 15: 2 times Sc Inc (next 7 Sc into next Sc, next Inc) (16 Sc)
Round 16-19 :
Ring 16-19: (3 rings) Sc into each Sc (16 Sc)
Info :
Fill the sleeves, straighten the ring. Dip the crochet in every 2 layers. Make 8 Sc. Finish fo. Leave a long strand end for sewing.
— Tail :
Round 1 :
Ring 1: Work a magic ring with thread A of color. Make 6 Sc into the ring, pull the rope tightly.
Round 2 :
Ring 2: 3 times Sc Inc (2 Sc into Sc, next to Inc) (9 Sc)
Round 3 :
Ring 3: Sc into each Sc along the ring (9 Sc)
Round 4 :
Ring 4: 3 times Sc Inc (3 Sc into Sc next Inc) (12 Sc)
Round 5-7 :
Ring 5-7: (3 rings) Sc into each Sc (12 of Sc)
Round 8 :
Ring 8: 2 times Sc Inc (5 Sc into Sc next Inc) (14 Sc)
Round 9-12 :
Ring 9-12: (4 rings) Sc into each Sc along the ring (14 Sc)
Info :
Finish color A, switch to main color, start filling.
Round 13 :
Ring 13: 2 times Sc Inc (Next 6 Sc into Next Sc, next Inc) (16 Sc)
Round 14-20 :
Ring 4-20: (6 rings) Sc into each Sc along the ring (16 Sc)
Round 21 :
Ring 21: 2 times Sc Inc (Sc into each 6 Sc, next Dec) (14 sc)
Round 22-24 :
Ring 22-24: (3 rings) Sc into each Sc along the ring (12 Sc)
Info :
Fill the tail as you go.
Round 25-45 :
Ring 25-45: (Sc into each Sc over 20 rings) (12 Sc in each ring)
Info :
Straighten the last loop, dip the crochet in every 2 layers, make 6 Sc. Finish fo. A long thread to sew.
— Belly :
Round 1 :
Ring 1: Make 7 Fo. 2 Sc into the first Fo from the crochet, the next 2 Sc into the next 5 Sc. Work on rings that are not being worked on. Sc into 5 Sc, next 2 Sc. (14 sc)
Round 2 :
Ring 2: 3 Sc in the first Sc, 6 Sc in each of the next 6 Sc. 3 Sc in the next 1 Sc, Sc in the next 6 Sc (20 Sc)
Round 3 :
Ring 3: 4 times 3 Sc into Sc next Inc (26 grains Sc) Sc into ring 4
Round 4 :
Ring 4: 1 Sc next Inc (39 grains Sc)
Round 5 :
Ring 5: Sc into each Sc (39 units of Sc)
Round 6 :
Ring 6: Next 1 Sc into Inc. Sc into 5 Sc, Inc into next 1 Sc (41 Sc in)
Info :
Finish the closure chain, leave a long thread end to sew. Knit the mouth and eyes with the wrapping technique.
— Ears :
Info :
Make 2 with the main color yarn, 2 with the B color yarn, 4 with the yarn.
Round 1 :
Make 2 Sc into Rnd 1: 2 Ch.
Round 2 :
Rnd 2: 1 Ch 2 Sc in the first Sc, 3 Sc in total
Round 3 :
Rnd 3: 1 Ch 2 Sc into the first Sc, total 4 Sc
Round 4 :
Rnd 4: 1 Ch 2 Sc in the first Sc, total 5 Sc
Round 5 :
Rnd 5: 1 Ch 2 Sc in the first Sc, 6 Sc in total
Round 6 :
Rnd 6: 1 Ch 2 Sc into the first Sc, total 7 Sc
Round 7 :
Rnd 7: 1 Ch 2 Sc into the first Sc, total 8 Sc
Info :
Combine with B color on the front and main color on the back. Make the triangular shaped ears with the main color thread Sc into Sc. Dip in both layers of the rings, turn them around.
— Legs :
Round 1 :
Ring 1: 5 pieces of Ch. Sink 2 times into the second chain from the crochet hook. Sc in each of the next 3 chains. Make 2 Sc in the next chain. Return to the non-worked loops of the chain. Make 3 Sc. Make 2 Sc for the next one. (12 sc)
Round 2 :
Ring 2: Switch to A color rope, do not finish B color rope. Immerse 2 times in the first Sc. Sc for each of the 4 Sc, the next one is Inc. In the next 1 Sc, the next 1 Sc is in the next Inc. Sc into the next 4 Sc (16 Sc.)
Round 3 :
Ring 3: Sc into each Sc along the ring (16 Sc)
Round 4 :
Ring 4: Sc for each of the next 6 Sc. Switch to color B. 2 Sc in the next 1 Sc. Switch to color A. 1 Sc. Switch to B color again. 2 Sc in 1 Sc. Switch to color A. 1 Sc. Switch to B color again. 2 Sc in 1 Sc. Finish Sc in the next 6 Sc in the next Inc, B color.
Round 5 :
Ring 5: Sc into each Sc through the ring. (20 grains Sc) Finish A color.
Round 6 :
Ring 6: Switch to main color. Sc into each Sc through 2 rings (20 grains of Sc)
Round 7 :
Ring 7: Sc for each of the next 7 Sc [3 times Sc Dec] for each of the next Sc
Round 8 :
Ring 8: Sc for each of the next 8 Sc [3 times Sc Dec] for each of the next Sc.
Round 9 :
Ring 9: Sc for each of the next 8 Sc [3 times Sc Dec] for each of the next Sc.
Round 10 :
Ring 10: Sc for each of the next 7 Sc [2 times Sc Dec] for each of the next Sc.
Round 11-14 :
Ring 11-14: (4 rings) Sc into each Sc. (15 sc)
Info :
Fill the leg. Flatten the last ring. Dip the crochet in both layers together. Make 7 Sc. Leave a long thread end for sewing.
— The Fish :
Round 1 :
Ring 1: Work 1 magic ring with yarn of color C. Make 6 Sc into the ring. Pull the rope tightly.
Round 2 :
Ring 2: 2 times Sc Inc (Sc for each of the next 2 Sc, the next Inc) (8 times Sc)
Round 3 :
Ring 3: Sc into each Sc along the ring (8 of Sc)
Round 4 :
Ring 4: 2 times Sc Inc (Next 3 Sc into Next Sc, next Inc) (10 of Sc)
Round 5 :
Ring 5: 2 times Sc Inc (Next 4 Sc into Next Sc, next Inc) (12 of Sc)
Round 6-8 :
Ring 6-8: (3 rings) Sc into each Sc. (12 sc)
Round 9 :
Ring 9: 2 times Sc Inc (Next 5 Sc into Next Sc, next Inc) (14 of Sc)
Round 10 :
Ring 10: 2 times Sc Dec (Sc into next 5 Sc, next Dec) (12 of Sc)
Round 11 :
Ring 11: 2 times Sc Dec (Next 4 Sc into Next Sc, Next Dec) (10 Sc)
Round 12 :
Ring 12: Sc into each Sc along the ring (10 Sc)
Round 13 :
Ring 13: Divide the ring in half (Sc into previous 5 Sc, sink into each 2 layers of each Sc in the middle. Pull 1 chain, turn. Sc 5 Sc into each Sc. Turn 3 Sc and Finish 2 Sc.
— Mouth :
Round 1 :
Ring 1: Work 1 magic ring with A color thread. Make 8 Sc into the ring. Pull the rope tightly.
Round 2 :
Ring 2: 8 times Sc Inc (Sc Inc into each Sc) (16 Sc.)
Round 3 :
Ring 3: 4 times Sc Inc (4 Sc into Sc, next to Inc) (20 of Sc)
Info :
Finish the closure chain, leave a long thread end to sew. Knit the mouth and eyes with the wrapping technique.
This charming little cat holds a tiny fish and brings a smile to any shelf or nursery. It is a quick, rewarding amigurumi with sweet color details and a cuddly shape. Perfect for gifting, decorating, or practicing shaping techniques. 🧶🐱✨