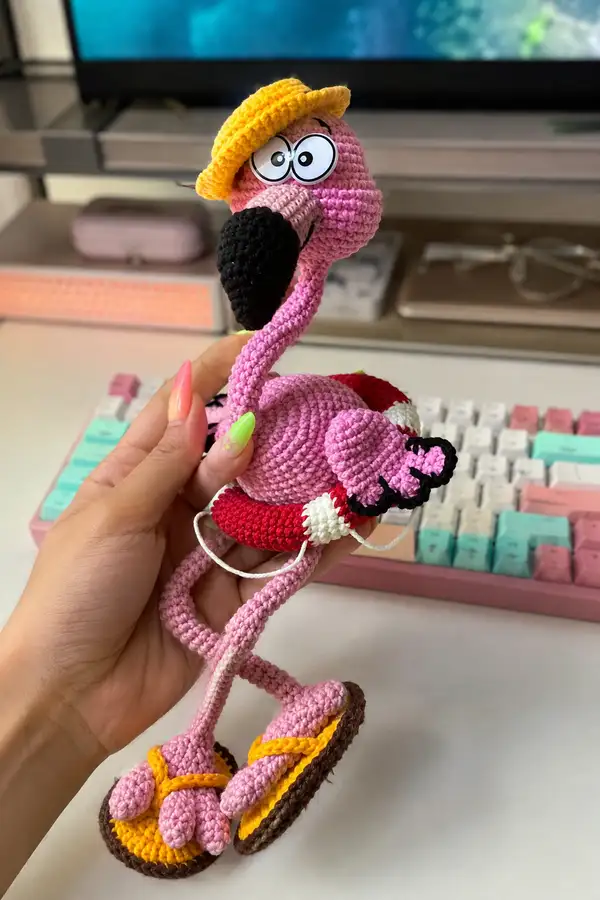
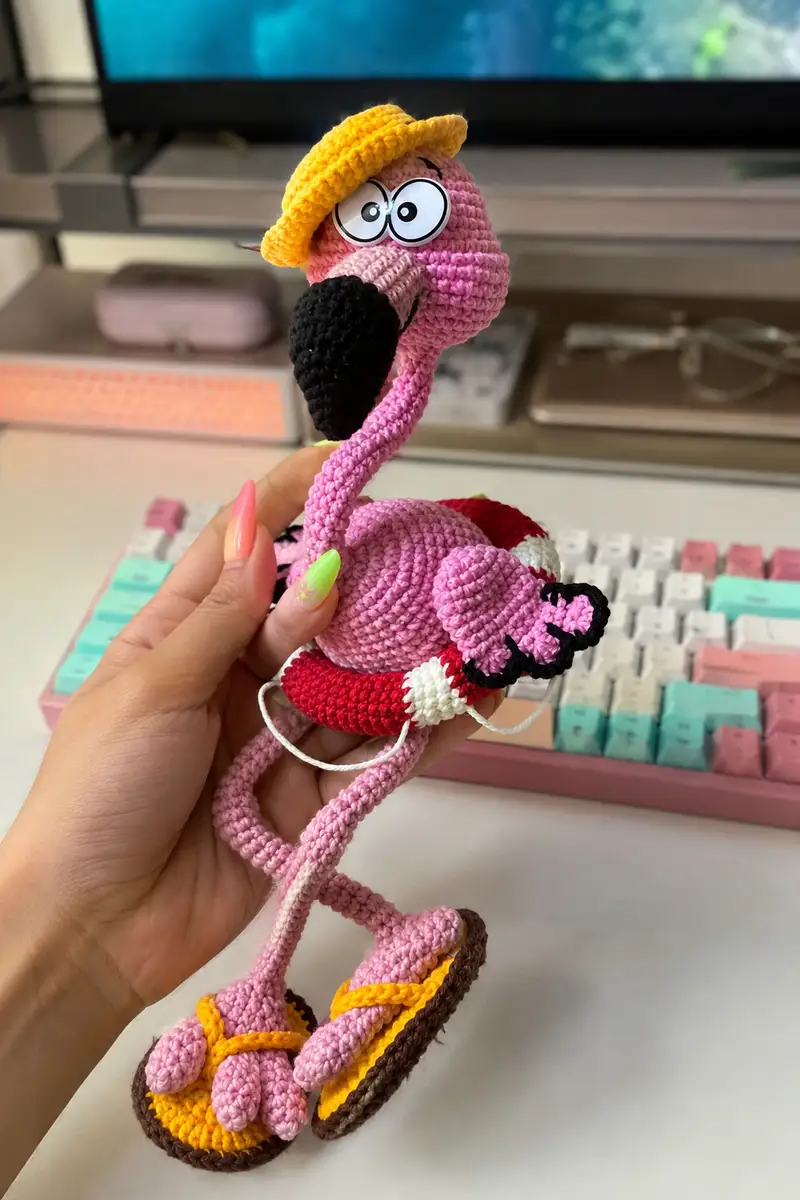
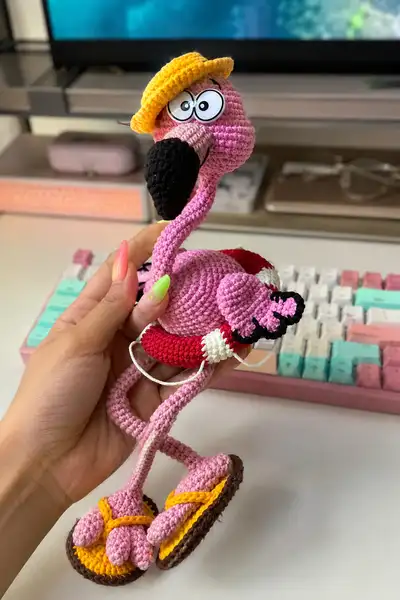
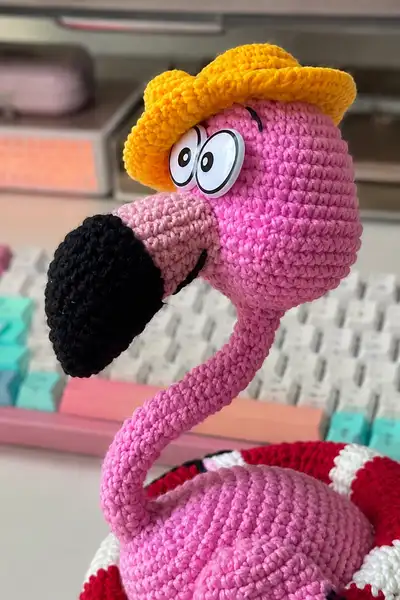
This delightful flamingo amigurumi wears a red-and-white lifebuoy, a jaunty yellow sun hat, and tiny sandals — a sunny beach-ready friend. Worked mostly in a soft pink with contrasting beak, feet and accessories, the design uses a wire core for poseable posture and safety eyes for character. Detailed shaping creates the long curved neck, plump body, layered wing feathers and delicate sandals shown in the photo.
Progress Tracker
0% Complete
— Head, Neck, Body and Tail (worked as one long piece) :
Notes :
Work with main light pink yarn unless otherwise instructed. The head, neck, body and tail are crocheted in one continuous piece so the final work is a single connected element. Use a stitch marker at the first stitch of every round and move it each round. When the pattern calls to insert wire, finish the small internal skewer and place it as shown in the Info steps. At the end of the body section we'll split the body to work feathers and finish the underside and appendages.
Round 1 :
6 sc in magic ring (6)
Round 3 :
(1 sc, inc) x 6 (18)
Round 4 :
1 sc, inc, (2 sc, inc) x 5, 1 sc (24)
Round 5 :
(3 sc, inc) x 6 (30)
Round 6 :
1 sc in each st (30)
Round 7 :
1 sc in each st (30)
Info :
Place safety eyes between rounds 9 and 10, centered horizontally. For a curious wide-eyed look position eyes roughly 6-8 stitches apart measured on round 10. Insert eyes now and secure washers before continuing. Stuff head lightly before closing further rounds.
Round 8 :
(9 sc, inc) x 3 (33)
Round 9 :
1 sc in each st (33)
Round 10 :
5 sc, inc, (10 sc, inc) x 2, 5 sc (36)
Round 11 :
(10 sc, dec) x 3 (33)
Round 12 :
2 sc, inc, 4 sc, inc x5? (see Info) 9 sc, inc x5?, 4 sc, inc, 2 sc = (45)
Info :
Round 12 intentionally increases majorly to create chest and start of body blob. The sequence in this round builds the widest part of the body. If your tension differs you may end with +/- 2 stitches; ensure totals match 45 to keep pattern consistent.
Round 13 :
8 sc, (1 sc, inc) x 5, 9 sc, (inc, 1 sc) x 5, 8 sc (55)
Round 14 :
3 sc, inc, 47 sc, inc, 3 sc (57)
Round 15 :
9 sc, (1 sc, dec) x 5, 9 sc, (dec, 1 sc) x 5, 9 sc (47)
Round 16 :
(6 sc, dec) x 5, 7 sc (42)
Round 17 :
(5 sc, dec) x 6 (36)
Round 18 :
(4 sc, dec) x 6 (30)
Round 19 :
(3 sc, dec) x 6 (24)
Info :
By Round 19 the head bulb is shaped. Keep stuffing as you go — head should be noticeably firm but not rock hard. Insert a small amount of fiberfill to round out the top of the head. This is an excellent point to embroider any blush or eye detail before continuing to narrow the neck.
Round 20 :
(2 sc, dec) x 6 (18)
Info :
Cut a length of 1.6 mm aluminum wire about 30 cm long. Make a small loop ('bagel') on one end by wrapping the end around itself so it cannot poke out later. We will insert the wire through the head for internal support. Twist loop well and secure with small amount of tape if necessary.
Round 21 :
(1 sc, dec) x 6 (12)
Round 23 :
6 sc in each st around (6)
Info :
Push the looped end of your aluminum wire into the head from the bottom opening so the loop sits snugly at the top inside the head. Continue stuffing the head fully until it is firm. Make sure the wire is centered. Twist remaining wire downwards so it will run through the neck and body when you create them.
Info :
We are now forming the neck start. The small 7-stitch ring is the top of the neck. This will be lengthened using several rounds of 7-8 stitches to create a narrow tube. Make sure the wire passes through the center of this tube.
Round 27 :
3 sc, inc, 3 sc (8)
Round 28-40 :
8 sc in each round (8)
Info :
Rounds 28-40: work an 8-stitch tube for the upper neck. This long tube wrapped around the internal wire gives the curved flamingo neck its long elegant length. Keep tension even; this section is usually worked without stuffing so the neck remains flexible. If you want a stiffer neck, add a little loose stuffing between every 6-8 rounds, but keep it light.
Round 41 :
3 sc, 2 inc, 3 sc (10)
Round 42 :
9 sc, 1 sl st into next stitch (10)
Round 43 :
1 sl st, 8 sc, 1 sl st (10)
Round 44 :
1 sl st, 3 sc, 2 inc, 3 sc, 1 sl st (12)
Round 45 :
3 inc, 6 sc, 3 inc (18)
Info :
Rounds 41-45 create the transition from the narrow neck tube into the mid-body bulb. At the end of Round 45 we'll expand to a larger body circumference. Keep the toy oriented so the front faces away from you; this helps align future feather placement.
Round 46 :
3 inc, 12 sc, 3 inc (24)
Round 47 :
(1 sc, inc) x 3, 12 sc, (inc, 1 sc) x 3 (30)
Round 48 :
(2 sc, inc) x 3, 12 sc, (inc, 2 sc) x 3 (36)
Round 49-50 :
36 sc in each round (36)
Round 51 :
(5 sc, inc) x 6 (42)
Round 54 :
(6 sc, inc) x 6 (48)
Info :
This wide belly area provides the seating surface where the lifebuoy will sit. Keep rounds even. Start stuffing the body lightly at round 56 and add moderate stuffing by round 59. The body should be plump but still have a soft give so the lifebuoy can sit around it snugly.
Round 60 :
(6 sc, dec) x 6 (42)
Round 64 :
(5 sc, dec) x 6 (36)
Info :
At rounds 64-67 the body narrows toward the waist/tail connection. Continue stuffing the lower belly moderately so the toy keeps balance once mounted on its lifebuoy. If using a poseable wire inside the legs later, ensure there is room to anchor wires inside the lower body.
Round 68 :
6 sc, (2 sc, dec) x 6, 6 sc (30)
Info :
Trim any excess wire if the wire runs longer than the body. Twist and tape the excess tightly and bury inside the body so it won't poke through. Make sure the wire continues down to the lower body area where the legs attach.
Round 70 :
6 sc, (1 sc, dec) x 6, 6 sc (24)
Info :
We will now form the tail. Mark the left side where the tail will begin (approximately on a lateral stitch). Move the stitch marker 2 stitches forward from center back towards left to place the tail starter row (this places the tail slightly to the side as in the photo).
Round 73 :
Start tail: 1 sc in each of next 12 sts (12)
Round 74-80 :
Work tail tube: (1 sc in each st) for 7 rounds forming a small tapered tail. At round 80 begin shaping tail tip with (1 sc, dec) repeats as needed to close and fasten off leaving tail long for attaching feathers (result ~6 sts then close)
Info :
Tail is usually left slightly rounded and stable; do not overstuff. Fasten off leaving long tail for sewing and weaving into the body. The main head-body-tail piece is now complete and will receive wing attachments next.
— Wing (Make 2) :
Notes :
Each wing is worked flat and then attached to the body. The pattern builds a small wing base that is folded and crocheted together to form three layered feathers. Use main pink for the base and swap to darker pink for edge scallops as in the photo. We will add black outline to the feather tips for a crisp look.
Round 1 :
6 sc in magic ring (6)
Round 3 :
(1 sc, inc) x 6 (18)
Round 4 :
(2 sc, inc) x 6 (24)
Round 5 :
1 sc in each st (24)
Info :
Work a few even rounds to build a broad wing base. Flatten wing and fold to work edging for feather shapes. We will crochet petals from the base edge working into both layers for a solid seam.
Round 6 :
Fold base in half and join by working 12 sc through both layers to close base, turn (12)
Round 7 :
Work 3 separate feather lobes across the open edge. First feather: 3 sc, 2 hdc, 1 dc, 2 hdc, 3 sc (anchor to base). Second feather: repeat. Third feather: repeat. Fasten off main color leaving long tail for sewing.
Round 8 :
With darker pink, work a single crochet border around feather edges: 1 sc in each st along feathers to create scalloped edge. At tips, switch to black and surface slip stitch 1-2 rows for outline (optional).
Info :
Pin wings to body before final attachment. Place wings on either side of body at the widest round (approximately between rounds 54-58 on the body). Overlap slightly and sew with a ladder stitch for invisible seam. Add a few stitches through body rounds to secure wing so it won't flop.
— Feathers (Small petal details, make 6-8) :
Round 1 :
Ch 6, in 2nd ch from hook: sc, hdc, dc, hdc, sc (5 sts) Fasten off leaving long tail for sewing
Info :
Sew these small petals in layered rows along the wing edge and at tail tip for a realistic layered feather look. Use darker pink and outline with black to match photo.
— Beak (Make 2 pieces: upper beige base and lower black tip) :
Upper Beak (beige) Round 1 :
6 sc in magic ring (6)
Round 3 :
(1 sc, inc) x 6 (18)
Round 7 :
(2 sc, dec) x 6 (12)
Round 8 :
12 sc (12) Stuff lightly and shape
Lower Tip (black) Round 1 :
6 sc in magic ring (6)
Round 3 :
(1 sc, inc) x 6 (18)
Round 4 :
(2 sc, inc) x 6 (24)
Round 5-8 :
24 sc (24) Stuff firmly to create a solid black tip
Round 9 :
(2 sc, dec) x 6 (18)
Round 10 :
(1 sc, dec) x 6 (12)
Info :
Sew the black tip to the beige upper beak neatly. Use the long tail left on the beige piece to attach the assembled beak to the face between rounds 10-12 where the head front projects. Sew through head stitches to anchor well. Use a little stuffing to maintain beak shape but do not overstuff as it should lie flush against the face.
— Eye Whites / Details :
Optional white backing (if you want prominent rings): Round 1 :
6 sc in magic ring (6)
Round 3 :
12 sc (12) Fasten off and sew small plastic safety eye (30mm) to this backing then to head. Or mount safety eye directly to head between rounds 9 and 10 as noted earlier.
Info :
Use either large cartoon safety eyes or embroider circles for a similar look. If using safety eyes, place them before stuffing head fully as noted earlier.
— Legs (Make 2) :
Notes :
Legs are long narrow tubes with toes attached to a flat sandal shape. For poseable legs you can use 1mm wire inside each leg. The pictured flamingo has two long slender legs folded over the box. Legs begin as small tubes worked in beige/pink.
Leg Round 1 :
6 sc in magic ring (6)
Round 3 :
(1 sc, inc) x 6 (18)
Info :
These initial rounds form the foot top. We will flatten and form toes and sole details after building the ankle tube length. Insert 1 mm wire inside length of leg if making poseable legs; be sure to fold and tape wire ends.
Round 7-20 :
Work long tube: 18 sc each round (length depends on your desired final leg length — the sample has legs approximately 17-20 cm from hip to sandal). For the sample this was about 24-28 rounds total from the foot start; continue until you reach the desired ankle location.
Info :
When tube is long enough, work shaping for toes: flatten last 8-10 rounds and create three toe tubes by splitting the stitches into three small tubes (see Toe section). Add thin stuffing to toes to keep shape and attach to sandal sole using sewing tail.
— Toes and Sandal (Make 2) :
Toe (Make 3 for each foot) Round 1 :
4 sc in magic ring (4)
Round 2-4 :
4 sc (4) Fasten off leaving long tail for sewing
Sandal sole (brown) Round 1 :
Ch 10, sc in 2nd ch from hook 8 sc, 3 sc in last ch, continue along opposite side of chain 8 sc, 2 sc in last ch (total ~22 sc) Join into round and work 2-3 rounds sc to make a thick sole. Fasten off leaving long tail for sewing.
Sandal top/straps (yellow) :
Use surface crochet or sl st to attach a thin strap pattern: ch 12, anchor to sole with sl st, then bring strap over foot forming a 'Y' shape - tack the ends to underside with a couple of stitches and hide tails. Sew toes to top of sole as pictured. Add small round corks for toe pads using beige yarn: 6 sc in magic ring, 1-2 rounds sc, stuff lightly and sew on.
Info :
Attach sandals to end of the leg tubes by sewing through several rounds of the tube and the underside of the sole for a secure fit. If using wire, cover its end and fold it into the inside sole area before final sewing for extra stability.
— Lifebuoy (Red & White Ring) :
Notes :
Lifebuoy is crocheted as a ring with alternating red and white panels. The ring is stuffed lightly so it keeps shape and then sewn around the body. Use two stripes of red separated by white panels and attach thin white cords around for a realistic effect.
Round 1 :
Ch 12, join to form a ring (12)
Round 2 :
Work 12 sc in ring (12)
Round 3 :
Inc around: (1 sc, inc) x 6 (18)
Round 4 :
18 sc (18) Change color to red and work 2 rounds of red sc
Info :
We will alternate red and white panels by doing 4-5 sc in red, switch to white for 4-5 stitches, etc. Keep a small tail at each color change and carry yarn inside to hide if you prefer fewer ends.
Round 5 :
Work first paneling round: 4 sc red, switch to white, 4 sc white, switch to red, 5 sc red, switch to white, 5 sc white (18)
Round 6 :
Work a second round in same sequence but in BLO to create a slight ridge: 1 sc in each st BLO (18)
Round 7 :
Make a parallel ring of 18 sc and then sew both rings together around the edge to form a thicker float. Optionally stuff the ring lightly before closing.
Round 8 :
With white yarn, make 2 long cords by chaining 40 and securing ends to ring at 4 equidistant positions to imitate tied rope. Weave cords under and over rings to match photo. Fasten off and secure all ends.
Info :
Place lifebuoy around the body and sew to belly at a few hidden points so it sits and does not slip. The lifebuoy should not be extremely tight; it should sit snugly around the widest part of the belly (approx rounds 55-58). Add a few stitches to anchor on the underside so it remains stable.
— Hat (yellow small sun hat) :
Hat Crown Round 1 :
6 sc in magic ring (6)
Round 3 :
(1 sc, inc) x 6 (18)
Round 4 :
(2 sc, inc) x 6 (24)
Hat Brim Round 6 :
Work in BLO around: (3 sc, inc) repeat until you reach approx 36-40 sts creating a flat brim (36-40)
Round 7 :
Work 1 round sc around brim to firm edge. Fasten off leaving long tail to sew hat onto head slightly tilted as in photo.
Info :
Sew hat to top surface of head between rounds 6-9 centered slightly to the left to reproduce the jaunty tilt. Add an inside stitch so the hat sits permanently.
— Assembly & Final Details :
Info :
Before assembly, block each part slightly by shaping by hand. Use pins to position parts on the body to check symmetry. Weave in long tails from parts to avoid visible knots. Add blush with a small amount of pink colored pencil or fabric-safe paint for cheeks if desired.
Round-style Finishing :
Sew neck securely to head base if neck was worked separately; our sample used one-piece construction so only sewing wings, beak, sandals and lifebuoy remain. Attach wings to body at rounds 54-58. Sew beak to head center between rounds 10-12. Attach legs to body underside centered and spaced about 6-8 stitches apart for stability. Attach sandals to leg ends using long tails for secure stitching. Place safety eyes and glue washers if necessary.
Info :
Double-check all connections and weave in ends at least 4 cm into the toy. If toy is for small child, replace any sewn-on embellishments (buttons, large eyes) with embroidered features to reduce choking hazards.
This sunny flamingo amigurumi brings a splash of seaside charm to your handmade collection! The combination of long graceful neck, layered feathers, and playful accessories like the lifebuoy and tiny sandals make this an especially delightful piece to crochet. I hope the detailed steps help you recreate each lovable feature with confidence. 🧶 Have fun assembling and styling your flamingo — and don't forget to share your finished friend! 🌞🦩