๐Ÿงถ Beautiful โœจ Detailed ๐Ÿ’ Adorable

Cherry Blossom Motif Pattern

Cherry Blossom Motif Pattern
4.8โ˜… Rating
5-7 Hours Time Needed
3.8K Made This
โœ‚๏ธ

Intermediate Level

Ideal for those with basic crochet experience, featuring slightly more advanced stitches and techniques to expand your skills.

โฑ๏ธ

Weekend Treat

Takes 5-7 hours, making it an enjoyable project to finish over a couple of days.

๐Ÿก

Cozy Accent

A warm touch for your space that transforms ordinary corners into inviting nooks filled with handmade charm.

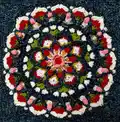
About This Cherry Blossom Motif Pattern

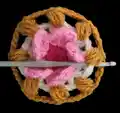
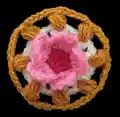
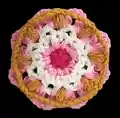
This pattern creates a detailed Cherry Blossom motif with layered petals, textured puffs and a decorative chain border. The design uses DK weight yarn and multiple colors to achieve a vibrant, floral mandala effect. Youll follow step-by-step photo sequences for each color round to build the motif.

Cherry Blossom Motif Pattern crochet pattern - detailed view of completed project

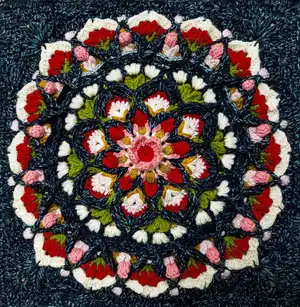
The pattern includes a materials list, abbreviations in multiple languages and photo instructions for each round. Suitable for those comfortable with puff stitches, clusters and working in the round.

Why You'll Love This Cherry Blossom Motif Pattern

I absolutely love this pattern because it captures the delicate look of cherry blossoms using simple crochet techniques combined in a creative way. I enjoy how the layered petals and puff stitches add depth and texture without requiring complex shaping. The color changes make each motif sing, and I find it very satisfying to watch the design bloom round by round. Sharing this pattern lets me spread a little handmade joyโ€”I hope you feel the same delight while making it.

Cherry Blossom Motif Pattern step 1 - construction progress Cherry Blossom Motif Pattern step 2 - assembly progress Cherry Blossom Motif Pattern step 3 - details and accessories Cherry Blossom Motif Pattern step 4 - final assembly and finishing

Switch Things Up

I love how this motif responds to color changes, so I often swap the color palette to match my home decor or season โ€” try autumn tones for a warm blanket, or pastels for a soft spring look.

If you want a larger motif I change yarn weight and hook size; using aran or bulky yarn with a larger hook creates a chunkier, more sculptural motif.

I sometimes make mini versions by using lighter lace or fingering weight yarn and a smaller hook to create delicate appliques for clothing or accessories.

I like to experiment with finishing: add a round of single crochet around the perimeter to tidy edges, or a picot border for a delicate scalloped finish.

Consider swapping the puff stitches for bobbles or clusters to alter the texture โ€” the motif architecture handles different raised stitches well.

I also enjoy joining multiple motifs with a contrasting join-as-you-go round, which creates an intentional seam and a pretty grid when assembling a blanket.

Try adding metallic or variegated yarn for the final round to give a subtle sparkle or gradient effect without changing stitch structure.

For a modern look, use just two high-contrast colors and let the stitch shapes create the visual interest; for a vintage effect, go tonal with shades of one color.

I sometimes embroider a small center or sew on a bead to add a focal point at the heart of the blossom โ€” small details make each motif unique.

Finally, dont be afraid to mix yarn types: a cotton main body with a wool accent round can add stability and soft halo respectively โ€” experiment until you find your favorite combination.

Common Mistakes & How to Fix Them

โœ— Skipping the magic ring closure will leave a visible hole in the center; always tighten the MR and weave the tail into the back to close the center neatly. โœ— Not replacing the first stitch of each round correctly can shift the stitch pattern; follow the replacement table (Sc=ch1, Hdc=ch2, Dc=ch3, Tr=ch4) to keep rounds even. โœ— Forgetting to count chain spaces when making petals will create misaligned petals; mark or count the ch-spaces before you start each petal repeat to ensure accurate placement. โœ— Pulling puff stitches too tight can make petals small and stiff; keep consistent tension and close the puff loops gently so petals remain full and soft. โœ— Changing yarn weight without adjusting hook size will alter the finished motif size; if you use a different yarn, make a gauge swatch and adjust hook size or stitch count as needed.

Cherry Blossom Motif Pattern

Create a beautiful Cherry Blossom crochet motif using DK weight yarn and clear step-by-step photo instructions. This pattern includes color placement, stitch notes and a full photo guide so you can recreate the layered floral mandala square. Perfect for a decorative cushion, blanket block or framed wall artโ€”youll love the texture and bloom-like petals.

Intermediate 5-7 Hours

Materials Needed for Cherry Blossom Motif Pattern

โ€” Main Fabric

  • 01
    Stylecraft Special DK (100g = 322 yds / 295 m) - DK weight (#3)
  • 02
    Stylecraft Batik DK (50g = 151 yds / 138 m) - DK weight (#3) for Indigo/Batik effect
  • 03
    Lipstick (Special) - 18 g (approx 53 m / 58 yds)
  • 04
    Fondant (Special) - 9 g (approx 27 m / 29 yds)
  • 05
    Cream (Special) - 16 g (approx 47 m / 52 yds)
  • 06
    Indigo (Batik) - 67 g (approx 198 m / 216 yds)
  • 07
    Powder Pink (Special) - 11 g (approx 32 m / 35 yds)
  • 08
    Apple (Special) - 12 g (approx 35 m / 39 yds)
  • 09
    Gold (Special) - 8 g (approx 24 m / 26 yds)
  • 10
    Approximate total yardage/metres = 450 yds / 410 m

โ€” Tools Required

  • 01
    Crochet hook size 3.5 - 4.0 mm (depending on your tension)
  • 02
    Scissors
  • 03
    Yarn needle for weaving ends
  • 04
    Blocking tools (pins, blocking mat) - pattern mentions finished size after blocking

Progress Tracker

0% Complete

โ€” Motif :

Info :

In all rounds the first stitch is replaced as follows: Sc = Ch1. Hdc = Ch2. Dc = Ch3. Tr = Ch4.

Item 1 (Lipstick center) :

1.- Lipstick a. 10sc in the MR b. Close with 1 ss in the first sc Total: 10 sc

Item 2 (Lipstick petal ring) :

2.- Lipstick a. *1sc, ch2 b. Skip 1 st* c. Repeat ** 4 more times d. Close with 1 ss in the first sc Total: 5 sc, 5 ch2

Item 3 (Fondant petal round) :

3.- Fondant a. *Work in the ch2 space R2a: 1sc, ch3, 3tr, ch3, 1sc (1 petal) b. Skip to the next space* c. Repeat ** 4 more times d. Close with 1 ss in the first sc Total: 15tr, 10sc, 10 ch3

Item 4 (Cream back loop work) :

4.- Cream a. Work in the back loop. b. Work 16 sc and 8 ch1, lifting 2 loops of the triples of the previous round a. *1sc, 1sc, ch1* b. Close with 1 ss in the first sc Total: 16 sc, 8 ch1

Item 5 (Cream shell round) :

5.- Cream a. *Work in the ch1 space: 1hdc, ch1, 1hdc in same space b. Ch1* c. Repeat ** 7 more times d. Close with 1 ss in the first hdc Total: 16 hdc, 16 ch1

Item 6 (Gold puff round) :

6.- Gold a. *Work in the ch1 space R5a: 1puff4, ch4 b. Skip to the next space* c. Repeat ** 7 more times d. Close with 1 ss in the closing chain of the first puff Total: 8 puff4, 8 ch4

Item 7 (Fondant dc2tog shaping) :

7.- Fondant a. *Dc2tog in the ch1 space R5a to the right of the puff, ch1 b. Dc2tog in the same space to the left of the puff, ch3* c. Repeat ** 7 more times d. Close with 1 ss in the closing chain of the first dc2tog Total: 16 dc2tog, 8 ch3, 8 ch1

Item 8 (Lipstick petal shaping) :

8.- Lipstick a. *1hdcfp in dc2tog R7a, ch1 b. Work in the ch1 space R7a. Close together the following stitches: 2tr, 1dtrfp in the puff R6a, 2tr c. Ch1, 1 hdcfp in the dc2tog R7b (1 petal) d. Ch3. Bring forward the 4 chains of R6a and work 1 sc e. Ch3* f. Repeat ** 7 more times g. Close with 1 ss in the first hdcfp Total: 8 dtrfp, 32 tr (8 1 dtrfp and 4 tr close together, 8 petals), 16 hdcfp, 8 sc, 16 ch3, 16 ch1

Item 9 (Indigo/Batik chain round) :

9.- Indigo (Batik) a. *Work in the ch1 space R5b: 2dc, ch8* b. Repeat ** 7 more times c. Close with 1 ss in the first dc d. Pass the 8 chains behind the petals Total: 16 dc, 8 ch8

Item 10 (Indigo folded petal & finishing) :

10.- Indigo (Batik) a. *1dcfp in each dc R9a b. 3sc in ch1 space R8a, ch1 c. 1hdcfp in the 5 stitches closed together R8b d. Ch1, 3sc in ch1 space R8c* e. Repeat ** 7 more times f. Close with 1 ss in the first sc Total: 16 dcfp, 8 hdcfp, 48 sc, 16 ch1

Assembly Instructions

  • Bring forward the 4 chains created in R6a and secure them with 1 sc as indicated in the instruction to form the petal shaping and hold layers together.
  • When working the Indigo ch8 round, pass the 8 chains behind the petals to form the decorative ring; arrange them evenly behind each petal before closing with slip stitch.
  • When creating the folded petals (hdcfp and dtrfp), close the required stitches together as instructed to form each petal and then secure the last petal with a slip stitch in the first hdcfp.
  • Weave in all yarn ends neatly at the back of the motif and block the finished square to the stated size (33 x 33 cm / 13" x 13") to flatten and even out the petals and chainwork.

Important Notes

  • ๐Ÿ’กUse the replacement table for the first stitch of each round (Sc=ch1, Hdc=ch2, Dc=ch3, Tr=ch4) to keep the round height consistent.
  • ๐Ÿ’กThe pattern uses DK weight yarn; if you change yarn or hook size, your motif size will changeโ€”make a gauge swatch first.
  • ๐Ÿ’กPass and position chains behind petals (for the Indigo round) before securing to ensure an even decorative ring.

This Cherry Blossom motif pattern brings floral beauty to your crochet projects with layered petals and textured puffs. Its colorwork and shaping create a decorative square perfect for cushions, blankets, or framed art. Make one or many to build a blooming project that brightens any space. ๐ŸŒธ๐Ÿงถ

You ask,

we answer.

FAQs

What size will the finished piece be?

The completed motif measures approximately 33 x 33 cm / 13" x 13" after blocking when using DK yarn and the recommended hook size.

Can I use a different yarn weight for this motif?

Yes, but changing yarn weight will affect the final size and texture; make a gauge swatch and adjust your hook size to achieve the desired dimensions.

Do I need experience with special stitches like puffs and dc2tog?

This pattern is intermediate and uses puff stitches, dc2tog and petal closures; basic familiarity with these techniques is recommended though the photo steps help guide you.

How long does this project typically take to complete?

Most crocheters finish a single motif in about 5-7 hours, depending on experience and coloring complexity.